crwdns2915892:0crwdne2915892:0
If the computer may start to boot but then shuts down, increased Windows errors or "blue screens of death” the computer may freeze for seemingly no reason, or connected devices that worked before suddenly won’t work, replace the motherboard on the HP EliteBook 840 G1
crwdns2942213:0crwdne2942213:0
-
-
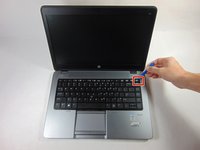
Slide the latch, to the right, away from the lock symbol.
-
Slide the cover away from the latch to remove it.
-
-
-
Once the cover is removed you will be able to see the battery and the two latches that hold it in place.
-
The two latches should be pulled back, one of which is spring loaded and must be held in place in order to remove the battery.
-
-
-
Battery should easily be lifted up and out.
-
-
crwdns2935267:0crwdne2935267:0Anti-Static Wrist Strap$7.95
-
Identify the RAM and the pull tabs that will be used in the next step.
-
-
-
Pull back the two tabs on either side of the RAM this will allow the RAM to be removed.
-
-
-
Pull the RAM stick gently out and up once the tabs have been pulled to the side.
-
-
-
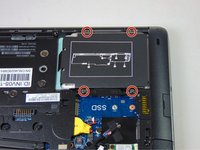
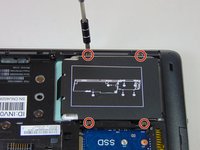
Loosen the four Phillips screws securing the hard drive.
-
-
-
Grab the pull tab on the hard drives plastic casing and pull it out and to the side.
-
Remove the 2.5" hard drive from the plastic bracket.
-
-
-
In order to take out the fan and heatsink the plastic cover must first be taken off.
-
Remove the eight 2 mm Phillips #1 screws.
-
-
-
-
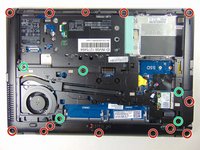
Remove the thirteen 6 mm Torx T8 screws.
-
Remove the five Torx M2.5x5 screws.
-
Remove the single 7 mm Phillips #1 screw.
-
Loosen the two Phillips #1 screws. These screws will remain captive to the device.
-
-
-
Using the plastic opening tools, remove the plastic cover by beginning at one of the corners and prying it up.
-
-
-
Use the plastic opening tools to remove the keyboard, starting at one of the top corners. You need to lift the top side and then takeing it out moving the keyboard towards the screen.
-
Once the keyboard is removed, detach the ribbons connecting the keyboard to the laptop by prying the small tab and sliding the ribbon out.
-
-
-
Loosen the six Phillips #1 screws. These will remain captive to the heatsink.
-
-
-
Use the plastic opening tools to remove the tape covering the wires connected from the fan to the motherboard.
-
Disconnect the fan by sliding the wire out.
-
-
-
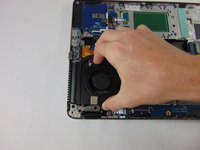
Remove the fan by lifting it up and sliding it out.
-
Remove the heat sink by lifting it up and sliding it out.
-
-
-
Disconnect the two antenna cables.
-
-
-
Remove the single 3 mm Phillips #1 screw securing the wireless card.
-
-
-
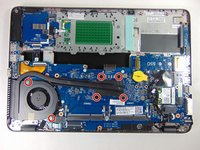
Remove the three 4 mm Phillips #1 screws.
-
Remove the single 2 mm Phillips #1 screw.
-
-
-
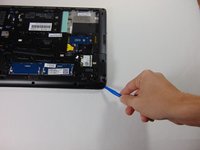
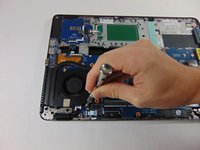
Pry the grey plastic tab from the orange tab to free it.
-
Repeat for the clear plastic tab.
-
-
-
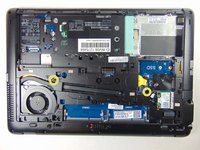
Disconnect the cables by taking off the tape and getting them out from under the plastic.
-
-
-
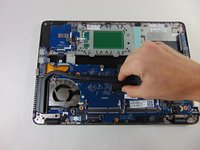
Remove ribbon cable connected to the motherboard.
-
-
-
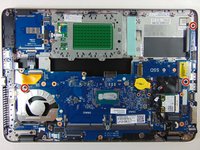
Remove black tape near the edge of the motherboard.
-
-
-
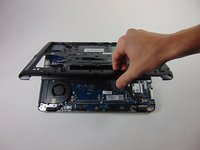
The motherboard can now be lifted up easily, if any snagging occurs make sure everything was disconnected properly before continuing.
-


To reassemble your device, follow these instructions in reverse order.
To reassemble your device, follow these instructions in reverse order.
crwdns2935221:0crwdne2935221:0
crwdns2935229:017crwdne2935229:0
crwdns2915084:0crwdne2915084:0

USF Tampa, Team 5-3, Blackwell Fall 2015 crwdns2935289:0USF Tampa, Team 5-3, Blackwell Fall 2015crwdne2935289:0
USFT-BLACKWELL-F15S5G3
crwdns2931471:04crwdne2931471:0
crwdns2935297:019crwdne2935297:0
crwdns2947412:07crwdne2947412:0
thanks a lot for this good article ... could you please advice where to buy the replacement motherboard online ?
many thanks again
Alibaba or AliExpress is cheaper than eBay or Amazon but if in USA then buy from
Does someone know if we can replace a 745 g2 motherboard by another model like a 820 g2 or something like this ? Tks.
745 G2 can only be replaced with 840 G2.
While 725 G2 can only be replaced by 820 G2
How can i find this mother card