crwdns2915892:0crwdne2915892:0
This guide demonstrates how to safely remove and replace a damaged or malfunctioning keyboard. Following these steps should ensure a simple replacement for a keyboard that has experienced a spill, is missing keys, or otherwise does not function correctly.
crwdns2942213:0crwdne2942213:0
-
-
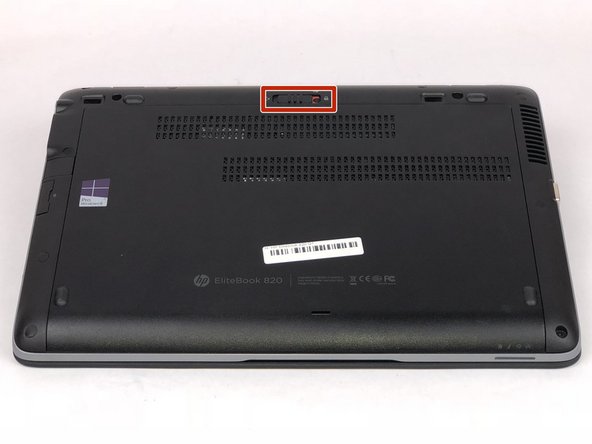
Turn over laptop so that the bottom is showing.
-
Unlock the latch.
-
-
-
Remove the back cover and you will then be able to see the battery.
-
-
-
Unlatch the two latches securing the battery in the case.
-
-
-
Use a plastic opening tool to lift and remove the battery.
-
-
-
-
Remove the two Phillips #0 screws securing the keyboard to the laptop.
-
Turn the laptop over and lift the display to reveal the keyboard.
-
-
-
Insert the plastic spudger between the keyboard and the housing.
-
-
-
4 tabs are located at the top of the keyboard, which lock it in place.
-
Pry and twist the spudger along the top of the keyboard until each tab is released.
-
-
-
Flip up the connecting flap on each of the three ribbon cables.
-
-
-
Remove each of the three cables by gently pulling them from their respective connectors.
-
-
-
Remove the keyboard from the housing.
-


To reassemble your device, follow these instructions in reverse order.
To reassemble your device, follow these instructions in reverse order.
crwdns2935221:0crwdne2935221:0
crwdns2935229:05crwdne2935229:0
crwdns2915084:0crwdne2915084:0

IUPUI, Team S1-G2, Harley Fall 2018 crwdns2935289:0IUPUI, Team S1-G2, Harley Fall 2018crwdne2935289:0
IUPUI-HARLEY-F18S1G2
crwdns2931471:02crwdne2931471:0
crwdns2935297:04crwdne2935297:0
crwdns2947410:01crwdne2947410:0
Good guide. Thanks!
But you missed step 1. Remove two screws that hold the keyboard in place