crwdns2915892:0crwdne2915892:0
This guide shows how to replace the power button in the HP EliteBook x360 1030 G3. A power button that doesn't work makes the computer useless, as it won't turn on. Replacing it can allow you to extend the life of your computer.
crwdns2942213:0crwdne2942213:0
-
-
Close the laptop and flip it so that the screen is on the surface of the table and the back plate is facing you.
-
Remove the 3.3 mm screw near the top of the hinge using a T5 Torx screwdriver.
-
Remove the remaining four 7.3 mm screws using the same screwdriver.
-
-
-
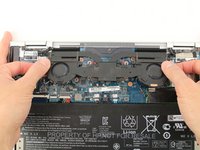
Separate the bottom cover from the laptop, starting from the upper corner and working your way around the edge.
-
-
-
Remove the five 3.7 mm screws that are holding the battery in place using a Phillips #00 screwdriver.
-
-
-
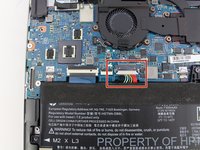
Carefully pull the white plastic battery connector towards you until it is removed from the port.
-
-
-
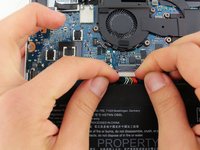
Gently lift the battery out of its place.
-
-
-
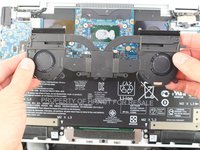
Use a Phillips #1 screwdriver to remove the four 3.5 mm screws near the middle of the fan assembly.
-
Use the same screwdriver to remove the remaining five 3.9 mm screws.
-
-
-
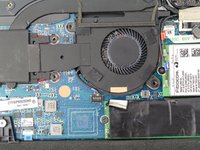
Before pulling the fan out, identify the two wires that are connected to the fan and to the motherboard.
-
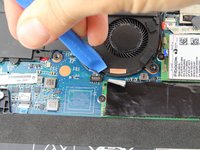
For each, use plastic opening tool to lift the black wire housing upward out of its port.
-
-
-
Slide the fan assembly toward you, and when the top edge of the fan is out of the vent grill, the fan is completely removed.
-
-
-
-
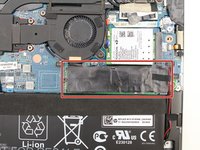
Lift the black tape covering the solid state drive.
-
-
-
Remove the 2.4 mm screw using a Phillips #00 screwdriver.
-
-
-
Slide the solid state drive to the left and out of its port.
-
-
-
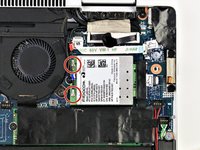
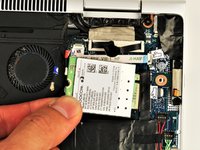
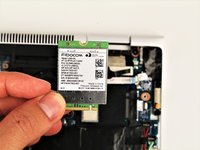
Detach the small wires connected to the card by lifting the ends straight upward. The wires are held in place by friction and should pop right off.
-
-
-
Remove the 2.4 mm screw holding the card down using a Phillips #00 screwdriver.
-
-
-
Carefully pull out the card by sliding it to the left.
-
-
-
Remove the single 5 mm screw holding the HDMI port cover in place using a Phillips #0 screwdriver.
-
-
-
Lift and remove the HDMI port cover.
-
-
-
Disconnect the red and blue display wires using an iFixit opening tool.
-
-
-
Detach the display wire connector using a nylon spudger. Repeat on the other side.
-
-
-
Flip up the five white wire clips and the single black clip using an iFixit opening tool.
-
Detach the wires connected to the motherboard.
-
Remove the two 5 mm screws that hold the motherboard in place with a Phillips #1 screwdriver.
-
-
-
Carefully remove the motherboard from the device by sliding it away from the laptop hinge and lifting upwards. Pull the blue sticky foam off of the back of the motherboard.
-
-
-
Remove the two black rubber covers.
-
Remove the two 5 mm screws beneath the rubber covers using a Phillips #0 screwdriver.
-


To reassemble your device, follow these instructions in reverse order.
To reassemble your device, follow these instructions in reverse order.
crwdns2935221:0crwdne2935221:0
crwdns2935227:0crwdne2935227:0

crwdns2915084:0crwdne2915084:0

IUPUI, Team 2-2, Harley Summer 2023 crwdns2935289:0IUPUI, Team 2-2, Harley Summer 2023crwdne2935289:0
IUPUI-HARLEY-SU23S2G2
crwdns2931471:03crwdne2931471:0
crwdns2935297:06crwdne2935297:0