crwdns2915892:0crwdne2915892:0
If you are experiencing a trackpad that is losing sensitivity, or does not work at all, then please follow the guide below on replacing the trackpad in your HP Elitebook 840 G5. This replacement guide requires only the opening tool and screwdriver listed. Please proceed with caution while replacing your trackpad, as the internal wiring has to be carefully unconnected during disassembly.
crwdns2942213:0crwdne2942213:0
-
-
Use a Phillips #1 screwdriver to undo the five screws. The top three screws are 10 mm and the two side screws are 7 mm.
-
Unscrew the bottom three screws using the same screwdriver.
-
-
-
Turn computer so that the hinged side is facing up.
-
Use the plastic opening tool to pry open the back plate.
-
Drag the plastic opening tool along the edge from left to right and use a second opening tool to pry open the top right corner.
-
Repeat the 3rd step for the other side.
-
Repeat on Left and Right sides of the system. There are two points in the middle (on the left and right sides of the center screw) that will release with slight lifting pressure.
-
-
-
Grab the back plate and separate it slowly away from the device.
-
-
-
Remove the 4mm screws that are fastened on the battery with your T9 Torx screwdriver.
-
-
-
-
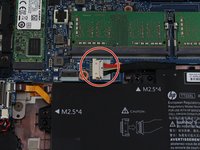
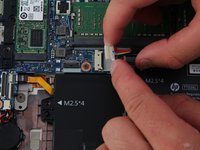
Carefully remove the power supply connector by tugging it from the sides of its head.
-
-
-
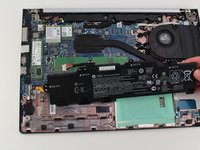
Slide the battery out and remove it from the device.
-
-
-
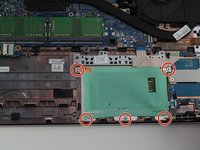
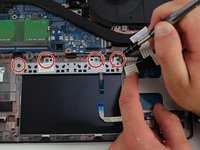
Using the Phillips #1 screwdriver, unscrew the five 2 mm long screws which are along the side of the track pad.
-
-
crwdns2935267:0crwdne2935267:0Tweezers$4.99
-
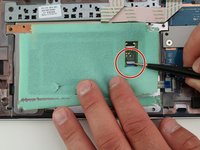
Lift up on the connector gate with a pair of precision tweezers, which clamps down on the end of the ribbon cable.
-
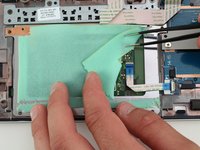
With the pair of tweezers, firmly clamp down on the ribbon cable, and pull it away from the connector gate.
-
-
-
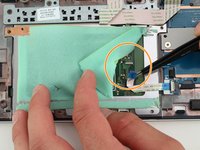
Lift up on the second connector gate with a pair of precision tweezers.
-
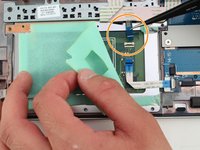
Use the tweezers to pull the Ribbon Cable away from the second connector gate.
-
-
-
After lifting the connector gate with the precision tweezers, gently pull on the ribbon cable that connects the clickers to the motherboard.
-
-
-
Using your Phillips #1 screwdriver, remove the 3mm long screws on the underside of the track pad's clicker.
-
Pull the clicker out of the computer.
-


To reassemble your device, follow these instructions in reverse order.
To reassemble your device, follow these instructions in reverse order.
crwdns2935221:0crwdne2935221:0
crwdns2935229:04crwdne2935229:0
crwdns2915084:0crwdne2915084:0

Cal Poly, Team S25-G13, Maness Spring 2018 crwdns2935289:0Cal Poly, Team S25-G13, Maness Spring 2018crwdne2935289:0
CPSU-MANESS-S18S25G13
crwdns2931471:04crwdne2931471:0
crwdns2935297:018crwdne2935297:0