crwdns2933423:0crwdne2933423:0

HP EliteBook 820 G3 Keyboard Replacement

crwdns2942213:0crwdne2942213:0

  1. HP EliteBook 820 G3 Keyboard Replacement, Back Cover: crwdns2935265:01crwdnd2935265:01crwdnd2935265:02crwdne2935265:0 HP EliteBook 820 G3 Keyboard Replacement, Back Cover: crwdns2935265:01crwdnd2935265:02crwdnd2935265:02crwdne2935265:0
    • Remove the eleven 3 mm screws with a Phillips #00 screwdriver.

    • Keep track of where the screw covers were attached to as there are four different sizes.

  2. HP EliteBook 820 G3 Keyboard Replacement: crwdns2935265:02crwdnd2935265:01crwdnd2935265:02crwdne2935265:0 HP EliteBook 820 G3 Keyboard Replacement: crwdns2935265:02crwdnd2935265:02crwdnd2935265:02crwdne2935265:0
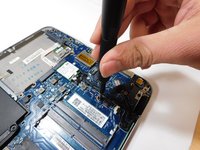
    • Remove the SD card blank and the single 3 mm screw beneath it using a Phillips #00 screwdriver.

    • Lift off the back cover with your hands.

  3. HP EliteBook 820 G3 Keyboard Replacement, Keyboard: crwdns2935265:03crwdnd2935265:01crwdnd2935265:02crwdne2935265:0 HP EliteBook 820 G3 Keyboard Replacement, Keyboard: crwdns2935265:03crwdnd2935265:02crwdnd2935265:02crwdne2935265:0
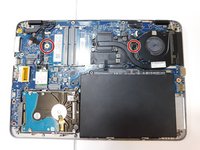
    • Remove the two 3.4 mm keyboard screws found near the fan and on top of the hard drive using a Phillips #00 screwdriver.

  4. HP EliteBook 820 G3 Keyboard Replacement: crwdns2935265:04crwdnd2935265:01crwdnd2935265:03crwdne2935265:0 HP EliteBook 820 G3 Keyboard Replacement: crwdns2935265:04crwdnd2935265:02crwdnd2935265:03crwdne2935265:0 HP EliteBook 820 G3 Keyboard Replacement: crwdns2935265:04crwdnd2935265:03crwdnd2935265:03crwdne2935265:0
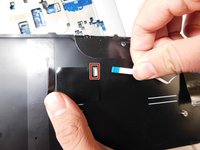
    • Use an iFixit opening pick to gently pry open the top of the keyboard.

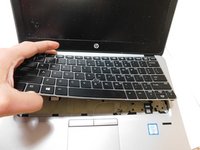
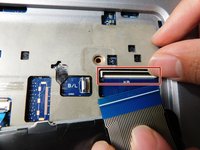
    • Gently pull the keyboard up until you can see the three ribbons under the keyboard.

  5. HP EliteBook 820 G3 Keyboard Replacement: crwdns2935265:05crwdnd2935265:01crwdnd2935265:03crwdne2935265:0 HP EliteBook 820 G3 Keyboard Replacement: crwdns2935265:05crwdnd2935265:02crwdnd2935265:03crwdne2935265:0 HP EliteBook 820 G3 Keyboard Replacement: crwdns2935265:05crwdnd2935265:03crwdnd2935265:03crwdne2935265:0
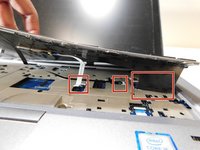
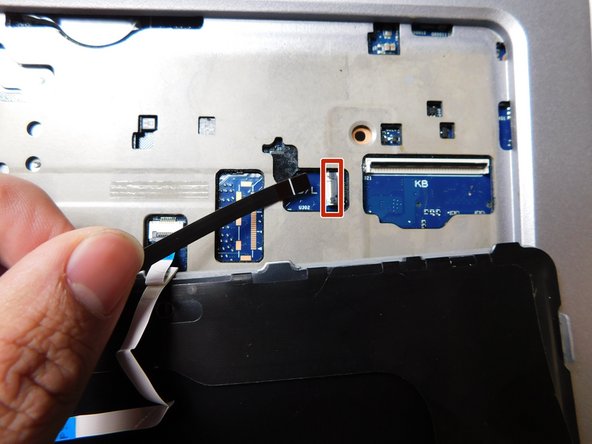
    • Lift up the latch holding down the ribbon and pull the ribbon out once it is lifted.

    • Repeat for all three of the ribbons.

    • The white ribbon (left ribbon) sometimes does not come with a new keyboard. You may need to detach it and add it to the replacement if necessary.

crwdns2915888:0crwdne2915888:0

To reassemble your device, follow these instructions in reverse order.

crwdns2935227:0crwdne2935227:0

Caleb Morales

crwdns2935283:008/25/22crwdne2935283:0

127 crwdns2915208:0crwdne2915208:0

crwdns2935295:0crwdne2935295:0

crwdns2915084:0crwdne2915084:0

Gateway, Team 1-1, Class Fall 2022 crwdns2935289:0Gateway, Team 1-1, Class Fall 2022crwdne2935289:0

GCC-CLASS-F22S1G1

crwdns2931471:04crwdne2931471:0

crwdns2935297:05crwdne2935297:0

crwdns2917034:0crwdne2917034:0

I did this, it won’t stay in.

Serial Action - crwdns2934203:0crwdne2934203:0

crwdns2917038:0crwdne2917038:0

crwdns2936625:0crwdne2936625:0:

crwdns2936751:024crwdne2936751:0 2

crwdns2936753:07crwdne2936753:0 11

crwdns2936753:030crwdne2936753:0 44

crwdns2942667:0crwdne2942667:0 1,003