crwdns2933423:0crwdne2933423:0

HP Elite x2 1012 G2 Screen Replacement

crwdns2942213:0crwdne2942213:0

  1. HP Elite x2 1012 G2 Screen Replacement, Screen: crwdns2935265:01crwdnd2935265:01crwdnd2935265:01crwdne2935265:0
    • Make sure the device is turned off before starting.

    • Orient the device so the back is facing you, with the kickstand up.

  2. HP Elite x2 1012 G2 Screen Replacement: crwdns2935265:02crwdnd2935265:01crwdnd2935265:03crwdne2935265:0 HP Elite x2 1012 G2 Screen Replacement: crwdns2935265:02crwdnd2935265:02crwdnd2935265:03crwdne2935265:0 HP Elite x2 1012 G2 Screen Replacement: crwdns2935265:02crwdnd2935265:03crwdnd2935265:03crwdne2935265:0
    • Remove the six 3mm Torx T5 screws underneath the kickstand.

  3. HP Elite x2 1012 G2 Screen Replacement: crwdns2935265:03crwdnd2935265:01crwdnd2935265:02crwdne2935265:0 HP Elite x2 1012 G2 Screen Replacement: crwdns2935265:03crwdnd2935265:02crwdnd2935265:02crwdne2935265:0
    • Turn the device over so the screen is facing you.

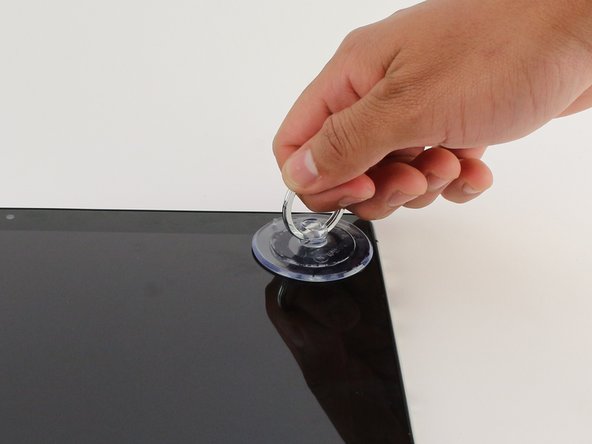
    • Place a suction cup firmly onto a corner of the screen.

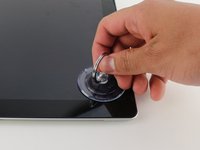
    • Lift up gently until you see the screen separate from the casing.

    • Repeat this process for all four corners.

    • During reassembly, certain clips/edges may not snap into place properly even with a lot of force. To counteract this, lift the edge up, place the suction cup further inwards on the screen and pull it slightly upwards while pressing the edge of the screen downwards. The edge should snap correctly into the housing.

  4. HP Elite x2 1012 G2 Screen Replacement: crwdns2935265:04crwdnd2935265:01crwdnd2935265:01crwdne2935265:0
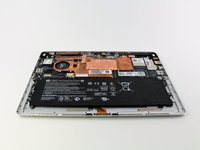
    • Lift the screen up and off of the device.

    • Pry each corner up first, otherwise you may damage or crack the screen.

  5. HP Elite x2 1012 G2 Screen Replacement: crwdns2935265:05crwdnd2935265:01crwdnd2935265:03crwdne2935265:0 HP Elite x2 1012 G2 Screen Replacement: crwdns2935265:05crwdnd2935265:02crwdnd2935265:03crwdne2935265:0 HP Elite x2 1012 G2 Screen Replacement: crwdns2935265:05crwdnd2935265:03crwdnd2935265:03crwdne2935265:0
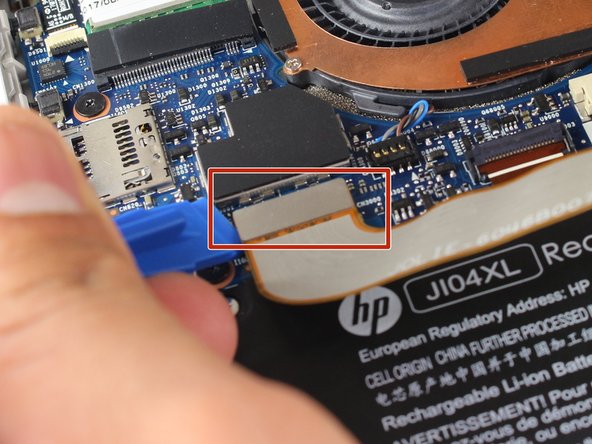
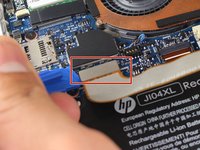
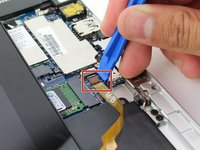
    • Remove the two connectors on the back of the screen by lifting the connector tabs on the motherboard with a plastic opening tool and pulling gently.

  6. HP Elite x2 1012 G2 Screen Replacement: crwdns2935265:06crwdnd2935265:01crwdnd2935265:02crwdne2935265:0 HP Elite x2 1012 G2 Screen Replacement: crwdns2935265:06crwdnd2935265:02crwdnd2935265:02crwdne2935265:0
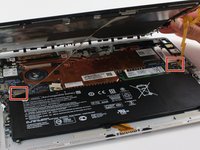
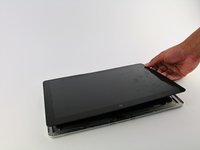
    • Remove the screen by gently lifting it off of the device.

crwdns2915888:0crwdne2915888:0

To reassemble your device, follow these instructions in reverse order.

crwdns2935229:04crwdne2935229:0

Noah Stapp

crwdns2935283:004/18/18crwdne2935283:0

770 crwdns2915208:0crwdne2915208:0

crwdns2935297:02crwdne2935297:0

crwdns2915084:0crwdne2915084:0

Cal Poly, Team S18-G5, Livingston Spring 2018 crwdns2935289:0Cal Poly, Team S18-G5, Livingston Spring 2018crwdne2935289:0

CPSU-LIVINGSTON-S18S18G5

crwdns2931471:04crwdne2931471:0

crwdns2935297:013crwdne2935297:0

crwdns2947412:05crwdne2947412:0

Where can I purchase a screen for the HP Elite x2 1012 g2?

Greg M - crwdns2934203:0crwdne2934203:0

just completed this, VERY surprising to find a HP product with an easy install

CILLIAN BYRNE - crwdns2934203:0crwdne2934203:0

Just finished a repair and very easy to do. Thank you!!

Richard Taylor - crwdns2934203:0crwdne2934203:0

The touch stopped working after the replacement. Any suggestions?

el._.msn - crwdns2934203:0crwdne2934203:0

I replaced my screen and upon turning the device on I have a black screen. Already made sure connections are all attached correctly. Tried hard reset with power and volume button down for 15 seconds. A bad new screen? Any other ideas?

iamacomputertech - crwdns2934203:0crwdne2934203:0

crwdns2917038:0crwdne2917038:0

crwdns2936625:0crwdne2936625:0:

crwdns2936751:024crwdne2936751:0 4

crwdns2936753:07crwdne2936753:0 25

crwdns2936753:030crwdne2936753:0 123

crwdns2942667:0crwdne2942667:0 9,987