crwdns2933423:0crwdne2933423:0

HP Elite x2 1012 G2 Rear Facing Camera Replacement

crwdns2942213:0crwdne2942213:0

  1. HP Elite x2 1012 G2 Rear Facing Camera Replacement, Screen: crwdns2935265:01crwdnd2935265:01crwdnd2935265:01crwdne2935265:0
    • Make sure the device is turned off before starting.

    • Orient the device so the back is facing you, with the kickstand up.

  2. HP Elite x2 1012 G2 Rear Facing Camera Replacement: crwdns2935265:02crwdnd2935265:01crwdnd2935265:03crwdne2935265:0 HP Elite x2 1012 G2 Rear Facing Camera Replacement: crwdns2935265:02crwdnd2935265:02crwdnd2935265:03crwdne2935265:0 HP Elite x2 1012 G2 Rear Facing Camera Replacement: crwdns2935265:02crwdnd2935265:03crwdnd2935265:03crwdne2935265:0
    • Remove the six 3mm Torx T5 screws underneath the kickstand.

  3. HP Elite x2 1012 G2 Rear Facing Camera Replacement: crwdns2935265:03crwdnd2935265:01crwdnd2935265:02crwdne2935265:0 HP Elite x2 1012 G2 Rear Facing Camera Replacement: crwdns2935265:03crwdnd2935265:02crwdnd2935265:02crwdne2935265:0
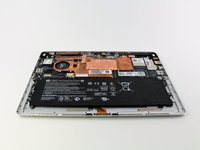
    • Turn the device over so the screen is facing you.

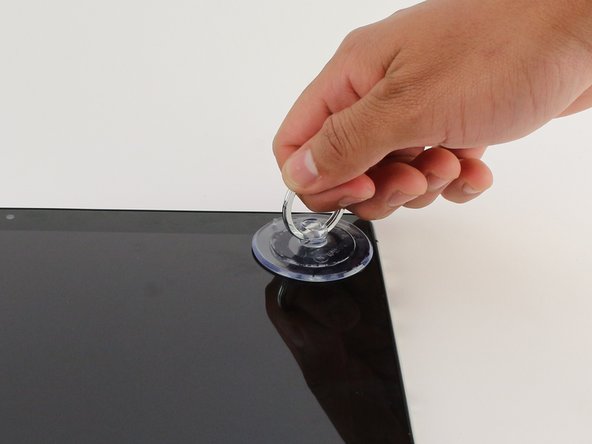
    • Place a suction cup firmly onto a corner of the screen.

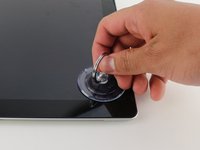
    • Lift up gently until you see the screen separate from the casing.

    • Repeat this process for all four corners.

  4. HP Elite x2 1012 G2 Rear Facing Camera Replacement: crwdns2935265:04crwdnd2935265:01crwdnd2935265:01crwdne2935265:0
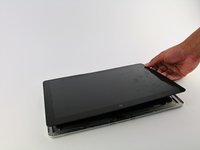
    • Lift the screen up and off of the device.

    • Pry each corner up first, otherwise you may damage or crack the screen.

  5. HP Elite x2 1012 G2 Rear Facing Camera Replacement: crwdns2935265:05crwdnd2935265:01crwdnd2935265:03crwdne2935265:0 HP Elite x2 1012 G2 Rear Facing Camera Replacement: crwdns2935265:05crwdnd2935265:02crwdnd2935265:03crwdne2935265:0 HP Elite x2 1012 G2 Rear Facing Camera Replacement: crwdns2935265:05crwdnd2935265:03crwdnd2935265:03crwdne2935265:0
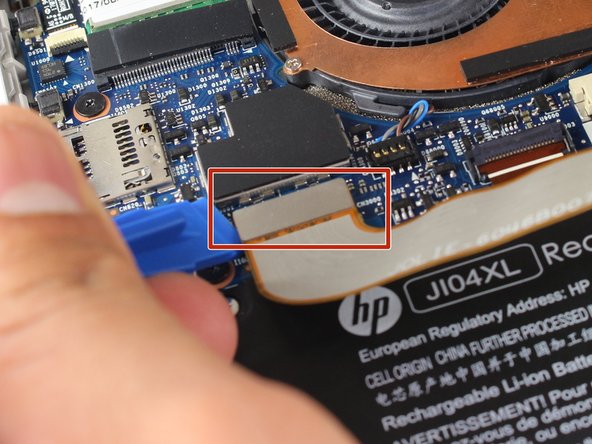
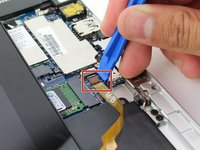
    • Remove the two connectors on the back of the screen by lifting the connector tabs on the motherboard with a plastic opening tool and pulling gently.

  6. HP Elite x2 1012 G2 Rear Facing Camera Replacement: crwdns2935265:06crwdnd2935265:01crwdnd2935265:02crwdne2935265:0 HP Elite x2 1012 G2 Rear Facing Camera Replacement: crwdns2935265:06crwdnd2935265:02crwdnd2935265:02crwdne2935265:0
    • Remove the screen by gently lifting it off of the device.

  7. HP Elite x2 1012 G2 Rear Facing Camera Replacement, Rear Facing Camera: crwdns2935265:07crwdnd2935265:01crwdnd2935265:02crwdne2935265:0 HP Elite x2 1012 G2 Rear Facing Camera Replacement, Rear Facing Camera: crwdns2935265:07crwdnd2935265:02crwdnd2935265:02crwdne2935265:0
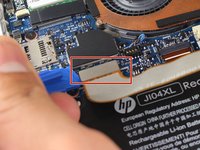
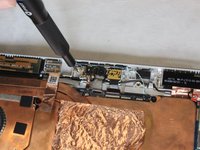
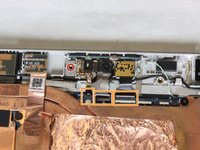
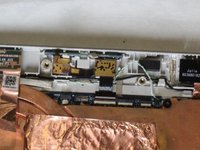
    • Locate the cameras at the top center of the power and processing unit.

    • Use a Phillips #00 screwdriver to remove the single 3 mm screw.

    • Use a spudger tool to lift up the ribbon cable clamps.

    • Be careful not to crease or damage the ribbon cables or connectors.

  8. HP Elite x2 1012 G2 Rear Facing Camera Replacement: crwdns2935265:08crwdnd2935265:01crwdnd2935265:02crwdne2935265:0 HP Elite x2 1012 G2 Rear Facing Camera Replacement: crwdns2935265:08crwdnd2935265:02crwdnd2935265:02crwdne2935265:0
    • Remove the front-facing camera.

    • Remove the metal bracket securing the rear-facing camera.

    • Remove the rear-facing camera.

crwdns2915888:0crwdne2915888:0

To reassemble your device, follow these instructions in reverse order.

WesleyEagleson

crwdns2935283:004/06/19crwdne2935283:0

431 crwdns2915208:0crwdne2915208:0

crwdns2935297:03crwdne2935297:0

crwdns2915084:0crwdne2915084:0

IUPUI, Team S13-G13, Wilson Spring 2019 crwdns2935289:0IUPUI, Team S13-G13, Wilson Spring 2019crwdne2935289:0

IUPUI-WILSON-S19S13G13

crwdns2931471:04crwdne2931471:0

crwdns2935297:04crwdne2935297:0

crwdns2944067:00crwdne2944067:0

crwdns2917038:0crwdne2917038:0

crwdns2936625:0crwdne2936625:0:

crwdns2936751:024crwdne2936751:0 1

crwdns2936753:07crwdne2936753:0 5

crwdns2936753:030crwdne2936753:0 16

crwdns2942667:0crwdne2942667:0 506