crwdns2933423:0crwdne2933423:0

HP Deskjet 2624 Magnetic Strip Replacement

crwdns2942213:0crwdne2942213:0

  1. HP Deskjet 2624 Magnetic Strip Replacement, Magnetic Strip: crwdns2935265:01crwdnd2935265:01crwdnd2935265:01crwdne2935265:0
    • Unplug the printer and remove all paper from the input tray.

  2. HP Deskjet 2624 Magnetic Strip Replacement: crwdns2935265:02crwdnd2935265:01crwdnd2935265:02crwdne2935265:0 HP Deskjet 2624 Magnetic Strip Replacement: crwdns2935265:02crwdnd2935265:02crwdnd2935265:02crwdne2935265:0
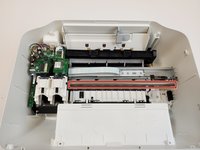
    • Using the Torx T5 screwdriver, remove the four screws holding the scanner bed module to the printer base.

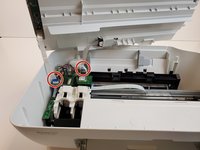
    • Slowly lift up the scanner bed slightly off the base.

    • Be sure to unplug the ribbons connecting the two parts by pulling them straight out of their plugs gently.

  3. HP Deskjet 2624 Magnetic Strip Replacement: crwdns2935265:03crwdnd2935265:01crwdnd2935265:02crwdne2935265:0 HP Deskjet 2624 Magnetic Strip Replacement: crwdns2935265:03crwdnd2935265:02crwdnd2935265:02crwdne2935265:0
    • Gently lift the scanner bed module slightly off of the printer base. Be sure to carefully unplug the ribbon cables before fully removing the scanner bed.

    • Unplug the ribbon cables by pulling them gently straight out of their plugs.

  4. HP Deskjet 2624 Magnetic Strip Replacement: crwdns2935265:04crwdnd2935265:01crwdnd2935265:03crwdne2935265:0 HP Deskjet 2624 Magnetic Strip Replacement: crwdns2935265:04crwdnd2935265:02crwdnd2935265:03crwdne2935265:0 HP Deskjet 2624 Magnetic Strip Replacement: crwdns2935265:04crwdnd2935265:03crwdnd2935265:03crwdne2935265:0
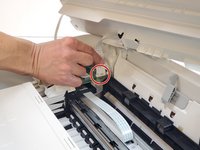
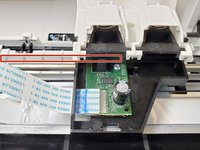
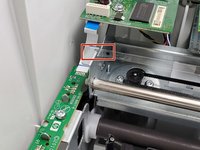
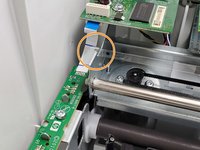
    • Locate the magnetic strip found running straight through the ink cartridge carriage.

  5. HP Deskjet 2624 Magnetic Strip Replacement: crwdns2935265:05crwdnd2935265:01crwdnd2935265:03crwdne2935265:0 HP Deskjet 2624 Magnetic Strip Replacement: crwdns2935265:05crwdnd2935265:02crwdnd2935265:03crwdne2935265:0 HP Deskjet 2624 Magnetic Strip Replacement: crwdns2935265:05crwdnd2935265:03crwdnd2935265:03crwdne2935265:0
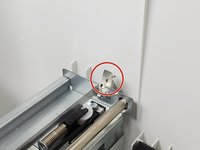
    • To remove the strip, start by applying pressure to the silver connection located on the right hand side of the strip.

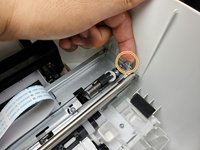
    • While applying pressure to the right hand side, push the strip off the left hand hook and pull it straight up.

    • Lift the strip vertically and unhook it from the silver strip.

    • When putting the strip back in, ensure that the arrow on the replacement faces to the right and downwards.

crwdns2915888:0crwdne2915888:0

To reassemble your device, follow these instructions in reverse order.

Ryan Doyle

crwdns2935283:001/16/20crwdne2935283:0

578 crwdns2915208:0crwdne2915208:0

crwdns2935297:04crwdne2935297:0

crwdns2915084:0crwdne2915084:0

Embry-Riddle Aeronautical University, Team S6-G12, Rauch Spring 2020 crwdns2935289:0Embry-Riddle Aeronautical University, Team S6-G12, Rauch Spring 2020crwdne2935289:0

ERAU-RAUCH-S20S6G12

crwdns2931471:04crwdne2931471:0

crwdns2935297:010crwdne2935297:0

crwdns2947412:00crwdne2947412:0

crwdns2917038:0crwdne2917038:0

crwdns2936625:0crwdne2936625:0:

crwdns2936751:024crwdne2936751:0 0

crwdns2936753:07crwdne2936753:0 3

crwdns2936753:030crwdne2936753:0 27

crwdns2942667:0crwdne2942667:0 642