crwdns2915892:0crwdne2915892:0
You will need to take out the keyboard as a part of replacing the heat sink. Know the steps to Keyboard Replacement before starting on this.
crwdns2942213:0crwdne2942213:0
-
-
Flip the laptop over to the back.
-
Using two hands, push on the tabs while gently taking out the battery.
-
-
-
Flip to the backside of the laptop.
-
Using a Phillips #1 screwdriver, unscrew the 5mm screw and take off the shown cover.
-
Using the same screwdriver, unscrew the 8mm screws.
-
-
-
Flip over the laptop to the top side, and open the laptop.
-
Slide the locking tabs down using a blue plastic opening tool or your fingernail.
-
-
-
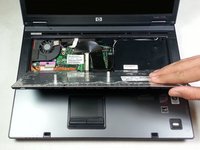
Using the plastic prying tool, lift the keyboard gently towards you.
-
-
-
-
Pull up on both sides of the black locking tab of the connector.
-
The keyboard should now be free of the computer.
-
-
-
Put a finger under each side of the plastic lock on the ribbon cable and pull up.
-
-
-
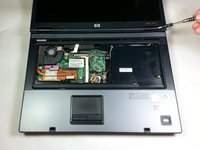
Using a flathead screwdriver, get under each plastic hinge cover until they pop.
-
Lift the right edge of plastic strip covering the power button and gently pull it up until the whole strip comes free.
-
-
-
Using two fingers, open the prongs holding the RAM
-
Then slide the RAM out from the socket
-
-
-
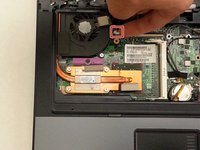
Using a Phillips #1 screwdriver, unscrew the two 7mm screws on the top and bottom of the fan.
-
-
-
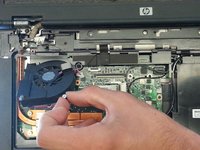
Using two fingers, pull out the fan power connector.
-
To take out the fan, lift the bottom of the fan and take it out at an angle.
-
-
-
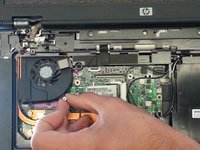
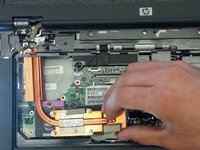
Using the Phillips #1 screwdriver, unscrew the four screws on the copper plate.
-
-
-
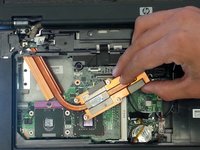
Rotate the copper plate heat sink to slide it out.
-


To reassemble your device, follow these instructions in reverse order.
To reassemble your device, follow these instructions in reverse order.
crwdns2935221:0crwdne2935221:0
crwdns2935229:09crwdne2935229:0
crwdns2915084:0crwdne2915084:0

Cal Poly, Team 4-2, Maness Spring 2015 crwdns2935289:0Cal Poly, Team 4-2, Maness Spring 2015crwdne2935289:0
CPSU-MANESS-S15S4G2
crwdns2931471:04crwdne2931471:0
crwdns2935297:06crwdne2935297:0
crwdns2947412:03crwdne2947412:0
That was easy. Thanks man :)
благодаря за инструкцията!
Piece of cake ! Thanks. :)