crwdns2933423:0crwdne2933423:0

HP Compaq 2510p Power/audio bar Replacement

crwdns2942213:0crwdne2942213:0

  1. HP Compaq 2510p Power/audio bar Replacement, Power/audio bar: crwdns2935265:01crwdnd2935265:01crwdnd2935265:01crwdne2935265:0
    • Locate the 4 screws in the four corners of the laptop screen.

    • The screws may be hidden underneath a small rubber pad.

    • Be sure to ground yourself and tools before working near electronics.

  2. HP Compaq 2510p Power/audio bar Replacement: crwdns2935265:02crwdnd2935265:01crwdnd2935265:01crwdne2935265:0
    • Use a Flathead screwdriver to remove the 4 rubber covers over the 4 screws referenced in step 1.

  3. HP Compaq 2510p Power/audio bar Replacement: crwdns2935265:03crwdnd2935265:01crwdnd2935265:01crwdne2935265:0
    • Once the rubber has been removed a screw will be revealed. Remove each of the four screws with your Philips head screwdriver.

  4. HP Compaq 2510p Power/audio bar Replacement: crwdns2935265:04crwdnd2935265:01crwdnd2935265:01crwdne2935265:0
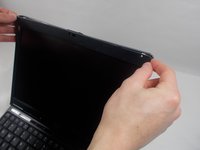
    • Insert your spudger along the top of the screen, separating the plastic cover and the screen

  5. HP Compaq 2510p Power/audio bar Replacement: crwdns2935265:05crwdnd2935265:01crwdnd2935265:01crwdne2935265:0
    • Continue running your Flathead along the top of the screen until the top is completely separated.

  6. HP Compaq 2510p Power/audio bar Replacement: crwdns2935265:06crwdnd2935265:01crwdnd2935265:02crwdne2935265:0 HP Compaq 2510p Power/audio bar Replacement: crwdns2935265:06crwdnd2935265:02crwdnd2935265:02crwdne2935265:0
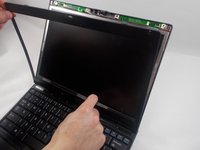
    • Pull the plastic covering of the screen towards the keyboard, exposing the inner workings of the screen.

  7. HP Compaq 2510p Power/audio bar Replacement: crwdns2935265:07crwdnd2935265:01crwdnd2935265:01crwdne2935265:0
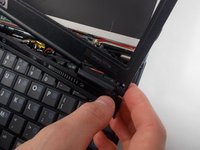
    • Locate the hinges at the bottom left, and right of the screen

  8. HP Compaq 2510p Power/audio bar Replacement: crwdns2935265:08crwdnd2935265:01crwdnd2935265:02crwdne2935265:0 HP Compaq 2510p Power/audio bar Replacement: crwdns2935265:08crwdnd2935265:02crwdnd2935265:02crwdne2935265:0
    • Separate the Power/Audio bar from the hinge by gently pulling.

  9. HP Compaq 2510p Power/audio bar Replacement: crwdns2935265:09crwdnd2935265:01crwdnd2935265:01crwdne2935265:0
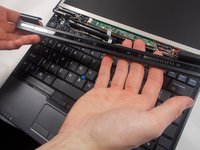
    • Flip the Power/Audio bar over exposing the ribbon wire and its connection to the Power/Audio bar.

  10. HP Compaq 2510p Power/audio bar Replacement: crwdns2935265:010crwdnd2935265:01crwdnd2935265:01crwdne2935265:0
    • Separate the ribbon wire by gently pulling the wire from its socket.

    • The wire will be separated and the bar is free.

    • Be gentle as you pull.

crwdns2915888:0crwdne2915888:0

To reassemble your device, follow these instructions in reverse order.

crwdns2935227:0crwdne2935227:0

Derek Kohansky

crwdns2935283:010/26/16crwdne2935283:0

297 crwdns2915208:0crwdne2915208:0

crwdns2935297:02crwdne2935297:0

crwdns2915084:0crwdne2915084:0

UMass Dartmouth, Team 3-8, Isaacson Fall 2016 crwdns2935289:0UMass Dartmouth, Team 3-8, Isaacson Fall 2016crwdne2935289:0

UMASSD-ISAACSON-F16S3G8

crwdns2931471:03crwdne2931471:0

crwdns2935297:05crwdne2935297:0

crwdns2947412:00crwdne2947412:0

crwdns2917038:0crwdne2917038:0

crwdns2936625:0crwdne2936625:0:

crwdns2936751:024crwdne2936751:0 3

crwdns2936753:07crwdne2936753:0 11

crwdns2936753:030crwdne2936753:0 15

crwdns2942667:0crwdne2942667:0 435