crwdns2933423:0crwdne2933423:0

HP Chromebook 14-x013dx Speakers Replacement

crwdns2942213:0crwdne2942213:0

  1. HP Chromebook 14-x013dx Speakers Replacement, Keyboard, Touchpad: crwdns2935265:01crwdnd2935265:01crwdnd2935265:02crwdne2935265:0 HP Chromebook 14-x013dx Speakers Replacement, Keyboard, Touchpad: crwdns2935265:01crwdnd2935265:02crwdnd2935265:02crwdne2935265:0
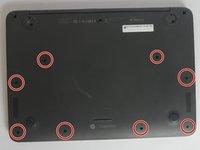
    • Using the plastic spudger, gently lift the 5 rubber pads away from their seating.

  2. HP Chromebook 14-x013dx Speakers Replacement: crwdns2935265:02crwdnd2935265:01crwdnd2935265:01crwdne2935265:0
    • Remove the five 6mm screws located under the removed pads using Phillips #00 screwdriver.

  3. HP Chromebook 14-x013dx Speakers Replacement: crwdns2935265:03crwdnd2935265:01crwdnd2935265:02crwdne2935265:0 HP Chromebook 14-x013dx Speakers Replacement: crwdns2935265:03crwdnd2935265:02crwdnd2935265:02crwdne2935265:0
    • With the Phillips #00 screwdriver, remove the remaining eight 6mm screws. You will now have thirteen 6mm screws removed from the case.

  4. HP Chromebook 14-x013dx Speakers Replacement: crwdns2935265:04crwdnd2935265:01crwdnd2935265:02crwdne2935265:0 HP Chromebook 14-x013dx Speakers Replacement: crwdns2935265:04crwdnd2935265:02crwdnd2935265:02crwdne2935265:0
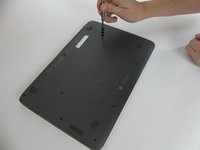
    • To continue removing the back cover, turn the laptop over as displayed.

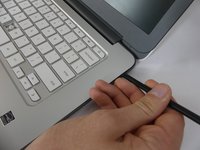
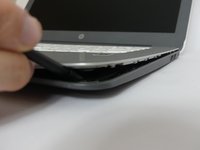
    • Use the plastic spudger to gently pry around the base of the laptop from the back cover. Continue prying around the entire base of the laptop.

  5. HP Chromebook 14-x013dx Speakers Replacement: crwdns2935265:05crwdnd2935265:01crwdnd2935265:03crwdne2935265:0 HP Chromebook 14-x013dx Speakers Replacement: crwdns2935265:05crwdnd2935265:02crwdnd2935265:03crwdne2935265:0 HP Chromebook 14-x013dx Speakers Replacement: crwdns2935265:05crwdnd2935265:03crwdnd2935265:03crwdne2935265:0
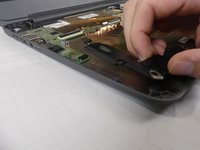
    • Gently lift the silver base of the laptop from the bottom, but do not remove it.

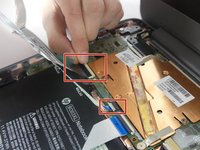
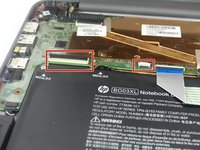
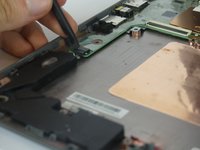
    • To remove the ribbon cables, lift the latch holding the ribbon cables in place and then pull them free.

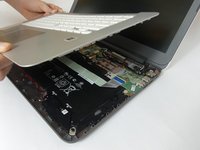
    • Remove the keyboard panel from the laptop.

  6. HP Chromebook 14-x013dx Speakers Replacement, Battery: crwdns2935265:06crwdnd2935265:01crwdnd2935265:02crwdne2935265:0 HP Chromebook 14-x013dx Speakers Replacement, Battery: crwdns2935265:06crwdnd2935265:02crwdnd2935265:02crwdne2935265:0
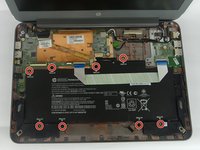
    • Remove the eight 4mm screws holding the battery in place using the Phillips #00 screwdriver.

  7. HP Chromebook 14-x013dx Speakers Replacement: crwdns2935265:07crwdnd2935265:01crwdnd2935265:02crwdne2935265:0 HP Chromebook 14-x013dx Speakers Replacement: crwdns2935265:07crwdnd2935265:02crwdnd2935265:02crwdne2935265:0
    • Remove the ribbon cable that runs over the battery by lifting up the plastic latches and pulling the cable away.

  8. HP Chromebook 14-x013dx Speakers Replacement: crwdns2935265:08crwdnd2935265:01crwdnd2935265:02crwdne2935265:0 HP Chromebook 14-x013dx Speakers Replacement: crwdns2935265:08crwdnd2935265:02crwdnd2935265:02crwdne2935265:0
    • Unhook the battery's power connector from the motherboard.

  9. HP Chromebook 14-x013dx Speakers Replacement: crwdns2935265:09crwdnd2935265:01crwdnd2935265:01crwdne2935265:0
    • Lift the battery out of the laptop case.

  10. HP Chromebook 14-x013dx Speakers Replacement, Speakers: crwdns2935265:010crwdnd2935265:01crwdnd2935265:02crwdne2935265:0 HP Chromebook 14-x013dx Speakers Replacement, Speakers: crwdns2935265:010crwdnd2935265:02crwdnd2935265:02crwdne2935265:0
    • Unplug Speaker from motherboard.

  11. HP Chromebook 14-x013dx Speakers Replacement: crwdns2935265:011crwdnd2935265:01crwdnd2935265:02crwdne2935265:0 HP Chromebook 14-x013dx Speakers Replacement: crwdns2935265:011crwdnd2935265:02crwdnd2935265:02crwdne2935265:0
    • Pull the left and right speaker out carefully.

    • The corners of the the speakers will be held in place by tape, and may require a bit of force.

  12. HP Chromebook 14-x013dx Speakers Replacement: crwdns2935265:012crwdnd2935265:01crwdnd2935265:02crwdne2935265:0 HP Chromebook 14-x013dx Speakers Replacement: crwdns2935265:012crwdnd2935265:02crwdnd2935265:02crwdne2935265:0
    • Remove the black tape holding the wire to the laptop casing.

    • Remove the wires from the three hooks on the case.

crwdns2915888:0crwdne2915888:0

To reassemble your device, follow these instructions in reverse order.

crwdns2935227:0crwdne2935227:0

NHerbert

crwdns2935283:009/28/17crwdne2935283:0

602 crwdns2915208:0crwdne2915208:0

crwdns2935297:05crwdne2935297:0

crwdns2915084:0crwdne2915084:0

USF Tampa, Team S3-G6, Nance Fall 2017 crwdns2935289:0USF Tampa, Team S3-G6, Nance Fall 2017crwdne2935289:0

USFT-NANCE-F17S3G6

crwdns2931471:04crwdne2931471:0

crwdns2935297:05crwdne2935297:0

crwdns2944067:00crwdne2944067:0

crwdns2917038:0crwdne2917038:0

crwdns2936625:0crwdne2936625:0:

crwdns2936751:024crwdne2936751:0 0

crwdns2936753:07crwdne2936753:0 0

crwdns2936753:030crwdne2936753:0 7

crwdns2942667:0crwdne2942667:0 241