crwdns2915892:0crwdne2915892:0
If the keyboard on the HP Chromebook 14-q063cl is not responding when you press the keys, it needs to be replaced. Use this guide to remove and replace the keyboard.
The keyboard is one of the main components through which you give your laptop commands. If one or more of the keys are not responding, the whole keyboard needs to be removed in order to properly address the issue.
For more information on troubleshooting issues for the keyboard assembly, take a look at the Troubleshooting page for assistance.
Before beginning this guide, power down the device and disconnect it from the charger
crwdns2942213:0crwdne2942213:0
-
-
Flip the laptop upside down so that the bottom is facing upwards.
-
Use Phillips #0 screwdriver to remove nine 6.7 mm screws from the bottom panel.
-
-
-
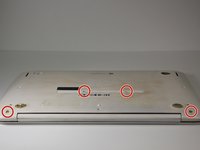
Use a metal spudger to pry the plastic covers off four additional screws.
-
-
-
-
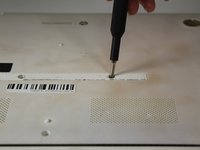
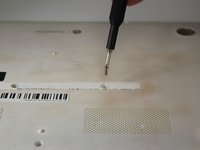
Use a Phillips #0 screwdriver to remove the four remaining 6.7 mm screws from the bottom panel.
-
-
-
Turn the laptop upright.
-
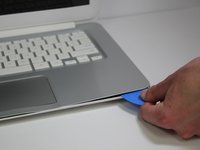
Use an opening tool or picks to undo the clips around the perimeter of the keyboard assembly and separate it from the rest of the laptop.
-
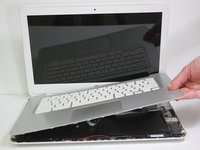
Remove the keyboard assembly.
-
Disconnect the cable attaching the keyboard cable to the motherboard.
-


To reassemble your device, follow these instructions in reverse order.
To reassemble your device, follow these instructions in reverse order.

crwdns2915084:0crwdne2915084:0

Carson-Newman University, Team A-2, Sobiech Spring 2023 crwdns2935289:0Carson-Newman University, Team A-2, Sobiech Spring 2023crwdne2935289:0
CNU-SOBIECH-S23SAG2
crwdns2931471:07crwdne2931471:0
crwdns2935297:05crwdne2935297:0