crwdns2933423:0crwdne2933423:0

HP Chromebook 11 G4 Battery Replacement

crwdns2942213:0crwdne2942213:0

  1. HP Chromebook 11 G4 Battery Replacement, Keyboard: crwdns2935265:01crwdnd2935265:01crwdnd2935265:01crwdne2935265:0
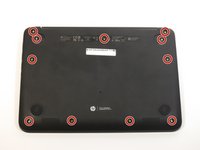
    • Position the closed Chromebook with the rubber pads are facing up.

  2. HP Chromebook 11 G4 Battery Replacement: crwdns2935265:02crwdnd2935265:01crwdnd2935265:02crwdne2935265:0 HP Chromebook 11 G4 Battery Replacement: crwdns2935265:02crwdnd2935265:02crwdnd2935265:02crwdne2935265:0
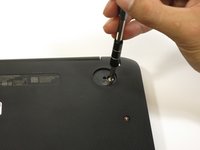
    • Slide the flat end of the spudger under the rubber pads at the upper right-hand and the upper left-hand corners.

    • Pry off the rubber pads to reveal a screw under each pad.

    • The rubber pads are attached with a strong adhesive. The force applied may damage the pads.

  3. HP Chromebook 11 G4 Battery Replacement: crwdns2935265:03crwdnd2935265:01crwdnd2935265:02crwdne2935265:0 HP Chromebook 11 G4 Battery Replacement: crwdns2935265:03crwdnd2935265:02crwdnd2935265:02crwdne2935265:0
    • Remove the eleven 6mm Phillips #1 screws.

  4. HP Chromebook 11 G4 Battery Replacement: crwdns2935265:04crwdnd2935265:01crwdnd2935265:01crwdne2935265:0
    • Flip over the Chromebook and open it.

  5. HP Chromebook 11 G4 Battery Replacement: crwdns2935265:05crwdnd2935265:01crwdnd2935265:02crwdne2935265:0 HP Chromebook 11 G4 Battery Replacement: crwdns2935265:05crwdnd2935265:02crwdnd2935265:02crwdne2935265:0
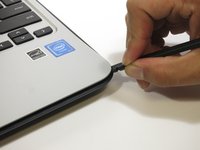
    • Insert the flat end of the spudger between the bottom body of the Chromebook and keyboard body.

    • Slide the spudger along the gap, applying downward pressure to separate the two components.

    • You should hear popping sounds as you slide the spudger along the edge.

    • If the spudger gets stuck while sliding, simply slide the spudger back for a bit, and continue sliding forward.

  6. HP Chromebook 11 G4 Battery Replacement: crwdns2935265:06crwdnd2935265:01crwdnd2935265:01crwdne2935265:0
    • Lift the bottom of the keyboard assembly to reveal the internal components of the device.

  7. HP Chromebook 11 G4 Battery Replacement: crwdns2935265:07crwdnd2935265:01crwdnd2935265:03crwdne2935265:0 HP Chromebook 11 G4 Battery Replacement: crwdns2935265:07crwdnd2935265:02crwdnd2935265:03crwdne2935265:0 HP Chromebook 11 G4 Battery Replacement: crwdns2935265:07crwdnd2935265:03crwdnd2935265:03crwdne2935265:0
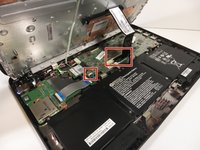
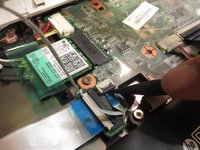
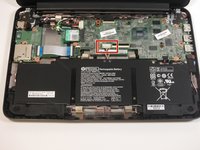
    • Use the pointed end of the spudger to flip up the black tabs on the two ZIF connectors located on the motherboard.

    • Disconnect the ribbon cables from the motherboard by gently sliding them out of their sockets.

  8. HP Chromebook 11 G4 Battery Replacement: crwdns2935265:08crwdnd2935265:01crwdnd2935265:01crwdne2935265:0
    • Remove the keyboard assembly by lifting it off the laptop base.

  9. HP Chromebook 11 G4 Battery Replacement, Battery: crwdns2935265:09crwdnd2935265:01crwdnd2935265:02crwdne2935265:0 HP Chromebook 11 G4 Battery Replacement, Battery: crwdns2935265:09crwdnd2935265:02crwdnd2935265:02crwdne2935265:0
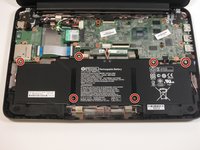
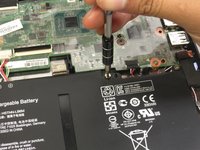
    • Remove the six 4mm Phillips #1 screws.

  10. HP Chromebook 11 G4 Battery Replacement: crwdns2935265:010crwdnd2935265:01crwdnd2935265:02crwdne2935265:0 HP Chromebook 11 G4 Battery Replacement: crwdns2935265:010crwdnd2935265:02crwdnd2935265:02crwdne2935265:0
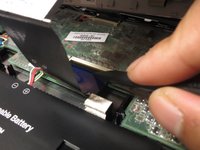
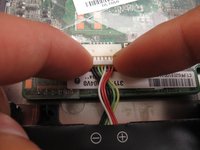
    • Disconnect the bundled power cable by grasping both edges with your fingers and pulling.

  11. HP Chromebook 11 G4 Battery Replacement: crwdns2935265:011crwdnd2935265:01crwdnd2935265:01crwdne2935265:0
    • Lift the battery out of the laptop.

crwdns2915888:0crwdne2915888:0

To reassemble your device, follow these instructions in reverse order.

crwdns2935229:027crwdne2935229:0

Christopher Flood

crwdns2935283:004/26/17crwdne2935283:0

593 crwdns2915208:0crwdne2915208:0

crwdns2935295:0crwdne2935295:0

crwdns2915084:0crwdne2915084:0

Cal Poly, Team S23-G5, Livingston Spring 2017 crwdns2935289:0Cal Poly, Team S23-G5, Livingston Spring 2017crwdne2935289:0

CPSU-LIVINGSTON-S17S23G5

crwdns2931471:03crwdne2931471:0

crwdns2935297:06crwdne2935297:0

crwdns2944067:07crwdne2944067:0

wow so this is what computer technicians do.

88 88 - crwdns2934203:0crwdne2934203:0

Christopher, your step by step is superb! I am one grateful chicky. Thanks to your guide, I didn't have to replace my laptop! It worked like a charm, despite not owning a spudger. I had to improvise and used a butter knife for tha unclipping of keyboard and my fingernails to unclip tha component clips and didn't even damage my rubber pads! Thank you so very much!!!

Jammie Brasher - crwdns2934203:0crwdne2934203:0

Video was great. Disassembly and assembly took about 1 hour

Jorge De Joya - crwdns2934203:0crwdne2934203:0

Measured power supply voltage as 6V. Not sure if this is enough to bring down the computer. Spec says is should be 7.7Vdc.

Jorge De Joya - crwdns2934203:0crwdne2934203:0

Excellent! So easy to follow! Thank you for the well written guide and tips.

Martha Webb - crwdns2934203:0crwdne2934203:0

crwdns2917038:0crwdne2917038:0

crwdns2936625:0crwdne2936625:0:

crwdns2936751:024crwdne2936751:0 2

crwdns2936753:07crwdne2936753:0 24

crwdns2936753:030crwdne2936753:0 150

crwdns2942667:0crwdne2942667:0 62,001