crwdns2933423:0crwdne2933423:0
crwdns2947577:0crwdnd2947577:0crwdne2947577:0

HP 7 Plus 1302 Battery Replacement

crwdns2942213:0crwdne2942213:0

    1. HP 7 Plus 1302 Battery Replacement, Back Cover: crwdns2935265:01crwdnd2935265:01crwdnd2935265:01crwdne2935265:0
      • Using the T5 Torx Screwdriver, remove the T5x3mm screws located in all 4 corners.

      • Device should be turned off and unplugged before starting the replacements.

      crwdns2952109:0crwdne2952109:0

      crwdns2917038:0crwdne2917038:0

    2. HP 7 Plus 1302 Battery Replacement: crwdns2935265:02crwdnd2935265:01crwdnd2935265:02crwdne2935265:0 HP 7 Plus 1302 Battery Replacement: crwdns2935265:02crwdnd2935265:02crwdnd2935265:02crwdne2935265:0
      • Use the plastic opening tool to push in between the front and the back of the tablet.

      • Slide the plastic opening tool around all 4 sides of the tablet to separate the back cover.

      • Be careful when you are trying to remove the back as it can damage the screen if you force it too much.

      crwdns2952109:0crwdne2952109:0

      crwdns2917038:0crwdne2917038:0

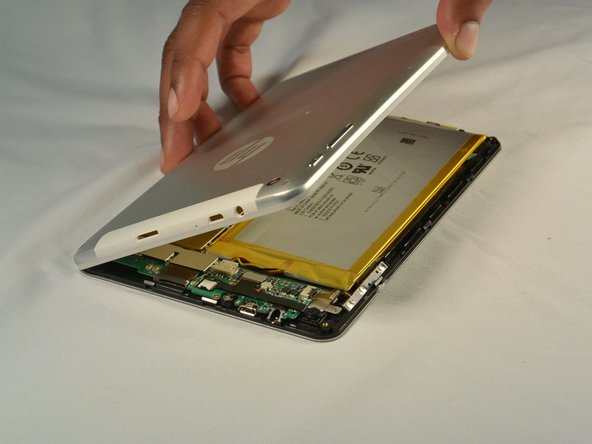
    3. HP 7 Plus 1302 Battery Replacement: crwdns2935265:03crwdnd2935265:01crwdnd2935265:02crwdne2935265:0 HP 7 Plus 1302 Battery Replacement: crwdns2935265:03crwdnd2935265:02crwdnd2935265:02crwdne2935265:0
      • Continue sliding the plastic opening tool around the tablet until all 4 sides are separated from each other.

      • Remove the back cover.

      crwdns2952109:0crwdne2952109:0

      crwdns2917038:0crwdne2917038:0

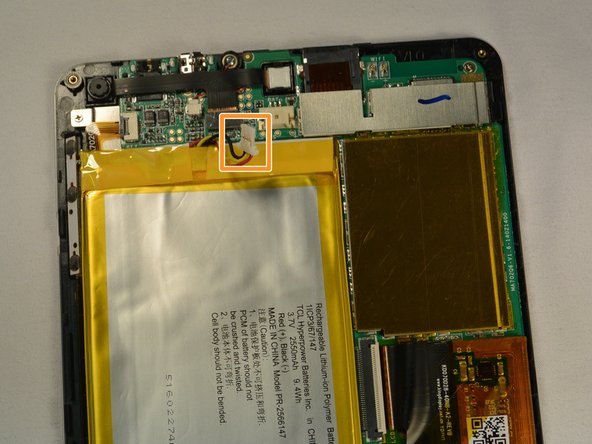
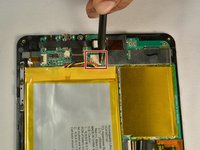
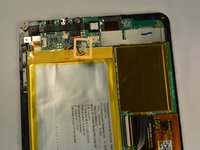
    1. HP 7 Plus 1302 Battery Replacement, Battery: crwdns2935265:04crwdnd2935265:01crwdnd2935265:02crwdne2935265:0 HP 7 Plus 1302 Battery Replacement, Battery: crwdns2935265:04crwdnd2935265:02crwdnd2935265:02crwdne2935265:0
      • Push out the battery connector using the spudger.

      • Swing the battery connector clear of the connector socket.

      crwdns2952109:0crwdne2952109:0

      crwdns2917038:0crwdne2917038:0

    2. HP 7 Plus 1302 Battery Replacement: crwdns2935265:05crwdnd2935265:01crwdnd2935265:01crwdne2935265:0
      • Lift the battery from the device.

      crwdns2952109:0crwdne2952109:0

      crwdns2917038:0crwdne2917038:0

crwdns2915888:0crwdne2915888:0

To reassemble your device, follow these instructions in reverse order. Use new double sided tape to secure the new battery.

crwdns2935221:0crwdne2935221:0

crwdns2935227:0crwdne2935227:0

Jason

crwdns2935283:007/07/15crwdne2935283:0

101 crwdns2915208:0crwdne2915208:0

crwdns2935295:0crwdne2935295:0

crwdns2935287:0crwdne2935287:0

IUPUI, Team 1-2, Renguette SU 2015 crwdns2935289:0IUPUI, Team 1-2, Renguette SU 2015crwdne2935289:0

IUPUI-RENGUETTE-SU15S1G2

crwdns2931471:05crwdne2931471:0

crwdns2935297:048crwdne2935297:0

crwdns2947412:00crwdne2947412:0

crwdns2917038:0crwdne2917038:0

crwdns2936625:0crwdne2936625:0:

crwdns2936751:024crwdne2936751:0 2

crwdns2936753:07crwdne2936753:0 5

crwdns2936753:030crwdne2936753:0 24

crwdns2942667:0crwdne2942667:0 2,109