crwdns2933423:0crwdne2933423:0

HP 17-bs049dx Hard Drive Replacement

crwdns2942213:0crwdne2942213:0

  1. HP 17-bs049dx Hard Drive  Replacement, Battery: crwdns2935265:01crwdnd2935265:01crwdnd2935265:01crwdne2935265:0
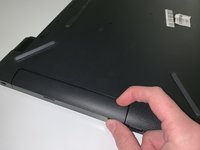
    • To remove the battery, simply push the tabs towards each other.

    • The battery will come out with force, be sure to keep anything fragile away from the laptop during this process.

  2. HP 17-bs049dx Hard Drive  Replacement, Back Panel: crwdns2935265:02crwdnd2935265:01crwdnd2935265:01crwdne2935265:0
    • Remove the four screws (13.7mm) with a Phillips #0 screwdriver.

    • Be sure to lift all four rubber tabs to access screws (7.51mm) underneath.

    • Rubber tabs will require force to access screws.

    Just for clarity, there are 8 screws to be removed, four that are always visible and four that are hidden under the outer ends of the rubber feet.

    roberttrevellyan - crwdns2934203:0crwdne2934203:0

  3. HP 17-bs049dx Hard Drive  Replacement: crwdns2935265:03crwdnd2935265:01crwdnd2935265:01crwdne2935265:0
    • Use the Philips 0 screwdriver to unscrew the screws (7.51mm) that were underneath the battery.

  4. HP 17-bs049dx Hard Drive  Replacement: crwdns2935265:04crwdnd2935265:01crwdnd2935265:02crwdne2935265:0 HP 17-bs049dx Hard Drive  Replacement: crwdns2935265:04crwdnd2935265:02crwdnd2935265:02crwdne2935265:0
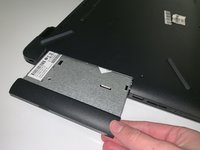
    • Pull outwards on the disk reader to remove from main frame.

    • This removal will require force.

    • All screws must be removed before removing disk reader.

  5. HP 17-bs049dx Hard Drive  Replacement: crwdns2935265:05crwdnd2935265:01crwdnd2935265:01crwdne2935265:0
    • Lift back panel to access internal components.

    • You will need to use force to pry it open.

  6. HP 17-bs049dx Hard Drive  Replacement, Hard Drive: crwdns2935265:06crwdnd2935265:01crwdnd2935265:01crwdne2935265:0
    • Remove screw (7.51mm) on USB port with "Phillips 0 Screwdriver".

    • Lift the USB port over and away from hard drive.

    This is unnecessary. You need only open the tan cable release latch from either end of the cable, remove the cable from the socket, and move the cable out of the way.

    Steve - crwdns2934203:0crwdne2934203:0

  7. HP 17-bs049dx Hard Drive  Replacement: crwdns2935265:07crwdnd2935265:01crwdnd2935265:02crwdne2935265:0 HP 17-bs049dx Hard Drive  Replacement: crwdns2935265:07crwdnd2935265:02crwdnd2935265:02crwdne2935265:0
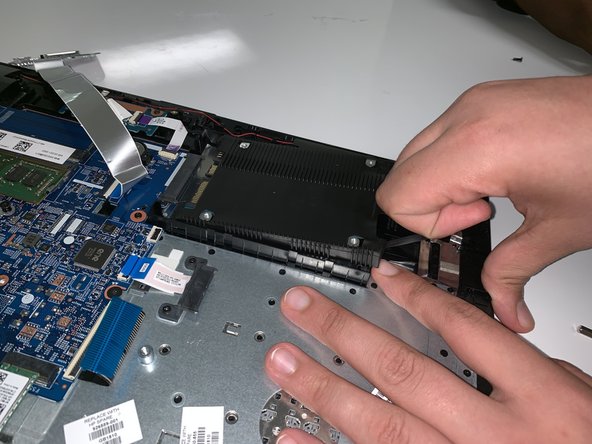
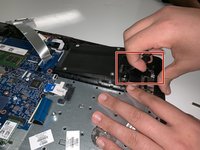
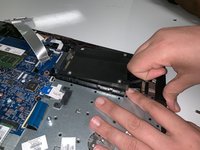
    • Lift rubber black tabs located on the hard drive upwards.

    • Disconnect hard drive from motherboard by pulling towards you.

crwdns2915888:0crwdne2915888:0

To reassemble your device, follow these instructions in reverse order.

crwdns2935229:012crwdne2935229:0

Logan McCarty

crwdns2935283:010/01/18crwdne2935283:0

307 crwdns2915208:0crwdne2915208:0

crwdns2935297:02crwdne2935297:0

crwdns2915084:0crwdne2915084:0

University of North Texas, Team S7-G2, Thompson Fall 2018 crwdns2935289:0University of North Texas, Team S7-G2, Thompson Fall 2018crwdne2935289:0

UNT-THOMPSON-F18S7G2

crwdns2931471:06crwdne2931471:0

crwdns2935297:07crwdne2935297:0

crwdns2944067:02crwdne2944067:0

This was SPOT ON! After searching high and low all over the fricken INTERWEBS for a decent manual, I landed here on your guide and am VERY thankful! KUDOS to you for sharing it!

John Hart - crwdns2934203:0crwdne2934203:0

How much force am I required to put while lifting the back panel to access the internal components? I can go hulk on it but then I wouldn’t have a laptop later…

Stephanie Rose Brown - crwdns2934203:0crwdne2934203:0

crwdns2917038:0crwdne2917038:0

crwdns2936625:0crwdne2936625:0:

crwdns2936751:024crwdne2936751:0 1

crwdns2936753:07crwdne2936753:0 4

crwdns2936753:030crwdne2936753:0 13

crwdns2942667:0crwdne2942667:0 4,163