crwdns2933423:0crwdne2933423:0

HP 15-r137wm TouchSmart Screen Replacement

crwdns2942213:0crwdne2942213:0

  1. HP 15-r137wm TouchSmart Screen Replacement, Front Panel Assembly: crwdns2935265:01crwdnd2935265:01crwdnd2935265:03crwdne2935265:0 HP 15-r137wm TouchSmart Screen Replacement, Front Panel Assembly: crwdns2935265:01crwdnd2935265:02crwdnd2935265:03crwdne2935265:0 HP 15-r137wm TouchSmart Screen Replacement, Front Panel Assembly: crwdns2935265:01crwdnd2935265:03crwdnd2935265:03crwdne2935265:0
    • Make sure that the device is powered off and unplugged before removing components.

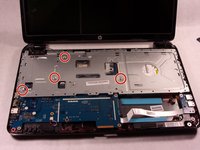
    • Remove all ten (10) 5.5 mm Phillips #0 screws.

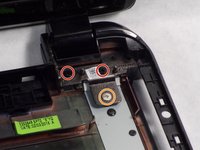
    • Remove the two (2) plastic tabs located at the rear of the panel. Locate the two (2) 7.5mm Phillips #0 screws underneath the pads and remove.

  2. HP 15-r137wm TouchSmart Screen Replacement: crwdns2935265:02crwdnd2935265:01crwdnd2935265:01crwdne2935265:0
    crwdns2935267:0crwdne2935267:0
    Anti-Static Wrist Strap
    $7.95
    crwdns2942207:0crwdne2942207:0
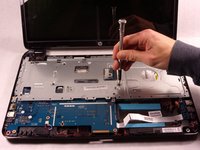
    • Use a wide plastic opening tool to pry off the top casing.

    • Be cautious not to crack the casing near the keyboard as it is quite fragile.

    • Lift the cover off carefully as there are wires still attached to internal components.

    • After panel is removed, use an anti-static wrist strap to ensure the motherboard does not get any external shocks from static discharge.

  3. HP 15-r137wm TouchSmart Screen Replacement: crwdns2935265:03crwdnd2935265:01crwdnd2935265:01crwdne2935265:0
    • The connection for the track pad is still connected.

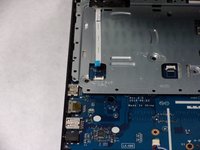
    • Move the keyboard slightly out of the way to locate the connection.

    • Disconnect the small wire protruding from the motherboard underneath the metal plate.

  4. HP 15-r137wm TouchSmart Screen Replacement: crwdns2935265:04crwdnd2935265:01crwdnd2935265:02crwdne2935265:0 HP 15-r137wm TouchSmart Screen Replacement: crwdns2935265:04crwdnd2935265:02crwdnd2935265:02crwdne2935265:0
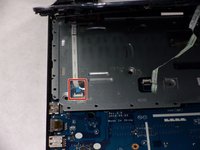
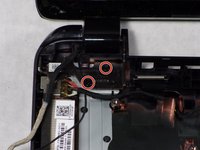
    • Locate the connection between the power button and the connecting cable.

    • Do not lift the front panel off to far as the cable is still attached.

    • Remove the cable from the motherboard carefully.

  5. HP 15-r137wm TouchSmart Screen Replacement, Keyboard: crwdns2935265:05crwdnd2935265:01crwdnd2935265:02crwdne2935265:0 HP 15-r137wm TouchSmart Screen Replacement, Keyboard: crwdns2935265:05crwdnd2935265:02crwdnd2935265:02crwdne2935265:0
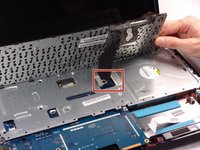
    • Disconnect the connection between the keyboard the the motherboard.

  6. HP 15-r137wm TouchSmart Screen Replacement: crwdns2935265:06crwdnd2935265:01crwdnd2935265:02crwdne2935265:0 HP 15-r137wm TouchSmart Screen Replacement: crwdns2935265:06crwdnd2935265:02crwdnd2935265:02crwdne2935265:0
    • Remove the four (4) 2.5mm by 3.5mm Phillips #0 screws from the metal retaining plate.

    • Lift the metal retaining plate off and away from the device.

  7. HP 15-r137wm TouchSmart Screen Replacement, CD Drive: crwdns2935265:07crwdnd2935265:01crwdnd2935265:02crwdne2935265:0 HP 15-r137wm TouchSmart Screen Replacement, CD Drive: crwdns2935265:07crwdnd2935265:02crwdnd2935265:02crwdne2935265:0
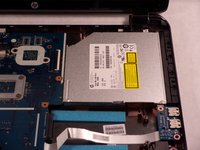
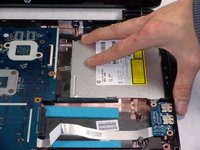
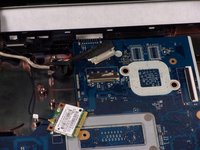
    • Slide the CD drive out slowly by pulling it to the right. There are no screws attached, but there is a connection to the motherboard.

  8. HP 15-r137wm TouchSmart Screen Replacement, Cooling Fan: crwdns2935265:08crwdnd2935265:01crwdnd2935265:02crwdne2935265:0 HP 15-r137wm TouchSmart Screen Replacement, Cooling Fan: crwdns2935265:08crwdnd2935265:02crwdnd2935265:02crwdne2935265:0
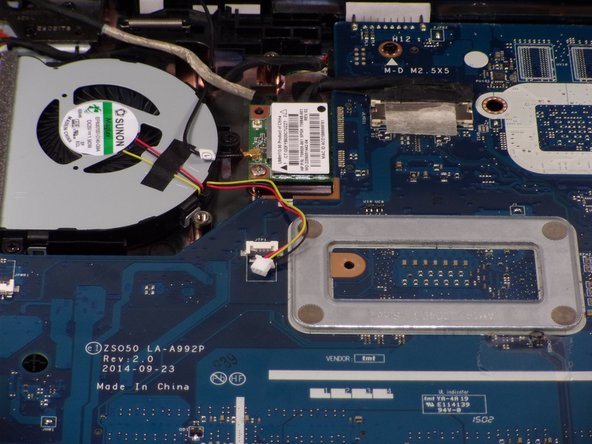
    • Locate the small connection on the motherboard and disconnect it by slowly pulling it away from the motherboard.

    • Slowly disconnect the cable as the wires are very small and fragile

  9. HP 15-r137wm TouchSmart Screen Replacement: crwdns2935265:09crwdnd2935265:01crwdnd2935265:02crwdne2935265:0 HP 15-r137wm TouchSmart Screen Replacement: crwdns2935265:09crwdnd2935265:02crwdnd2935265:02crwdne2935265:0
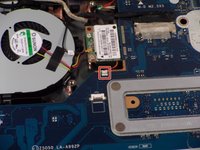
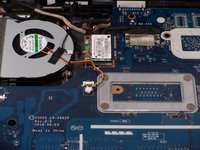
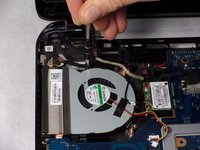
    • Remove the three (3) 2.5mm by 3.5mm Phillips #0 screws from the fan.

  10. HP 15-r137wm TouchSmart Screen Replacement: crwdns2935265:010crwdnd2935265:01crwdnd2935265:01crwdne2935265:0
    • Remove the cooling fan from the housing carefully.

    • The fan may be connected to the small foam screen. Pull gently to release it.

  11. HP 15-r137wm TouchSmart Screen Replacement, Screen: crwdns2935265:011crwdnd2935265:01crwdnd2935265:02crwdne2935265:0 HP 15-r137wm TouchSmart Screen Replacement, Screen: crwdns2935265:011crwdnd2935265:02crwdnd2935265:02crwdne2935265:0
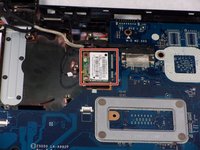
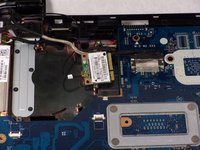
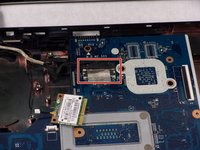
    • Remove the 5.5mm Phillips #0 screw.

  12. HP 15-r137wm TouchSmart Screen Replacement: crwdns2935265:012crwdnd2935265:01crwdnd2935265:02crwdne2935265:0 HP 15-r137wm TouchSmart Screen Replacement: crwdns2935265:012crwdnd2935265:02crwdnd2935265:02crwdne2935265:0
    • Gently pull and slide the video card out of its connector.

  13. HP 15-r137wm TouchSmart Screen Replacement: crwdns2935265:013crwdnd2935265:01crwdnd2935265:02crwdne2935265:0 HP 15-r137wm TouchSmart Screen Replacement: crwdns2935265:013crwdnd2935265:02crwdnd2935265:02crwdne2935265:0
    • Lift up tape, and then remove the power cable from its connector.

  14. HP 15-r137wm TouchSmart Screen Replacement: crwdns2935265:014crwdnd2935265:01crwdnd2935265:03crwdne2935265:0 HP 15-r137wm TouchSmart Screen Replacement: crwdns2935265:014crwdnd2935265:02crwdnd2935265:03crwdne2935265:0 HP 15-r137wm TouchSmart Screen Replacement: crwdns2935265:014crwdnd2935265:03crwdnd2935265:03crwdne2935265:0
    • Remove all four (4) 5.5mm Phillips #0 screws.

    • Remove the one (1) 2.5mm Phillips #0 screw.

    • Since all of the screws are now removed, the screen will begin to fall off on its own. make sure the screen is supported before removal.

  15. HP 15-r137wm TouchSmart Screen Replacement: crwdns2935265:015crwdnd2935265:01crwdnd2935265:01crwdne2935265:0
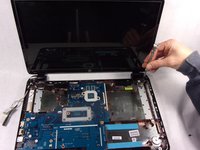
    • The screen can now be lifted out of place from the laptop.

crwdns2915888:0crwdne2915888:0

To reassemble your device, follow these instructions in reverse order.

crwdns2935229:02crwdne2935229:0

Ross B Jacques

crwdns2935283:010/18/17crwdne2935283:0

857 crwdns2915208:0crwdne2915208:0

crwdns2935297:07crwdne2935297:0

crwdns2915084:0crwdne2915084:0

UMass Dartmouth, Team S4-G4, Julie Fall 2017 crwdns2935289:0UMass Dartmouth, Team S4-G4, Julie Fall 2017crwdne2935289:0

UMASSD-JULIE-F17S4G4

crwdns2931471:03crwdne2931471:0

crwdns2935297:07crwdne2935297:0

crwdns2944067:00crwdne2944067:0

crwdns2917038:0crwdne2917038:0

crwdns2936625:0crwdne2936625:0:

crwdns2936751:024crwdne2936751:0 1

crwdns2936753:07crwdne2936753:0 1

crwdns2936753:030crwdne2936753:0 3

crwdns2942667:0crwdne2942667:0 643