crwdns2933423:0crwdne2933423:0

HP 15-g029wm Screen Replacement

crwdns2942213:0crwdne2942213:0

  1. HP 15-g029wm Screen Replacement, Battery: crwdns2935265:01crwdnd2935265:01crwdnd2935265:01crwdne2935265:0
    • Unplug any charging cord or accessories connected to the device before beginning.

  2. HP 15-g029wm Screen Replacement: crwdns2935265:02crwdnd2935265:01crwdnd2935265:01crwdne2935265:0
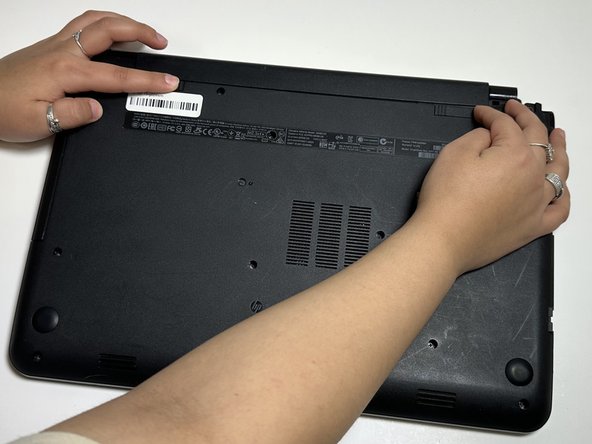
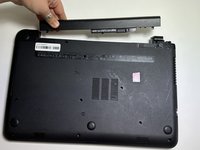
    • Place the laptop bottom-side up on a secure, flat surface.

  3. HP 15-g029wm Screen Replacement: crwdns2935265:03crwdnd2935265:01crwdnd2935265:03crwdne2935265:0 HP 15-g029wm Screen Replacement: crwdns2935265:03crwdnd2935265:02crwdnd2935265:03crwdne2935265:0 HP 15-g029wm Screen Replacement: crwdns2935265:03crwdnd2935265:03crwdnd2935265:03crwdne2935265:0
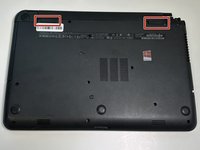
    • Slide each of the two switches that secure the battery to the left.

    • This will reveal an image of an unlocked lock.

  4. HP 15-g029wm Screen Replacement: crwdns2935265:04crwdnd2935265:01crwdnd2935265:03crwdne2935265:0 HP 15-g029wm Screen Replacement: crwdns2935265:04crwdnd2935265:02crwdnd2935265:03crwdne2935265:0 HP 15-g029wm Screen Replacement: crwdns2935265:04crwdnd2935265:03crwdnd2935265:03crwdne2935265:0
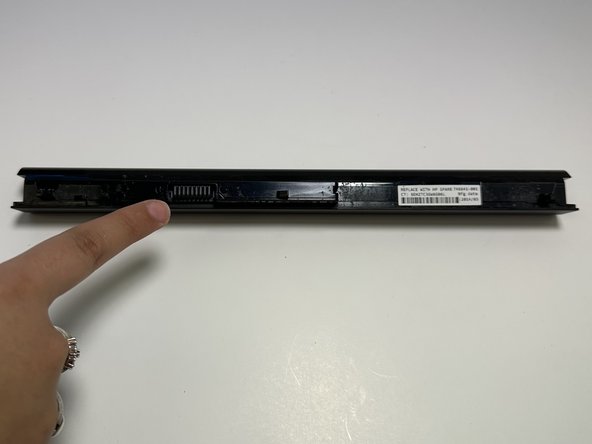
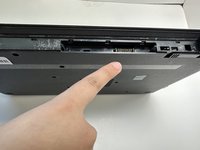
    • Use your hands to gently pull the disconnected battery out of the device.

    • When inserting the new battery, pay special attention to align the battery connections correctly.

  5. HP 15-g029wm Screen Replacement, Screen: crwdns2935265:05crwdnd2935265:01crwdnd2935265:01crwdne2935265:0
    • Open the laptop lid.

  6. HP 15-g029wm Screen Replacement: crwdns2935265:06crwdnd2935265:01crwdnd2935265:02crwdne2935265:0 HP 15-g029wm Screen Replacement: crwdns2935265:06crwdnd2935265:02crwdnd2935265:02crwdne2935265:0
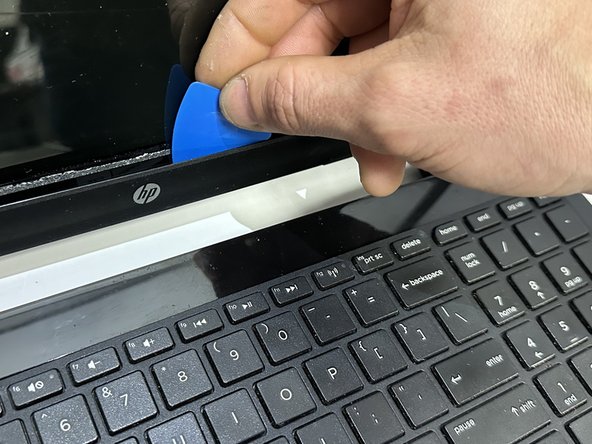
    • Insert an opening pick beneath the display bezel.

    • While periodically prying, slide the opening pick around the perimeter of the bezel to sever the adhesive.

  7. HP 15-g029wm Screen Replacement: crwdns2935265:07crwdnd2935265:01crwdnd2935265:01crwdne2935265:0
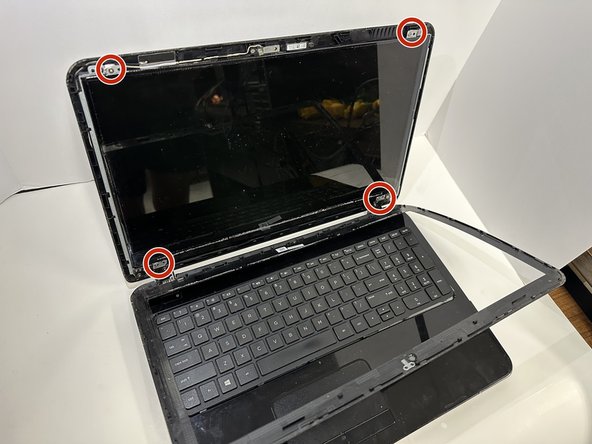
    • Once the majority of the adhesive is severed, use an opening pick or your hands to fully remove the bezel.

  8. HP 15-g029wm Screen Replacement: crwdns2935265:08crwdnd2935265:01crwdnd2935265:02crwdne2935265:0 HP 15-g029wm Screen Replacement: crwdns2935265:08crwdnd2935265:02crwdnd2935265:02crwdne2935265:0
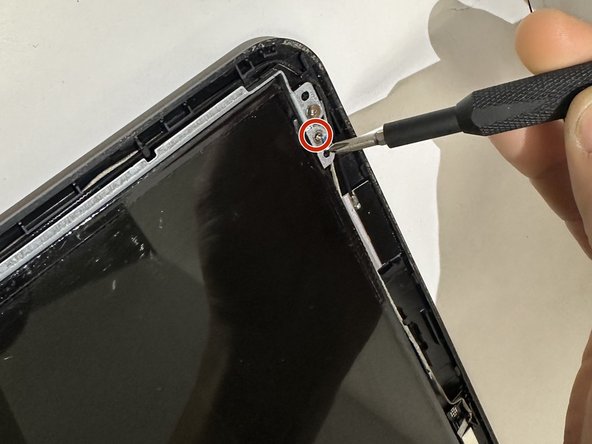
    • Use a Phillips screwdriver to remove the four 4 mm screws that secure the LCD panel.

  9. HP 15-g029wm Screen Replacement: crwdns2935265:09crwdnd2935265:01crwdnd2935265:01crwdne2935265:0
    • Use your hands to carefully remove/lift the panel away from the device.

    • The screen is connected to the device by a cord-do NOT pull it completely away or you risk damaging the device.

  10. HP 15-g029wm Screen Replacement: crwdns2935265:010crwdnd2935265:01crwdnd2935265:02crwdne2935265:0 HP 15-g029wm Screen Replacement: crwdns2935265:010crwdnd2935265:02crwdnd2935265:02crwdne2935265:0
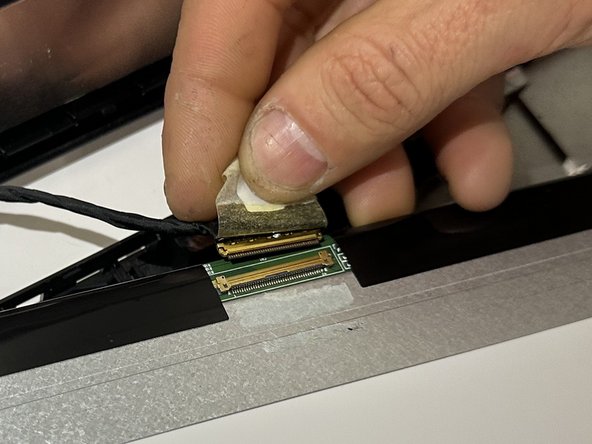
    • Gently peel up the tape over the display cable.

    • If there is a hinge, flip it up.

    • Remove the display cable.

crwdns2915888:0crwdne2915888:0

To reassemble your device, follow these instructions in reverse order.

Lawrence Bailey

crwdns2935283:001/29/24crwdne2935283:0

208 crwdns2915208:0crwdne2915208:0

crwdns2935297:02crwdne2935297:0

crwdns2915084:0crwdne2915084:0

Austin Community College, Team 18-2, Watkins Spring 2024 crwdns2935289:0Austin Community College, Team 18-2, Watkins Spring 2024crwdne2935289:0

AUSTINCC-WATKINS-S24S18G2

crwdns2931471:04crwdne2931471:0

crwdns2935297:06crwdne2935297:0

crwdns2947412:00crwdne2947412:0

crwdns2917038:0crwdne2917038:0

crwdns2936625:0crwdne2936625:0:

crwdns2936751:024crwdne2936751:0 0

crwdns2936753:07crwdne2936753:0 4

crwdns2936753:030crwdne2936753:0 5

crwdns2942667:0crwdne2942667:0 105