crwdns2933423:0crwdne2933423:0

HP 15-bs168cl Speaker Replacement

crwdns2942213:0crwdne2942213:0

  1. HP 15-bs168cl Speaker Replacement, Battery: crwdns2935265:01crwdnd2935265:01crwdnd2935265:02crwdne2935265:0 HP 15-bs168cl Speaker Replacement, Battery: crwdns2935265:01crwdnd2935265:02crwdnd2935265:02crwdne2935265:0
    • Unplug your laptop from its power adapter.

    • Turn the laptop over.

  2. HP 15-bs168cl Speaker Replacement: crwdns2935265:02crwdnd2935265:01crwdnd2935265:02crwdne2935265:0 HP 15-bs168cl Speaker Replacement: crwdns2935265:02crwdnd2935265:02crwdnd2935265:02crwdne2935265:0
    • Slide the Battery lock slider to the right until you see the “Unlocked” lock symbol.

  3. HP 15-bs168cl Speaker Replacement: crwdns2935265:03crwdnd2935265:01crwdnd2935265:02crwdne2935265:0 HP 15-bs168cl Speaker Replacement: crwdns2935265:03crwdnd2935265:02crwdnd2935265:02crwdne2935265:0
    • Slide the Battery release slider towards the battery while pulling the battery out.

  4. HP 15-bs168cl Speaker Replacement, Hard Drive: crwdns2935265:04crwdnd2935265:01crwdnd2935265:02crwdne2935265:0 HP 15-bs168cl Speaker Replacement, Hard Drive: crwdns2935265:04crwdnd2935265:02crwdnd2935265:02crwdne2935265:0
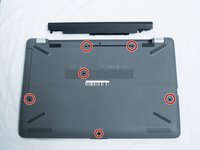
    • Use a Phillips #1 screwdriver to remove the six 10.5 mm screws visible on the bottom of the laptop.

  5. HP 15-bs168cl Speaker Replacement: crwdns2935265:05crwdnd2935265:01crwdnd2935265:02crwdne2935265:0 HP 15-bs168cl Speaker Replacement: crwdns2935265:05crwdnd2935265:02crwdnd2935265:02crwdne2935265:0
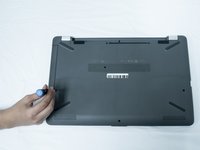
    • Carefully peel the four rubber feet off the bottom to reveal the four hidden screws.

    • Use a Phillips #1 screwdriver to remove the four 10.5 mm screws.

  6. HP 15-bs168cl Speaker Replacement: crwdns2935265:06crwdnd2935265:01crwdnd2935265:01crwdne2935265:0
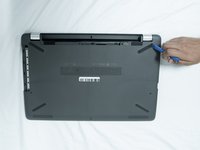
    • Remove the DVD drive by carefully sliding it out.

  7. HP 15-bs168cl Speaker Replacement: crwdns2935265:07crwdnd2935265:01crwdnd2935265:03crwdne2935265:0 HP 15-bs168cl Speaker Replacement: crwdns2935265:07crwdnd2935265:02crwdnd2935265:03crwdne2935265:0 HP 15-bs168cl Speaker Replacement: crwdns2935265:07crwdnd2935265:03crwdnd2935265:03crwdne2935265:0
    crwdns2935267:0crwdne2935267:0
    Plastic Cards
    $2.99
    crwdns2942207:0crwdne2942207:0
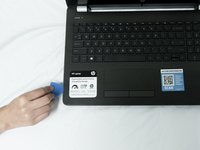
    • Flip the laptop over and open the screen.

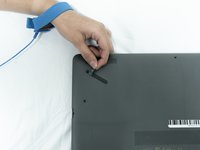
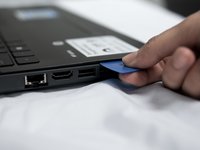
    • Carefully use a flat plastic card to separate the bottom plastic shell from the main body of the computer. Slowly slide the plastic card around the computer in between the two halves of its casing.

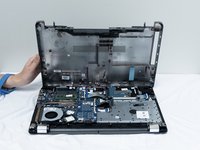
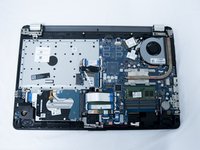
    • Flip the computer back over and remove the bottom plastic shell.

  8. HP 15-bs168cl Speaker Replacement: crwdns2935265:08crwdnd2935265:01crwdnd2935265:03crwdne2935265:0 HP 15-bs168cl Speaker Replacement: crwdns2935265:08crwdnd2935265:02crwdnd2935265:03crwdne2935265:0 HP 15-bs168cl Speaker Replacement: crwdns2935265:08crwdnd2935265:03crwdnd2935265:03crwdne2935265:0
    • Use a Phillips #1 screwdriver to remove the two 3.4 mm screws on the sides.

    • Use a Phillips #0 screwdriver to remove the one 3.3 mm screw at the bottom of the bracket.

  9. HP 15-bs168cl Speaker Replacement: crwdns2935265:09crwdnd2935265:01crwdnd2935265:02crwdne2935265:0 HP 15-bs168cl Speaker Replacement: crwdns2935265:09crwdnd2935265:02crwdnd2935265:02crwdne2935265:0
    • Remove the metal bracket holding the hard drive in place.

    • Carefully lift up the hard drive and slide it out of its connector.

  10. HP 15-bs168cl Speaker Replacement, Speaker: crwdns2935265:010crwdnd2935265:01crwdnd2935265:02crwdne2935265:0 HP 15-bs168cl Speaker Replacement, Speaker: crwdns2935265:010crwdnd2935265:02crwdnd2935265:02crwdne2935265:0
    • Using a Phillips #0 screwdriver remove the screw from the Wi-fi card.

    • Remove the card.

  11. HP 15-bs168cl Speaker Replacement: crwdns2935265:011crwdnd2935265:01crwdnd2935265:02crwdne2935265:0 HP 15-bs168cl Speaker Replacement: crwdns2935265:011crwdnd2935265:02crwdnd2935265:02crwdne2935265:0
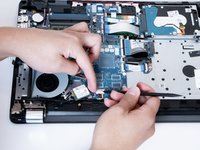
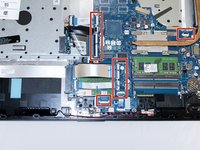
    • Carefully unplug the LCD connector using a plastic spudger.

  12. HP 15-bs168cl Speaker Replacement: crwdns2935265:012crwdnd2935265:01crwdnd2935265:02crwdne2935265:0 HP 15-bs168cl Speaker Replacement: crwdns2935265:012crwdnd2935265:02crwdnd2935265:02crwdne2935265:0
    • Unplug the power connector.

  13. HP 15-bs168cl Speaker Replacement: crwdns2935265:013crwdnd2935265:01crwdnd2935265:03crwdne2935265:0 HP 15-bs168cl Speaker Replacement: crwdns2935265:013crwdnd2935265:02crwdnd2935265:03crwdne2935265:0 HP 15-bs168cl Speaker Replacement: crwdns2935265:013crwdnd2935265:03crwdnd2935265:03crwdne2935265:0
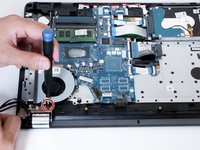
    • Pull all three cables to the side to reveal the 6.7 mm screw attached to the fan.

    • Remove the screw with a Phillips #0 screwdriver.

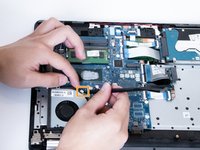
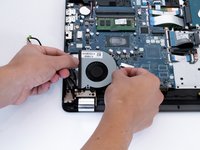
    • Unplug the fan connector.

    • Pull out the fan carefully leaving the heatsink in place.

  14. HP 15-bs168cl Speaker Replacement: crwdns2935265:014crwdnd2935265:01crwdnd2935265:03crwdne2935265:0 HP 15-bs168cl Speaker Replacement: crwdns2935265:014crwdnd2935265:02crwdnd2935265:03crwdne2935265:0 HP 15-bs168cl Speaker Replacement: crwdns2935265:014crwdnd2935265:03crwdnd2935265:03crwdne2935265:0
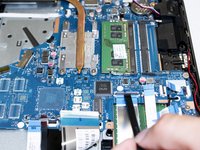
    • Unplug the eight ribbon cables by flipping up the “easy-on” connector using the flat end of the plastic spudger.

  15. HP 15-bs168cl Speaker Replacement: crwdns2935265:015crwdnd2935265:01crwdnd2935265:01crwdne2935265:0
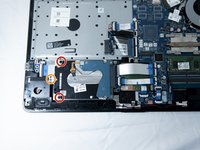
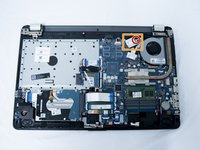
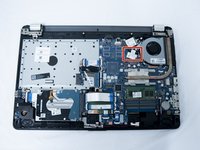
    • Use a Phillips #0 screwdriver to unscrew the five 3.3mm screws from the motherboard.

  16. HP 15-bs168cl Speaker Replacement: crwdns2935265:016crwdnd2935265:01crwdnd2935265:01crwdne2935265:0
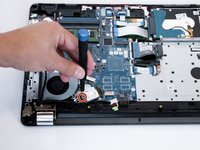
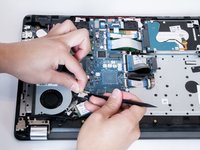
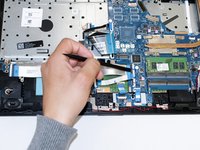
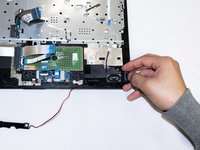
    • Unplug the speaker cable from the motherboard.

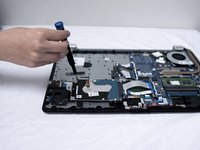
    • Remove the motherboard by carefully pulling it out using the plastic spudger.

  17. HP 15-bs168cl Speaker Replacement: crwdns2935265:017crwdnd2935265:01crwdnd2935265:03crwdne2935265:0 HP 15-bs168cl Speaker Replacement: crwdns2935265:017crwdnd2935265:02crwdnd2935265:03crwdne2935265:0 HP 15-bs168cl Speaker Replacement: crwdns2935265:017crwdnd2935265:03crwdnd2935265:03crwdne2935265:0
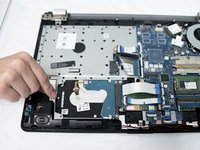
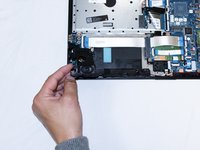
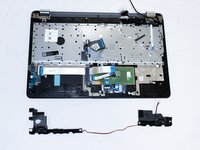
    • Pull the left speaker assembly out and make sure to carefully remove the speaker wires from the guide channel towards the bottom of the computer.

    • Carefully pull out the right side of the speaker assembly.

crwdns2915888:0crwdne2915888:0

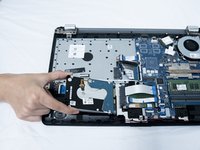
To reassemble your device, follow these instructions in reverse order.

Ian Gascon

crwdns2935283:010/15/19crwdne2935283:0

792 crwdns2915208:0crwdne2915208:0

crwdns2935297:04crwdne2935297:0

crwdns2915084:0crwdne2915084:0

UC Santa Barbara, Team S3-G3, Nowak Fall 2019 crwdns2935289:0UC Santa Barbara, Team S3-G3, Nowak Fall 2019crwdne2935289:0

UCSB-NOWAK-F19S3G3

crwdns2931471:03crwdne2931471:0

crwdns2935297:06crwdne2935297:0

crwdns2917034:0crwdne2917034:0

If this problem cannot be solved in the software, the speaker may break on its own, or the cable inside the computer might leak. If you can find the repair manual for your PC, don't be afraid to break it and see what it is - otherwise, you can contact a specialist. If you can't guarantee this, please send it back to the manufacturer to have it fixed, or find a local store that can diagnose the problem for you. With any luck, you'll be stuck in no time.

charpanchchey - crwdns2934203:0crwdne2934203:0

crwdns2917038:0crwdne2917038:0

crwdns2936625:0crwdne2936625:0:

crwdns2936751:024crwdne2936751:0 0

crwdns2936753:07crwdne2936753:0 4

crwdns2936753:030crwdne2936753:0 9

crwdns2942667:0crwdne2942667:0 565