crwdns2933423:0crwdne2933423:0

HP 15-ba0709dx RAM Replacement

crwdns2942213:0crwdne2942213:0

  1. HP 15-ba0709dx RAM Replacement, Battery: crwdns2935265:01crwdnd2935265:01crwdnd2935265:01crwdne2935265:0
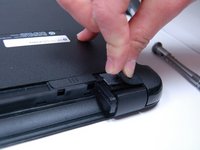
    • Flip the device over and locate the battery compartment.

    • Slide the battery release latch on the left and right side until the battery is detached from its slot.

    • A noticeable pop will be heard when the battery is fully released.

  2. HP 15-ba0709dx RAM Replacement: crwdns2935265:02crwdnd2935265:01crwdnd2935265:01crwdne2935265:0
    • Pull the battery out of its slot.

    • Be careful not to damage any of the connectors in the process.

  3. HP 15-ba0709dx RAM Replacement, Back Cover: crwdns2935265:03crwdnd2935265:01crwdnd2935265:01crwdne2935265:0
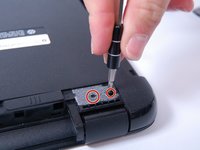
    • Place the laptop on a clean, flat surface with the bottom side facing up.

  4. HP 15-ba0709dx RAM Replacement: crwdns2935265:04crwdnd2935265:01crwdnd2935265:01crwdne2935265:0
    • Using a Phillips Head Screwdriver, remove the screws anchoring the bottom casing.

    • Note: Make sure to keep track of the screws once they have been removed.

  5. HP 15-ba0709dx RAM Replacement: crwdns2935265:05crwdnd2935265:01crwdnd2935265:01crwdne2935265:0
    • Locate the screws about 1 inch from the battery release tabs and use a Phillips Head Screwdriver to remove these screws.

    • Note:Place these newly removed screws with the ones removed in Step 2.

  6. HP 15-ba0709dx RAM Replacement: crwdns2935265:06crwdnd2935265:01crwdnd2935265:02crwdne2935265:0 HP 15-ba0709dx RAM Replacement: crwdns2935265:06crwdnd2935265:02crwdnd2935265:02crwdne2935265:0
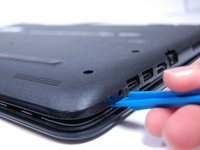
    • Locate the rubber friction pads on the top corners of the laptop. Pry the pads from the laptop and place them off to the side

    • Removing the friction pads will reveal two more anchoring screws.

    • Note: The adhesive keeping the pads on the laptop will weaken once doing this, but it is necessary to removing the bottom cover of the laptop.

  7. HP 15-ba0709dx RAM Replacement: crwdns2935265:07crwdnd2935265:01crwdnd2935265:01crwdne2935265:0
    • Remove disc reader.

    • Note: If all screws are removed it should slide out easily.

  8. HP 15-ba0709dx RAM Replacement: crwdns2935265:08crwdnd2935265:01crwdnd2935265:02crwdne2935265:0 HP 15-ba0709dx RAM Replacement: crwdns2935265:08crwdnd2935265:02crwdnd2935265:02crwdne2935265:0
    • Use a plastic prod to pry the back cover off the laptop.

    • Be careful not to damage the laptop while prying.

  9. HP 15-ba0709dx RAM Replacement, RAM: crwdns2935265:09crwdnd2935265:01crwdnd2935265:01crwdne2935265:0
    • Ensure your computer is shut down.

    • Remove any power adapters and cords connected to the laptop body.

    • Turn the computer over so the bottom is facing up.

    • Follow our guide on how to remove the backcover.

  10. HP 15-ba0709dx RAM Replacement: crwdns2935265:010crwdnd2935265:01crwdnd2935265:01crwdne2935265:0
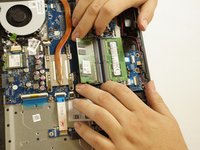
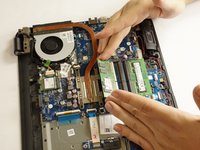
    • Push the two metal tabs on the side of the RAM module outwards, towards the battery and CMOS compartments (up and down).

  11. HP 15-ba0709dx RAM Replacement: crwdns2935265:011crwdnd2935265:01crwdnd2935265:02crwdne2935265:0 HP 15-ba0709dx RAM Replacement: crwdns2935265:011crwdnd2935265:02crwdnd2935265:02crwdne2935265:0
    • Once the module is released, gently pull the module upwards.

crwdns2915888:0crwdne2915888:0

To reassemble your device, follow these instructions in reverse order.

crwdns2935229:02crwdne2935229:0

Reece Marr

crwdns2935283:003/20/17crwdne2935283:0

369 crwdns2915208:0crwdne2915208:0

crwdns2935297:03crwdne2935297:0

crwdns2915084:0crwdne2915084:0

Texas Tech, Team S13-G3, Bennett Spring 2017 crwdns2935289:0Texas Tech, Team S13-G3, Bennett Spring 2017crwdne2935289:0

TTU-BENNETT-S17S13G3

crwdns2931471:05crwdne2931471:0

crwdns2935297:05crwdne2935297:0

crwdns2944067:00crwdne2944067:0

crwdns2917038:0crwdne2917038:0

crwdns2936625:0crwdne2936625:0:

crwdns2936751:024crwdne2936751:0 1

crwdns2936753:07crwdne2936753:0 7

crwdns2936753:030crwdne2936753:0 7

crwdns2942667:0crwdne2942667:0 648