crwdns2915892:0crwdne2915892:0
The replacement of the motherboard, other USB ports, HDMI port, or ethernet port. The motherboard could need to be replaced if the computer isn't booting up at all or malfunctions.
crwdns2942213:0crwdne2942213:0
-
-
Turn the device and lay it upside-down on a flat surface so the base of the computer is facing upwards.
-
-
-
Identify the two (2) sliding lock mechanisms on either side of the battery and slide them towards the center.
-
-
-
Pull the battery slightly up and out to remove.
-
-
-
Remove the rubber feet on the bottom of the device to access all the screws.
-
-
-
Unscrew the twelve 9 mm JIS #0 screws on the back of the device.
-
Gently remove the optical drive (CD reader) to more easily separate the base.
-
-
-
Unclip the keyboard surface from the base using an iFixit opening tool around the entire border.
-
-
-
Separate the base of the computer from the component assembly.
-
-
-
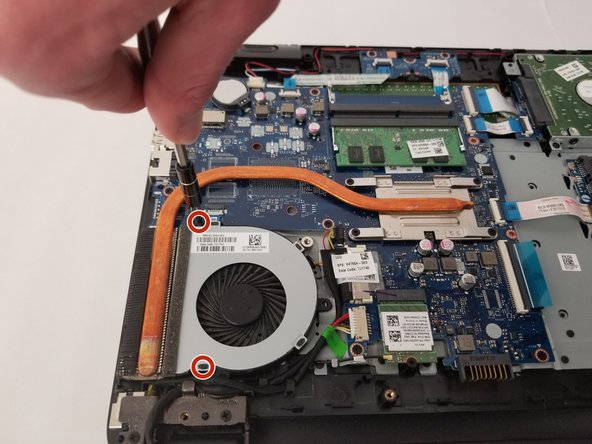
Remove the two 6.5 mm JIS #0 screws holding the cooling fan to the base.
-
-
-
-
Unplug the fan cable from the motherboard.
-
-
-
Remove the three 3 mm JIS #0 screws from the hard drive.
-
-
-
Unplug the hard drive from the motherboard.
-
-
-
Unplug display from the motherboard.
-
-
-
Unplug the power port from the motherboard.
-
-
-
Unplug the display wire from the wireless adapter.
-
-
-
Remove the single screw from the wireless card and gently remove the drive.
-
-
-
Unplug the keyboard from the motherboard.
-
-
-
Unplug the optical drive connection from the motherboard.
-
-
-
Remove the memory chip from the motherboard by pushing the clips away from the chip.
-
-
-
Unplug both (2) wires for the touch-pad from the motherboard.
-
-
-
Unplug the speakers from the motherboard.
-
-
-
Unplug the power button from the motherboard.
-
-
-
Unscrew the four 3mm JIS #0 screws that secure the motherboard.
-


To reassemble your device, follow these instructions in reverse order.

crwdns2935287:0crwdne2935287:0

Oregon Institute of Technology, Team S1-G5, Lancaster Winter 2019 crwdns2935289:0Oregon Institute of Technology, Team S1-G5, Lancaster Winter 2019crwdne2935289:0
OIT-LANCASTER-W19S1G5
crwdns2931471:04crwdne2931471:0
crwdns2935297:08crwdne2935297:0