crwdns2933423:0crwdne2933423:0

HP 15-ay014dx Heat sink Replacement

crwdns2942213:0crwdne2942213:0

  1. HP 15-ay014dx Heat sink Replacement, Battery: crwdns2935265:01crwdnd2935265:01crwdnd2935265:01crwdne2935265:0
    • Disconnect device from power source and power down.

  2. HP 15-ay014dx Heat sink Replacement: crwdns2935265:02crwdnd2935265:01crwdnd2935265:01crwdne2935265:0
    • With the device turned upside down, use your index fingers to push the battery latches in towards each other.

  3. HP 15-ay014dx Heat sink Replacement: crwdns2935265:03crwdnd2935265:01crwdnd2935265:01crwdne2935265:0
    • The latch on your left will stay at the inward position, while the latch on the right will slide back out.

    • Gently grasp the battery and pull it back away from the device and yourself.

  4. HP 15-ay014dx Heat sink Replacement, Optical Drive: crwdns2935265:04crwdnd2935265:01crwdnd2935265:01crwdne2935265:0
    • Close the laptop and lay it down with the bottom facing up.

    • Using a size #00 Phillips screw drive remove the screw holding in the optical drive.

  5. HP 15-ay014dx Heat sink Replacement: crwdns2935265:05crwdnd2935265:01crwdnd2935265:01crwdne2935265:0
    • Grip the optical drive and gently pull it out.

  6. HP 15-ay014dx Heat sink Replacement, Wireless Card: crwdns2935265:06crwdnd2935265:01crwdnd2935265:01crwdne2935265:0
    • Remove the 11 screws holding the body of the laptop together with a size #00 Phillips screwdriver.

  7. HP 15-ay014dx Heat sink Replacement: crwdns2935265:07crwdnd2935265:01crwdnd2935265:02crwdne2935265:0 HP 15-ay014dx Heat sink Replacement: crwdns2935265:07crwdnd2935265:02crwdnd2935265:02crwdne2935265:0
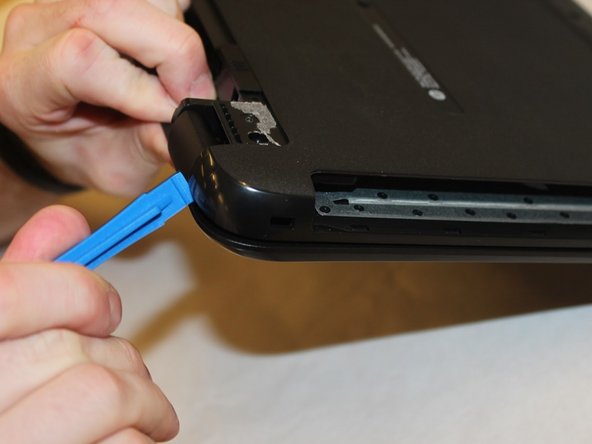
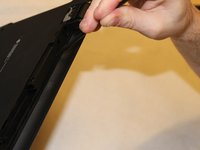
    • Using the spudger, push in the tabs in the back that hold the body together. Carefully pry the body apart by working the spudger around the body.

  8. HP 15-ay014dx Heat sink Replacement: crwdns2935265:08crwdnd2935265:01crwdnd2935265:02crwdne2935265:0 HP 15-ay014dx Heat sink Replacement: crwdns2935265:08crwdnd2935265:02crwdnd2935265:02crwdne2935265:0
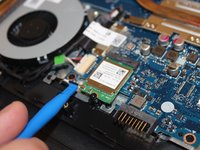
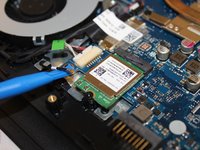
    • Using the spudger, carefully pry the wire connecting the wireless card to the motherboard off of it.

  9. HP 15-ay014dx Heat sink Replacement: crwdns2935265:09crwdnd2935265:01crwdnd2935265:01crwdne2935265:0
    • Using the size #00 Phillips screwdriver remove the single screw holding it in place.

  10. HP 15-ay014dx Heat sink Replacement: crwdns2935265:010crwdnd2935265:01crwdnd2935265:01crwdne2935265:0
    • carefully pull the card of its slot.

  11. HP 15-ay014dx Heat sink Replacement, Heat sink: crwdns2935265:011crwdnd2935265:01crwdnd2935265:01crwdne2935265:0
    • Remove the four screws holding the heatsink on.

  12. HP 15-ay014dx Heat sink Replacement: crwdns2935265:012crwdnd2935265:01crwdnd2935265:01crwdne2935265:0
    • Carefully pry the heat sink up and out of position to un-stick it from the thermal paste.

    • When reassembling, follow these steps on How to Apply Thermal Paste underneath the heatsink.

crwdns2915888:0crwdne2915888:0

To reassemble your device, follow these instructions in reverse order.

Drake Scoville

crwdns2935283:009/21/17crwdne2935283:0

533 crwdns2915208:0crwdne2915208:0

crwdns2935297:04crwdne2935297:0

crwdns2915084:0crwdne2915084:0

Washington State, Team S1-G4, Phelps-Hillen Fall 2017 crwdns2935289:0Washington State, Team S1-G4, Phelps-Hillen Fall 2017crwdne2935289:0

WSU-PHELPS-HILLEN-F17S1G4

crwdns2931471:06crwdne2931471:0

crwdns2935297:07crwdne2935297:0

crwdns2944067:00crwdne2944067:0

crwdns2917038:0crwdne2917038:0

crwdns2936625:0crwdne2936625:0:

crwdns2936751:024crwdne2936751:0 2

crwdns2936753:07crwdne2936753:0 4

crwdns2936753:030crwdne2936753:0 4

crwdns2942667:0crwdne2942667:0 406