crwdns2933423:0crwdne2933423:0

HP 15-R011DX RAM (Random Access Memory) Replacement

crwdns2942213:0crwdne2942213:0

  1. HP 15-R011DX RAM (Random Access Memory) Replacement, Battery: crwdns2935265:01crwdnd2935265:01crwdnd2935265:02crwdne2935265:0 HP 15-R011DX RAM (Random Access Memory) Replacement, Battery: crwdns2935265:01crwdnd2935265:02crwdnd2935265:02crwdne2935265:0
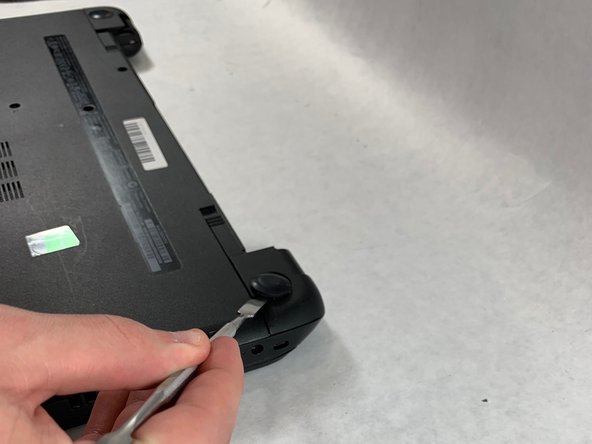
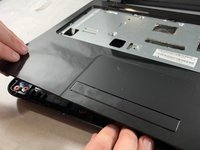
    • Slide the lock mechanism on the left side of the laptop to the right.

  2. HP 15-R011DX RAM (Random Access Memory) Replacement: crwdns2935265:02crwdnd2935265:01crwdnd2935265:01crwdne2935265:0
    • While holding the right slide mechanism, remove the battery from the laptop.

    • The battery is not pictured here because it is missing from this particular device.

  3. HP 15-R011DX RAM (Random Access Memory) Replacement, How to Access the Internal Components of an HP 15-R011DX: crwdns2935265:03crwdnd2935265:01crwdnd2935265:02crwdne2935265:0 HP 15-R011DX RAM (Random Access Memory) Replacement, How to Access the Internal Components of an HP 15-R011DX: crwdns2935265:03crwdnd2935265:02crwdnd2935265:02crwdne2935265:0
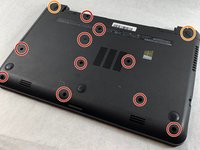
    • Flip the laptop over to reveal screw locations.

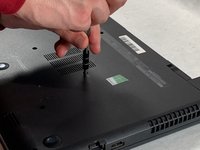
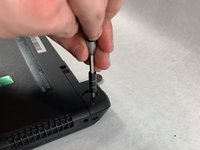
    • Use a metal spudger to remove the two rear rubber feet. There are screws hidden underneath them.

  4. HP 15-R011DX RAM (Random Access Memory) Replacement: crwdns2935265:04crwdnd2935265:01crwdnd2935265:02crwdne2935265:0 HP 15-R011DX RAM (Random Access Memory) Replacement: crwdns2935265:04crwdnd2935265:02crwdnd2935265:02crwdne2935265:0
    • Remove the twelve 5mm Phillips #1 screws on the back of the laptop.

  5. HP 15-R011DX RAM (Random Access Memory) Replacement: crwdns2935265:05crwdnd2935265:01crwdnd2935265:02crwdne2935265:0 HP 15-R011DX RAM (Random Access Memory) Replacement: crwdns2935265:05crwdnd2935265:02crwdnd2935265:02crwdne2935265:0
    • Remove the DVD drive from the laptop.

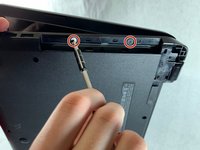
    • Remove the two 3 mm Phillips #1 screws underneath the DVD drive.

  6. HP 15-R011DX RAM (Random Access Memory) Replacement: crwdns2935265:06crwdnd2935265:01crwdnd2935265:03crwdne2935265:0 HP 15-R011DX RAM (Random Access Memory) Replacement: crwdns2935265:06crwdnd2935265:02crwdnd2935265:03crwdne2935265:0 HP 15-R011DX RAM (Random Access Memory) Replacement: crwdns2935265:06crwdnd2935265:03crwdnd2935265:03crwdne2935265:0
    • Flip the laptop and open.

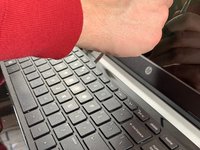
    • Detach the keyboard by prying it free from the laptop using a spudger.

    • Do not completely remove the keyboard yet. It is still attached by a ribbon cable.

    • Disconnect the keyboard ribbon cable.

  7. HP 15-R011DX RAM (Random Access Memory) Replacement: crwdns2935265:07crwdnd2935265:01crwdnd2935265:02crwdne2935265:0 HP 15-R011DX RAM (Random Access Memory) Replacement: crwdns2935265:07crwdnd2935265:02crwdnd2935265:02crwdne2935265:0
    • Disconnect the two narrow ribbon cables to the left of the keyboard connection.

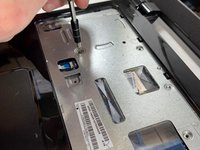
    • Remove five 4 mm Phillips #1 screws from the metal tray for the keyboard.

    • Pry open the plastic casing using a spudger.

    • If struggling to remove the plastic case, check that all screws have been removed.

  8. HP 15-R011DX RAM (Random Access Memory) Replacement, Hard Drive: crwdns2935265:08crwdnd2935265:01crwdnd2935265:01crwdne2935265:0
    • Remove two 5 mm Phillips #1 screws located at the base of the hard drive.

  9. HP 15-R011DX RAM (Random Access Memory) Replacement: crwdns2935265:09crwdnd2935265:01crwdnd2935265:02crwdne2935265:0 HP 15-R011DX RAM (Random Access Memory) Replacement: crwdns2935265:09crwdnd2935265:02crwdnd2935265:02crwdne2935265:0
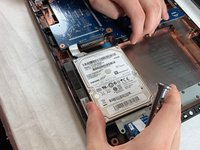
    • Pull the hard drive upwards and away from the laptop.

    • The hard drive should disconnect from its port on the motherboard as shown in the second image.

  10. HP 15-R011DX RAM (Random Access Memory) Replacement: crwdns2935265:010crwdnd2935265:01crwdnd2935265:01crwdne2935265:0
    • Flip the hard drive over.

    • Remove the two 4 mm Phillips #1 screws from the base of the hard drive.

    • Remove the mounting brace (silver bracket) from the hard drive.

  11. HP 15-R011DX RAM (Random Access Memory) Replacement, Motherboard: crwdns2935265:011crwdnd2935265:01crwdnd2935265:02crwdne2935265:0 HP 15-R011DX RAM (Random Access Memory) Replacement, Motherboard: crwdns2935265:011crwdnd2935265:02crwdnd2935265:02crwdne2935265:0
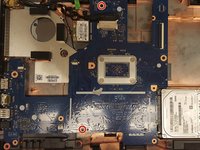
    • Remove the remaining two 5 mm Philips #1 screws from the motherboard.

  12. HP 15-R011DX RAM (Random Access Memory) Replacement: crwdns2935265:012crwdnd2935265:01crwdnd2935265:01crwdne2935265:0
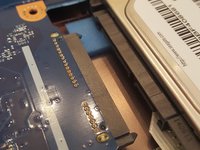
    • Remove the tape from the display connector attached to the motherboard.

    • Disconnect the display connector from the motherboard.

  13. HP 15-R011DX RAM (Random Access Memory) Replacement: crwdns2935265:013crwdnd2935265:01crwdnd2935265:01crwdne2935265:0
    • Remove one 4 mm Phillips #1 screw from the wireless chip.

    • Remove the wireless chip from the motherboard.

  14. HP 15-R011DX RAM (Random Access Memory) Replacement: crwdns2935265:014crwdnd2935265:01crwdnd2935265:01crwdne2935265:0
    • Remove two 5 mm Phillips #1 screws from the USB component connected to the motherboard.

    • Lift the USB component until the band connecting it to the motherboard lifts off of the laptop.

  15. HP 15-R011DX RAM (Random Access Memory) Replacement: crwdns2935265:015crwdnd2935265:01crwdnd2935265:01crwdne2935265:0
    • Slowly lift the motherboard out of the computer.

    • Be sure that the I/O ports on the left side of the motherboard are not stuck on the laptop frame.

    • Disconnect the power connector from the motherboard as shown in the image.

  16. HP 15-R011DX RAM (Random Access Memory) Replacement, RAM (Random Access Memory): crwdns2935265:016crwdnd2935265:01crwdnd2935265:01crwdne2935265:0
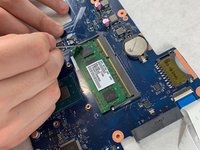
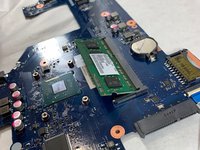
    • Locate the RAM drive on the underside of the motherboard.

  17. HP 15-R011DX RAM (Random Access Memory) Replacement: crwdns2935265:017crwdnd2935265:01crwdnd2935265:02crwdne2935265:0 HP 15-R011DX RAM (Random Access Memory) Replacement: crwdns2935265:017crwdnd2935265:02crwdnd2935265:02crwdne2935265:0
    • Push the locking tabs outward to release the RAM chip from the motherboard.

  18. HP 15-R011DX RAM (Random Access Memory) Replacement: crwdns2935265:018crwdnd2935265:01crwdnd2935265:01crwdne2935265:0
    • Remove the RAM chip by pulling the drive from the connectors.

crwdns2915888:0crwdne2915888:0

To reassemble your device, follow these instructions in reverse order.

crwdns2935229:02crwdne2935229:0

Joshua Brockman

crwdns2935283:003/25/19crwdne2935283:0

347 crwdns2915208:0crwdne2915208:0

crwdns2935297:02crwdne2935297:0

crwdns2915084:0crwdne2915084:0

UMass Dartmouth, Team S2-G4, Bailey Spring 2019 crwdns2935289:0UMass Dartmouth, Team S2-G4, Bailey Spring 2019crwdne2935289:0

UMASSD-BAILEY-S19S2G4

crwdns2931471:03crwdne2931471:0

crwdns2935297:06crwdne2935297:0

crwdns2944067:00crwdne2944067:0

crwdns2917038:0crwdne2917038:0

crwdns2936625:0crwdne2936625:0:

crwdns2936751:024crwdne2936751:0 4

crwdns2936753:07crwdne2936753:0 6

crwdns2936753:030crwdne2936753:0 19

crwdns2942667:0crwdne2942667:0 853