crwdns2933423:0crwdne2933423:0

HP 14-dq0052dx Motherboard Replacement

crwdns2942213:0crwdne2942213:0

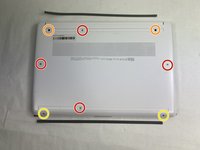
  1. HP 14-dq0052dx Motherboard Replacement, Back Panel: crwdns2935265:01crwdnd2935265:01crwdnd2935265:01crwdne2935265:0
    • Orient your laptop so that the vents are facing upwards.

  2. HP 14-dq0052dx Motherboard Replacement: crwdns2935265:02crwdnd2935265:01crwdnd2935265:01crwdne2935265:0
    • Remove the rubber feet.

  3. HP 14-dq0052dx Motherboard Replacement: crwdns2935265:03crwdnd2935265:01crwdnd2935265:02crwdne2935265:0 HP 14-dq0052dx Motherboard Replacement: crwdns2935265:03crwdnd2935265:02crwdnd2935265:02crwdne2935265:0
    • Remove the four M2.0 x 6 mm screws using a JIS #1 screwdriver.

    • Remove the two M2.5 x 6 mm screws using a JIS #1 screwdriver.

    • Remove the two M2.0 x 4 mm screws using a JIS #1 screwdriver.

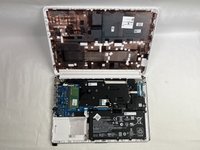
    • Use an iFixit opening tool to pry the back cover away from the laptop.

  4. HP 14-dq0052dx Motherboard Replacement, Battery: crwdns2935265:04crwdnd2935265:01crwdnd2935265:01crwdne2935265:0
    • Unplug the battery from the motherboard.

    • Carefully pull back and raise the battery out of its slot.

    • Replace the battery.

  5. HP 14-dq0052dx Motherboard Replacement, Motherboard: crwdns2935265:05crwdnd2935265:01crwdnd2935265:01crwdne2935265:0
    • Remove the five 4 mm screws from the heatsink.

  6. HP 14-dq0052dx Motherboard Replacement: crwdns2935265:06crwdnd2935265:01crwdnd2935265:01crwdne2935265:0
    • Remove the heatsink from the laptop.

  7. HP 14-dq0052dx Motherboard Replacement: crwdns2935265:07crwdnd2935265:01crwdnd2935265:01crwdne2935265:0
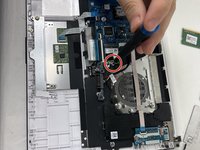
    • Remove the 4 mm screw from the bracket holding down the motherboard.

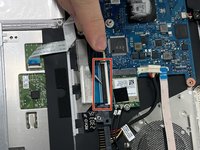
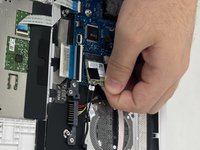
  8. HP 14-dq0052dx Motherboard Replacement: crwdns2935265:08crwdnd2935265:01crwdnd2935265:02crwdne2935265:0 HP 14-dq0052dx Motherboard Replacement: crwdns2935265:08crwdnd2935265:02crwdnd2935265:02crwdne2935265:0
    • Lift up the retaining clip to access the ribbon cable attached to the motherboard.

    • Be careful when removing the ribbon cable as it is prone to ripping which will damage it.

    • Remove the ribbon cable from the motherboard

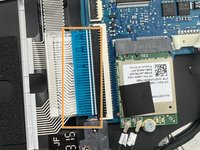
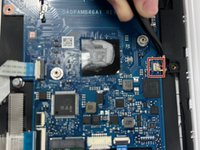
  9. HP 14-dq0052dx Motherboard Replacement: crwdns2935265:09crwdnd2935265:01crwdnd2935265:01crwdne2935265:0
    • Lift up this tab and remove the ribbon cable from the motherboard.

    • Be gentle with the ribbon cable as it can easily tear.

  10. HP 14-dq0052dx Motherboard Replacement: crwdns2935265:010crwdnd2935265:01crwdnd2935265:02crwdne2935265:0 HP 14-dq0052dx Motherboard Replacement: crwdns2935265:010crwdnd2935265:02crwdnd2935265:02crwdne2935265:0
    • Remove the 4 mm screw from the Wi-Fi card.

    • Remove the Wi-Fi card from the motherboard.

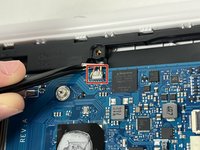
  11. HP 14-dq0052dx Motherboard Replacement: crwdns2935265:011crwdnd2935265:01crwdnd2935265:02crwdne2935265:0 HP 14-dq0052dx Motherboard Replacement: crwdns2935265:011crwdnd2935265:02crwdnd2935265:02crwdne2935265:0
    • Disconnect the small wires from the top of the motherboard.

    • Be extremely careful with these wires as bending them can cause the fragile inner wire to break.

  12. HP 14-dq0052dx Motherboard Replacement: crwdns2935265:012crwdnd2935265:01crwdnd2935265:01crwdne2935265:0
    • Carefully remove the motherboard.

crwdns2915888:0crwdne2915888:0

To reassemble your device, follow these instructions in reverse order.

DamianR

crwdns2935283:010/18/24crwdne2935283:0

279 crwdns2915208:0crwdne2915208:0

crwdns2935297:02crwdne2935297:0

crwdns2915084:0crwdne2915084:0

UMass Dartmouth, Team 2-5, Konn Fall 2024 crwdns2935289:0UMass Dartmouth, Team 2-5, Konn Fall 2024crwdne2935289:0

UMASSD-KONN-F24S2G5

crwdns2931471:04crwdne2931471:0

crwdns2935297:05crwdne2935297:0

crwdns2947412:00crwdne2947412:0

crwdns2917038:0crwdne2917038:0

crwdns2936625:0crwdne2936625:0:

crwdns2936751:024crwdne2936751:0 2

crwdns2936753:07crwdne2936753:0 13

crwdns2936753:030crwdne2936753:0 57

crwdns2942667:0crwdne2942667:0 191