crwdns2933423:0crwdne2933423:0

HKC P774A Battery Replacement

crwdns2942213:0crwdne2942213:0

  1. HKC P774A Battery Replacement, Digitizer: crwdns2935265:01crwdnd2935265:01crwdnd2935265:03crwdne2935265:0 HKC P774A Battery Replacement, Digitizer: crwdns2935265:01crwdnd2935265:02crwdnd2935265:03crwdne2935265:0 HKC P774A Battery Replacement, Digitizer: crwdns2935265:01crwdnd2935265:03crwdnd2935265:03crwdne2935265:0
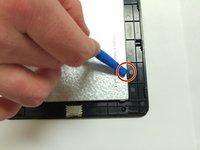
    • Insert the flat end of the spudger into the side of the device

    • This will create a gap between the device and screen housing.

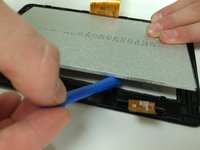
    • Insert the plastic opening tool into this gap and move it along this gap.

    • Make sure not to bent the digitizer during this step.

    • The screen housing and device will now be separated.

  2. HKC P774A Battery Replacement: crwdns2935265:02crwdnd2935265:01crwdnd2935265:03crwdne2935265:0 HKC P774A Battery Replacement: crwdns2935265:02crwdnd2935265:02crwdnd2935265:03crwdne2935265:0 HKC P774A Battery Replacement: crwdns2935265:02crwdnd2935265:03crwdnd2935265:03crwdne2935265:0
    crwdns2935267:0crwdne2935267:0
    Tweezers
    $4.99
    crwdns2942207:0crwdne2942207:0
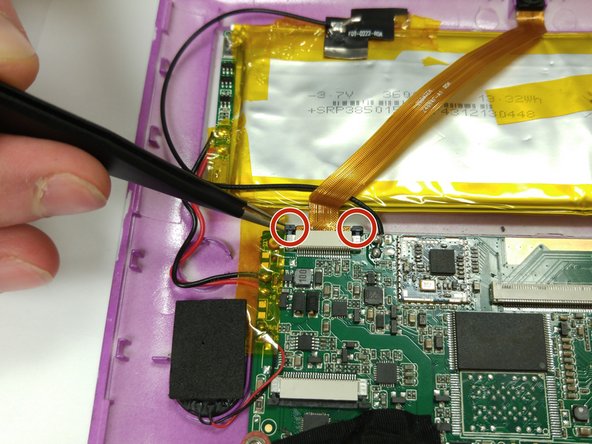
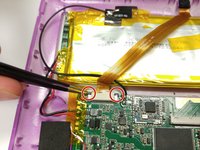
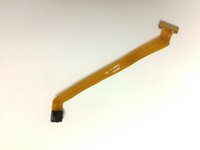
    • Once the digitizer has been been removed from the body, disconnect the digitizer band from the motherboard.

    • Two small black pins (circled in red) will need to be unlocked.

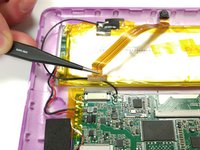
    • Unlock the pins by pulling them outward with the tweezers.

    • Make sure the pins are released entirely before attempting to remove the band.

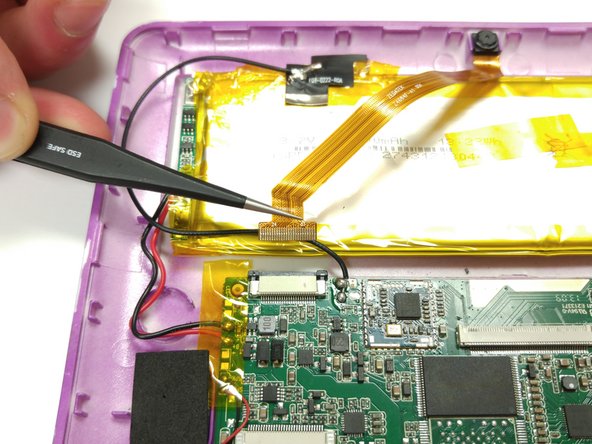
    • Remove the band using the tweezers.

  3. HKC P774A Battery Replacement: crwdns2935265:03crwdnd2935265:01crwdnd2935265:03crwdne2935265:0 HKC P774A Battery Replacement: crwdns2935265:03crwdnd2935265:02crwdnd2935265:03crwdne2935265:0 HKC P774A Battery Replacement: crwdns2935265:03crwdnd2935265:03crwdnd2935265:03crwdne2935265:0
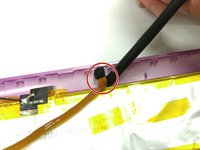
    • Once the digitizer has been disconnected from the motherboard, the LCD screen must be removed from the digitizer.

    • Push open the tabs (circled in red) using the flat end of the plastic spudger.

    • Be sure not to bend the digitizer while prying.

    • Continue to release all tabs while continuing to pry the LCD away from the digitizer.

  4. HKC P774A Battery Replacement, Camera: crwdns2935265:04crwdnd2935265:01crwdnd2935265:03crwdne2935265:0 HKC P774A Battery Replacement, Camera: crwdns2935265:04crwdnd2935265:02crwdnd2935265:03crwdne2935265:0 HKC P774A Battery Replacement, Camera: crwdns2935265:04crwdnd2935265:03crwdnd2935265:03crwdne2935265:0
    crwdns2935267:0crwdne2935267:0
    Tweezers
    $4.99
    crwdns2942207:0crwdne2942207:0
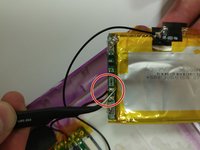
    • Use the tweezers to pull out the black pins (circled in red).

    • Use the tweezers to remove the camera band from the motherboard.

    • Handle the band with care.

  5. HKC P774A Battery Replacement: crwdns2935265:05crwdnd2935265:01crwdnd2935265:03crwdne2935265:0 HKC P774A Battery Replacement: crwdns2935265:05crwdnd2935265:02crwdnd2935265:03crwdne2935265:0 HKC P774A Battery Replacement: crwdns2935265:05crwdnd2935265:03crwdnd2935265:03crwdne2935265:0
    • Use the flat end of the plastic spudger to pry the camera lens from the case.

    • Use the tweezers to remove the camera and band.

  6. HKC P774A Battery Replacement, Battery: crwdns2935265:06crwdnd2935265:01crwdnd2935265:03crwdne2935265:0 HKC P774A Battery Replacement, Battery: crwdns2935265:06crwdnd2935265:02crwdnd2935265:03crwdne2935265:0 HKC P774A Battery Replacement, Battery: crwdns2935265:06crwdnd2935265:03crwdnd2935265:03crwdne2935265:0
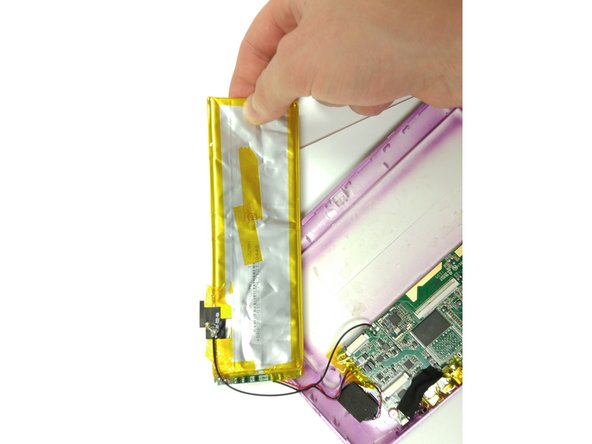
    • Use the plastic opening tool to begin prying the battery away from the case.
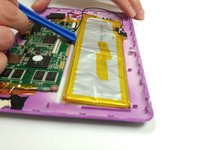
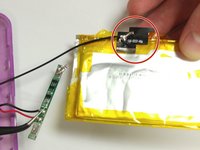
    • Be gentle as the battery is fragile.

    • Do not bend the battery. Work slowly.

  7. HKC P774A Battery Replacement: crwdns2935265:07crwdnd2935265:01crwdnd2935265:03crwdne2935265:0 HKC P774A Battery Replacement: crwdns2935265:07crwdnd2935265:02crwdnd2935265:03crwdne2935265:0 HKC P774A Battery Replacement: crwdns2935265:07crwdnd2935265:03crwdnd2935265:03crwdne2935265:0
    crwdns2935267:0crwdne2935267:0
    Tweezers
    $4.99
    crwdns2942207:0crwdne2942207:0
    • Us the tweezers to remove the circuit board from the side of the battery.

    • Be extremely gentle when removing the circuit from the battery.

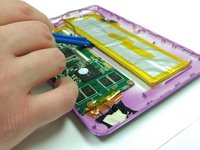
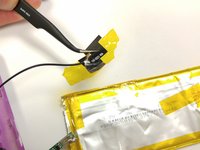
    • Remove the wire by peeling off the tape.

crwdns2915888:0crwdne2915888:0

To reassemble your device, follow these instructions in reverse order.

crwdns2935227:0crwdne2935227:0

Sean McCauley

crwdns2935283:010/26/15crwdne2935283:0

512 crwdns2915208:0crwdne2915208:0

crwdns2935297:04crwdne2935297:0

crwdns2915084:0crwdne2915084:0

Montana Tech, Team 10-1, Shirk Fall 2015 crwdns2935289:0Montana Tech, Team 10-1, Shirk Fall 2015crwdne2935289:0

MTUM-SHIRK-F15S10G1

crwdns2931471:04crwdne2931471:0

crwdns2935297:08crwdne2935297:0

crwdns2944067:00crwdne2944067:0

crwdns2917038:0crwdne2917038:0

crwdns2936625:0crwdne2936625:0:

crwdns2936751:024crwdne2936751:0 1

crwdns2936753:07crwdne2936753:0 5

crwdns2936753:030crwdne2936753:0 8

crwdns2942667:0crwdne2942667:0 339