crwdns2933423:0crwdne2933423:0
crwdns2947577:0crwdnd2947577:0crwdne2947577:0

GravityLight Motor Replacement

crwdns2942213:0crwdne2942213:0

  1. GravityLight Motor Replacement, Removing the Front Panel: crwdns2935265:01crwdnd2935265:01crwdnd2935265:02crwdne2935265:0 GravityLight Motor Replacement, Removing the Front Panel: crwdns2935265:01crwdnd2935265:02crwdnd2935265:02crwdne2935265:0
    • Flip the GravityLight on its back and place it on a sturdy surface.

    • Unscrew the three 2cm Phillips #00 screws on the back of the GravityLight’s body.

    crwdns2952109:0crwdne2952109:0

    crwdns2917038:0crwdne2917038:0

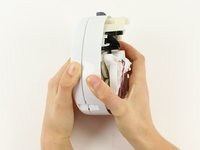
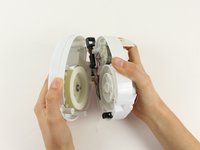
  2. GravityLight Motor Replacement, Opening the Device Housing: crwdns2935265:02crwdnd2935265:01crwdnd2935265:01crwdne2935265:0
    • Some of the internal pieces may loosen or fall out during disassembly.

    • Firmly grasp both parts of the GravityLight body and pull them apart.

    crwdns2952109:0crwdne2952109:0

    crwdns2917038:0crwdne2917038:0

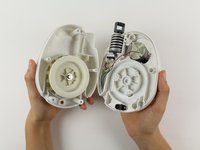
  3. GravityLight Motor Replacement, Isolating the Back Panel: crwdns2935265:03crwdnd2935265:01crwdnd2935265:01crwdne2935265:0
    • Take the thicker of the two parts, the back piece, and place it face down on a sturdy surface.

    crwdns2952109:0crwdne2952109:0

    crwdns2917038:0crwdne2917038:0

  4. GravityLight Motor Replacement, Removing the Back Panel Screws: crwdns2935265:04crwdnd2935265:01crwdnd2935265:01crwdne2935265:0
    • Place the back panel, the larger of the two pieces, on a sturdy surface with its back down.

    • Unscrew the two 2cm Phillips 00 screws on the inside of the back panel.

    crwdns2952109:0crwdne2952109:0

    crwdns2917038:0crwdne2917038:0

  5. GravityLight Motor Replacement, Removing the LED Housing: crwdns2935265:05crwdnd2935265:01crwdnd2935265:01crwdne2935265:0
    • Watch out for the wires! Keep them attached for this entire guide, or the GravityLight will not work!

    • Gently lift off the LED housing (the white disk).

    • Set the LED housing on the table next to the body of the device.

    crwdns2952109:0crwdne2952109:0

    crwdns2917038:0crwdne2917038:0

  6. GravityLight Motor Replacement, Removing White Frame and Gear: crwdns2935265:06crwdnd2935265:01crwdnd2935265:01crwdne2935265:0
    • Lift off the white piece with four arms.

    • Lift off the black-rimmed gear.

    • Set both pieces aside in a safe place.

    crwdns2952109:0crwdne2952109:0

    crwdns2917038:0crwdne2917038:0

  7. GravityLight Motor Replacement, Removing the Motor Screws: crwdns2935265:07crwdnd2935265:01crwdnd2935265:01crwdne2935265:0
    • Remove the two 2cm Phillips 00 screws from the motor housing.

    • The spring pushing the motor housing may pop out once the motor has been removed.

    crwdns2952109:0crwdne2952109:0

    crwdns2917038:0crwdne2917038:0

  8. GravityLight Motor Replacement, Separating the Back Panel Housing: crwdns2935265:08crwdnd2935265:01crwdnd2935265:03crwdne2935265:0 GravityLight Motor Replacement, Separating the Back Panel Housing: crwdns2935265:08crwdnd2935265:02crwdnd2935265:03crwdne2935265:0 GravityLight Motor Replacement, Separating the Back Panel Housing: crwdns2935265:08crwdnd2935265:03crwdnd2935265:03crwdne2935265:0
    • Some of the internal pieces may loosen or fall out during disassembly.

    • Firmly grasp both parts of the back panel and pull them apart.

    crwdns2952109:0crwdne2952109:0

    crwdns2917038:0crwdne2917038:0

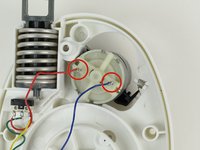
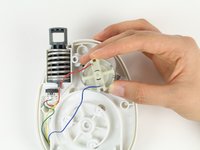
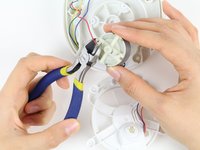
  9. GravityLight Motor Replacement, Removing the Motor: crwdns2935265:09crwdnd2935265:01crwdnd2935265:03crwdne2935265:0 GravityLight Motor Replacement, Removing the Motor: crwdns2935265:09crwdnd2935265:02crwdnd2935265:03crwdne2935265:0 GravityLight Motor Replacement, Removing the Motor: crwdns2935265:09crwdnd2935265:03crwdnd2935265:03crwdne2935265:0
    • Place the middle section flat with the side that holds the gear system down and locate the back of the motor.

    • Clip the wires close to the soldered joints.

    • Lift the motor out of the middle section. Using the flush wire cutters, clip the red and the blue wires located on the motor's back.

    crwdns2952109:0crwdne2952109:0

    crwdns2917038:0crwdne2917038:0

  10. GravityLight Motor Replacement, Soldering the New Motor: crwdns2935265:010crwdnd2935265:01crwdnd2935265:01crwdne2935265:0
    crwdns2952109:0crwdne2952109:0

    crwdns2917038:0crwdne2917038:0

crwdns2915888:0crwdne2915888:0

To reassemble your device, follow these instructions in reverse order.

crwdns2935221:0crwdne2935221:0

crwdns2935227:0crwdne2935227:0

Anthony Jungquist

crwdns2935283:009/26/14crwdne2935283:0

125 crwdns2915208:0crwdne2915208:0

crwdns2935295:0crwdne2935295:0

crwdns2935287:0crwdne2935287:0

Cal Poly, Team 12-2, Forte Fall 2014 crwdns2935289:0Cal Poly, Team 12-2, Forte Fall 2014crwdne2935289:0

CPSU-FORTE-F14S12G2

crwdns2931471:05crwdne2931471:0

crwdns2935297:07crwdne2935297:0

crwdns2947412:00crwdne2947412:0

crwdns2917038:0crwdne2917038:0

crwdns2936625:0crwdne2936625:0:

crwdns2936751:024crwdne2936751:0 0

crwdns2936753:07crwdne2936753:0 2

crwdns2936753:030crwdne2936753:0 24

crwdns2942667:0crwdne2942667:0 2,550