crwdns2933423:0crwdne2933423:0

Graco Secure Coverage LED Nursery Unit Replacement

crwdns2942213:0crwdne2942213:0

  1. Graco Secure Coverage LED Nursery Unit Replacement, Nursery Unit Battery: crwdns2935265:01crwdnd2935265:01crwdnd2935265:03crwdne2935265:0 Graco Secure Coverage LED Nursery Unit Replacement, Nursery Unit Battery: crwdns2935265:01crwdnd2935265:02crwdnd2935265:03crwdne2935265:0 Graco Secure Coverage LED Nursery Unit Replacement, Nursery Unit Battery: crwdns2935265:01crwdnd2935265:03crwdnd2935265:03crwdne2935265:0
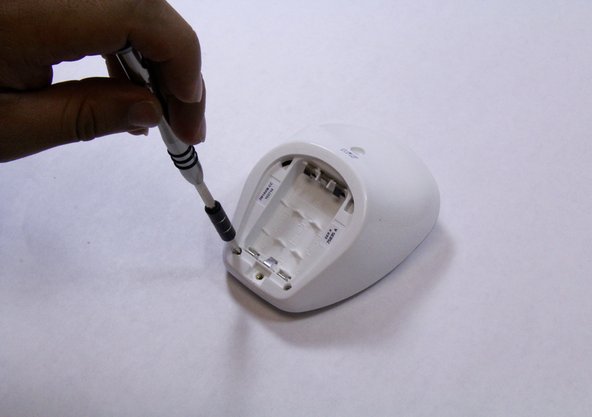
    • Remove the 9mm screw from the battery cover of the nursery unit using a Phillips #1 tip screwdriver.

  2. Graco Secure Coverage LED Nursery Unit Replacement: crwdns2935265:02crwdnd2935265:01crwdnd2935265:02crwdne2935265:0 Graco Secure Coverage LED Nursery Unit Replacement: crwdns2935265:02crwdnd2935265:02crwdnd2935265:02crwdne2935265:0
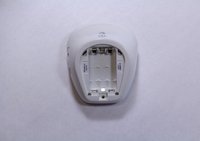
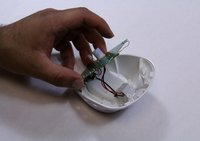
    • Using the plastic opening tool, pry and remove the battery cover carefully.

    • Remove the batteries using plastic opening tool.

    • Replace the batteries.

  3. Graco Secure Coverage LED Nursery Unit Replacement, LED Nursery Unit: crwdns2935265:03crwdnd2935265:01crwdnd2935265:02crwdne2935265:0 Graco Secure Coverage LED Nursery Unit Replacement, LED Nursery Unit: crwdns2935265:03crwdnd2935265:02crwdnd2935265:02crwdne2935265:0
    • Remove the two 9mm Phillips #1 screws from the rare case of the device.

    • Place the screws in a secure place.

  4. Graco Secure Coverage LED Nursery Unit Replacement: crwdns2935265:04crwdnd2935265:01crwdnd2935265:01crwdne2935265:0
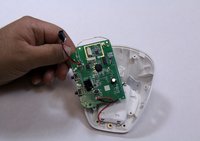
    • Hold the bottom of the device with one hand and pull down to separate the front and rare cases.

    • While holding the device with one hand, use plastic opening tool to pry the edges of the front case away from the back case.

    • Apply constant force carefully to avoid breaking any other plastic parts from the device.

  5. Graco Secure Coverage LED Nursery Unit Replacement: crwdns2935265:05crwdnd2935265:01crwdnd2935265:02crwdne2935265:0 Graco Secure Coverage LED Nursery Unit Replacement: crwdns2935265:05crwdnd2935265:02crwdnd2935265:02crwdne2935265:0
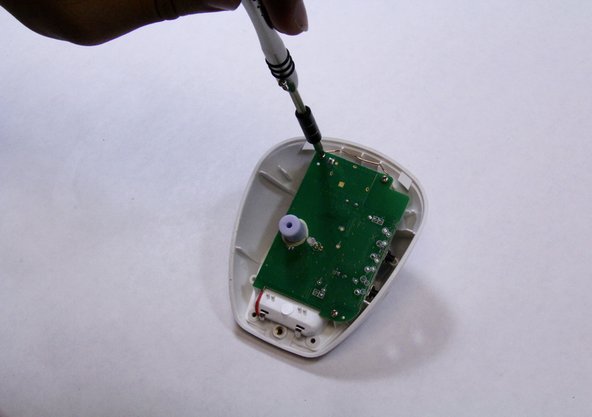
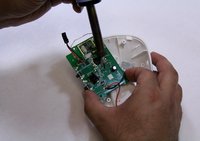
    • Remove all three 7mm Phillips #1 screws from the mother board.

    • Place the screws in secure place.

  6. Graco Secure Coverage LED Nursery Unit Replacement: crwdns2935265:06crwdnd2935265:01crwdnd2935265:03crwdne2935265:0 Graco Secure Coverage LED Nursery Unit Replacement: crwdns2935265:06crwdnd2935265:02crwdnd2935265:03crwdne2935265:0 Graco Secure Coverage LED Nursery Unit Replacement: crwdns2935265:06crwdnd2935265:03crwdnd2935265:03crwdne2935265:0
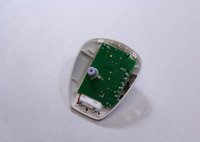
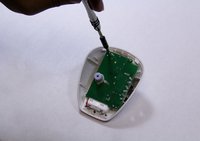
    • Flip over the motherboard to look at the LED pins that are connected to it.

    • Solder off the LED pin from the motherboard.

    • There are many pins are connect to the motherboard, so make sure that you solder off the LED pin.

    • Replace the LED.

crwdns2915888:0crwdne2915888:0

To reassemble your device, follow these instructions in reverse order.

Bryson Wolff

crwdns2935283:008/31/15crwdne2935283:0

237 crwdns2915208:0crwdne2915208:0

crwdns2935297:02crwdne2935297:0

crwdns2915084:0crwdne2915084:0

USF Tampa, Team 6-5, Remmell Fall 2015 crwdns2935289:0USF Tampa, Team 6-5, Remmell Fall 2015crwdne2935289:0

USFT-REMMELL-F15S6G5

crwdns2931471:04crwdne2931471:0

crwdns2935297:08crwdne2935297:0

crwdns2944067:00crwdne2944067:0

crwdns2917038:0crwdne2917038:0

crwdns2936625:0crwdne2936625:0:

crwdns2936751:024crwdne2936751:0 1

crwdns2936753:07crwdne2936753:0 1

crwdns2936753:030crwdne2936753:0 8

crwdns2942667:0crwdne2942667:0 141