crwdns2933423:0crwdne2933423:0

crwdns2862623:0crwdne2862623:0
crwdns2942641:0crwdne2942641:0
  1. crwdns2935201:0crwdne2935201:0 crwdns2935203:0crwdne2935203:0

    : crwdns2935265:01crwdnd2935265:01crwdnd2935265:03crwdne2935265:0 : crwdns2935265:01crwdnd2935265:02crwdnd2935265:03crwdne2935265:0 : crwdns2935265:01crwdnd2935265:03crwdnd2935265:03crwdne2935265:0
    • Use a spudger and tweezers to remove all the old battery adhesive from the frame.

    • The adhesive can be tricky to remove. Use your spudger to roll the adhesive into bigger clumps that you can peel up slowly with tweezers.

  2. crwdns2935201:0crwdne2935201:0 crwdns2935203:0crwdne2935203:0

    : crwdns2935265:02crwdnd2935265:01crwdnd2935265:01crwdne2935265:0
    • Use high‑concentration (>90%) isopropyl alcohol and a lint‑free cloth (or coffee filters) to clean up and remove all the old adhesive residue from the frame.

    • Apply isopropyl alcohol sparingly—too much can damage the display.

  3. crwdns2935201:0crwdne2935201:0 crwdns2935203:0crwdne2935203:0

    : crwdns2935265:03crwdnd2935265:01crwdnd2935265:03crwdne2935265:0 : crwdns2935265:03crwdnd2935265:02crwdnd2935265:03crwdne2935265:0 : crwdns2935265:03crwdnd2935265:03crwdnd2935265:03crwdne2935265:0
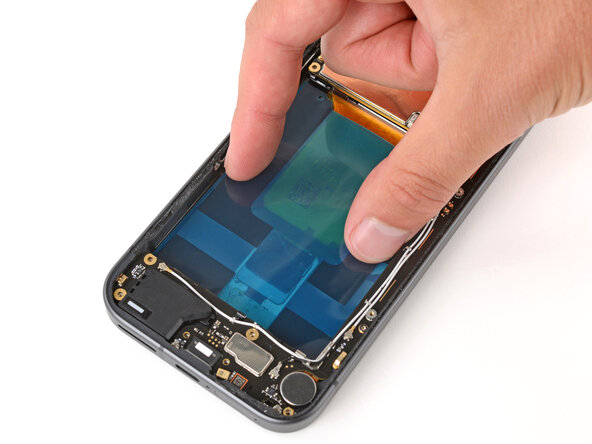
    • Remove the larger, clear liner from your replacement battery adhesive.

    • Lay the adhesive into the battery recess so the strips align with their contours on the frame.

  4. crwdns2935201:0crwdne2935201:0 crwdns2935203:0crwdne2935203:0

    : crwdns2935265:04crwdnd2935265:01crwdnd2935265:03crwdne2935265:0 : crwdns2935265:04crwdnd2935265:02crwdnd2935265:03crwdne2935265:0 : crwdns2935265:04crwdnd2935265:03crwdnd2935265:03crwdne2935265:0
    • Use your fingers or a spudger to firmly press the adhesive into place, securing it to the frame.

  5. crwdns2935201:0crwdne2935201:0 crwdns2935203:0crwdne2935203:0

    : crwdns2935265:05crwdnd2935265:01crwdnd2935265:03crwdne2935265:0 : crwdns2935265:05crwdnd2935265:02crwdnd2935265:03crwdne2935265:0 : crwdns2935265:05crwdnd2935265:03crwdnd2935265:03crwdne2935265:0
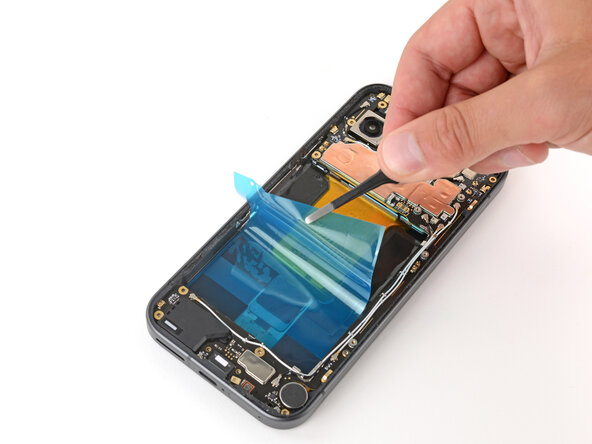
    • Peel up and remove the remaining liner.

  6. crwdns2935201:0crwdne2935201:0 crwdns2935203:0crwdne2935203:0

    : crwdns2935265:06crwdnd2935265:01crwdnd2935265:01crwdne2935265:0
    • The side button cable is delicate—be careful not to damage it.

    • Gently flip the side button cable over the frame so it doesn't get stuck between the side of the battery and the frame in the next step.

  7. crwdns2935201:0crwdne2935201:0 crwdns2935203:0crwdne2935203:0

    : crwdns2935265:07crwdnd2935265:01crwdnd2935265:03crwdne2935265:0 : crwdns2935265:07crwdnd2935265:02crwdnd2935265:03crwdne2935265:0 : crwdns2935265:07crwdnd2935265:03crwdnd2935265:03crwdne2935265:0
    • Hold the battery above its recess and use your finger to push down and reconnect the battery press connector.

    • Temporarily reconnecting the battery ensures that it's sitting properly in its recess.

    • Lay the battery into its recess and press down firmly to secure it to the adhesive.

    • Once the battery's in place, disconnect it while you continue reassembly.

  8. crwdns2935201:0crwdne2935201:0 crwdns2935203:0crwdne2935203:0

    : crwdns2935265:08crwdnd2935265:01crwdnd2935265:03crwdne2935265:0 : crwdns2935265:08crwdnd2935265:02crwdnd2935265:03crwdne2935265:0 : crwdns2935265:08crwdnd2935265:03crwdnd2935265:03crwdne2935265:0
    • Use your finger to flip the side button cable onto the battery and gently press down to secure it with its tape.

crwdns2935217:0crwdne2935217:0

Spencer Day

crwdns2935283:009/14/22crwdne2935283:0

117,372 crwdns2915208:0crwdne2915208:0

crwdns2935297:0837crwdne2935297:0

crwdns2915084:0crwdne2915084:0

iFixit crwdns2935289:0iFixitcrwdne2935289:0

Staff

crwdns2931471:0119crwdne2931471:0

crwdns2935297:021,011crwdne2935297:0

crwdns2947412:00crwdne2947412:0

crwdns2917038:0crwdne2917038:0

crwdns2936625:0crwdne2936625:0:

crwdns2936751:024crwdne2936751:0 0

crwdns2936753:07crwdne2936753:0 0

crwdns2936753:030crwdne2936753:0 5

crwdns2942667:0crwdne2942667:0 34