crwdns2933423:0crwdne2933423:0
crwdns2947577:0crwdnd2947577:0crwdne2947577:0

Gateway Solo 1200 Fan Replacement

crwdns2942213:0crwdne2942213:0

    1. Gateway Solo 1200 Fan Replacement, Battery: crwdns2935265:01crwdnd2935265:01crwdnd2935265:03crwdne2935265:0 Gateway Solo 1200 Fan Replacement, Battery: crwdns2935265:01crwdnd2935265:02crwdnd2935265:03crwdne2935265:0 Gateway Solo 1200 Fan Replacement, Battery: crwdns2935265:01crwdnd2935265:03crwdnd2935265:03crwdne2935265:0
      • Turn off your laptop and disconnect it from AC Adapter before use.

      • Locate the battery latch on the bottom of the laptop.

      • Release the latch by pressing it with your thumb and sliding it to the right.

      • Slide the battery out of its compartment.

      • Discharge your laptop by pushing the power button after removing the battery.

      crwdns2952109:0crwdne2952109:0

      crwdns2917038:0crwdne2917038:0

    1. Gateway Solo 1200 Fan Replacement, Keyboard and Frame: crwdns2935265:02crwdnd2935265:01crwdnd2935265:02crwdne2935265:0 Gateway Solo 1200 Fan Replacement, Keyboard and Frame: crwdns2935265:02crwdnd2935265:02crwdnd2935265:02crwdne2935265:0
      • Turn the device so the back is facing you.

      • Unscrew the 2 mm screws with a Phillips #0 screwdriver.

      • Unscrewing these back screws partially releases the keyboard.

      crwdns2952109:0crwdne2952109:0

      crwdns2917038:0crwdne2917038:0

    2. Gateway Solo 1200 Fan Replacement: crwdns2935265:03crwdnd2935265:01crwdnd2935265:02crwdne2935265:0 Gateway Solo 1200 Fan Replacement: crwdns2935265:03crwdnd2935265:02crwdnd2935265:02crwdne2935265:0
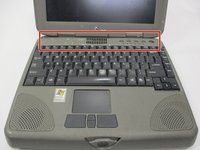
      • Open up the device so the keyboard is visible.

      • Locate the front panel with the power button above the keyboard.

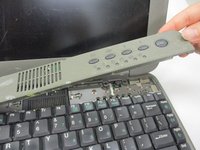
      • Remove the panel by gently pulling on it.

      • The panel should pop out with little force.

      crwdns2952109:0crwdne2952109:0

      crwdns2917038:0crwdne2917038:0

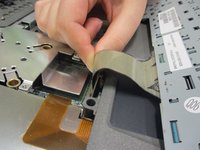
    3. Gateway Solo 1200 Fan Replacement: crwdns2935265:04crwdnd2935265:01crwdnd2935265:03crwdne2935265:0 Gateway Solo 1200 Fan Replacement: crwdns2935265:04crwdnd2935265:02crwdnd2935265:03crwdne2935265:0 Gateway Solo 1200 Fan Replacement: crwdns2935265:04crwdnd2935265:03crwdnd2935265:03crwdne2935265:0
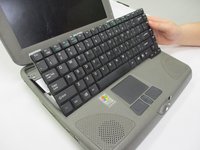
      • Gently lift the keyboard panel up.

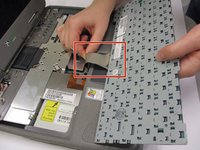
      • Flip the keyboard panel over to reveal the underside.

      • Gently tug on the ribbon cable at the bottom of the keyboard panel to release the keyboard.

      crwdns2952109:0crwdne2952109:0

      crwdns2917038:0crwdne2917038:0

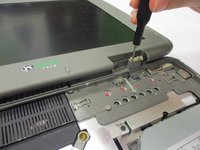
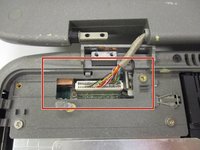
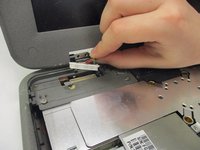
    4. Gateway Solo 1200 Fan Replacement: crwdns2935265:05crwdnd2935265:01crwdnd2935265:03crwdne2935265:0 Gateway Solo 1200 Fan Replacement: crwdns2935265:05crwdnd2935265:02crwdnd2935265:03crwdne2935265:0 Gateway Solo 1200 Fan Replacement: crwdns2935265:05crwdnd2935265:03crwdnd2935265:03crwdne2935265:0
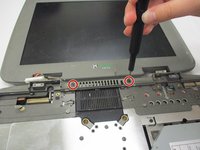
      • Remove both monitor hinge covers at the base of the screen by unscrewing the 2 mm screws with a Phillips #0 screwdriver.

      • Locate the visual output cord on the exposed left hinge connecting the monitor to the laptop.

      • Gently tug on the visual output cord to remove the screen.

      crwdns2952109:0crwdne2952109:0

      crwdns2917038:0crwdne2917038:0

    5. Gateway Solo 1200 Fan Replacement: crwdns2935265:06crwdnd2935265:01crwdnd2935265:03crwdne2935265:0 Gateway Solo 1200 Fan Replacement: crwdns2935265:06crwdnd2935265:02crwdnd2935265:03crwdne2935265:0 Gateway Solo 1200 Fan Replacement: crwdns2935265:06crwdnd2935265:03crwdnd2935265:03crwdne2935265:0
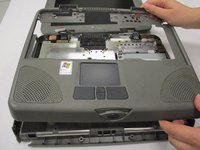
      • Once the screen is removed, locate the keyboard frame screws.

      • Unscrew the outer frame and gently pull it away from the device.

      • Gently tug on the trackpad connector underneath the keyboard frame to completely remove it.

      crwdns2952109:0crwdne2952109:0

      crwdns2917038:0crwdne2917038:0

    1. Gateway Solo 1200 Fan Replacement, Fan: crwdns2935265:07crwdnd2935265:01crwdnd2935265:03crwdne2935265:0 Gateway Solo 1200 Fan Replacement, Fan: crwdns2935265:07crwdnd2935265:02crwdnd2935265:03crwdne2935265:0 Gateway Solo 1200 Fan Replacement, Fan: crwdns2935265:07crwdnd2935265:03crwdnd2935265:03crwdne2935265:0
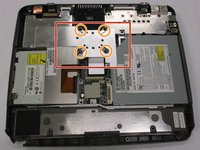
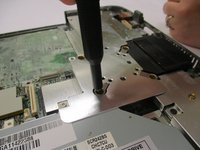
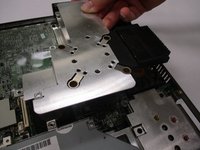
      • Locate the heatsink next to the fan.

      • Unscrew the four 2mm screws attaching the heatsink to the device.

      • Lift the heatsink upwards, careful not to disturb other internal components.

      crwdns2952109:0crwdne2952109:0

      crwdns2917038:0crwdne2917038:0

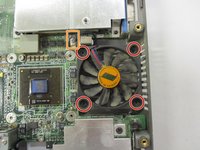
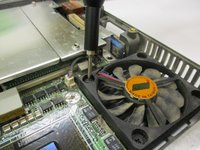
    2. Gateway Solo 1200 Fan Replacement: crwdns2935265:08crwdnd2935265:01crwdnd2935265:03crwdne2935265:0 Gateway Solo 1200 Fan Replacement: crwdns2935265:08crwdnd2935265:02crwdnd2935265:03crwdne2935265:0 Gateway Solo 1200 Fan Replacement: crwdns2935265:08crwdnd2935265:03crwdnd2935265:03crwdne2935265:0
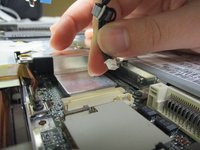
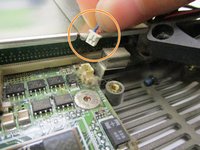
      • Unscrew the four screws attaching the fan to the device.

      • Carefully tug the fan's connector from the heat system.

      • The connector is fragile and shouldn't be yanked to avoid damages.

      crwdns2952109:0crwdne2952109:0

      crwdns2917038:0crwdne2917038:0

crwdns2915888:0crwdne2915888:0

To reassemble your device, follow these instructions in reverse order.

crwdns2935221:0crwdne2935221:0

Riki

crwdns2935283:008/26/19crwdne2935283:0

235 crwdns2915208:0crwdne2915208:0

crwdns2935297:02crwdne2935297:0

crwdns2935287:0crwdne2935287:0

University of North Texas, Team S1-G3, Friess Fall 2019 crwdns2935289:0University of North Texas, Team S1-G3, Friess Fall 2019crwdne2935289:0

UNT-FRIESS-F19S1G3

crwdns2931471:03crwdne2931471:0

crwdns2935297:0240crwdne2935297:0

crwdns2947412:00crwdne2947412:0

crwdns2917038:0crwdne2917038:0

crwdns2936625:0crwdne2936625:0:

crwdns2936751:024crwdne2936751:0 0

crwdns2936753:07crwdne2936753:0 3

crwdns2936753:030crwdne2936753:0 23

crwdns2942667:0crwdne2942667:0 542