crwdns2933423:0crwdne2933423:0
crwdns2947577:0crwdnd2947577:0crwdne2947577:0

Gateway MA6 Laptop Cooling Assembly Replacement

crwdns2942213:0crwdne2942213:0

    1. Gateway MA6 Laptop Cooling Assembly Replacement, Cooling Assembly: crwdns2935265:01crwdnd2935265:01crwdnd2935265:02crwdne2935265:0 Gateway MA6 Laptop Cooling Assembly Replacement, Cooling Assembly: crwdns2935265:01crwdnd2935265:02crwdnd2935265:02crwdne2935265:0
      • Loosen the seven 6 mm Phillips #0 screws on the back of the case.

      • Leave all the screws in the back plate and so you don't lose them.

      crwdns2952109:0crwdne2952109:0

      crwdns2917038:0crwdne2917038:0

    2. Gateway MA6 Laptop Cooling Assembly Replacement: crwdns2935265:02crwdnd2935265:01crwdnd2935265:02crwdne2935265:0 Gateway MA6 Laptop Cooling Assembly Replacement: crwdns2935265:02crwdnd2935265:02crwdnd2935265:02crwdne2935265:0
      • Pull upwards on the top of the back cover to remove it.

      crwdns2952109:0crwdne2952109:0

      crwdns2917038:0crwdne2917038:0

    3. Gateway MA6 Laptop Cooling Assembly Replacement: crwdns2935265:03crwdnd2935265:01crwdnd2935265:01crwdne2935265:0
      • Remove the four 9 mm Phillips #0 screws from the cooling assembly.

      crwdns2952109:0crwdne2952109:0

      crwdns2917038:0crwdne2917038:0

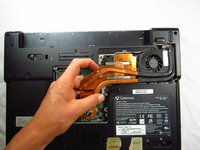
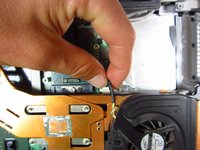
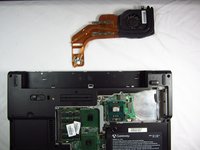
    4. Gateway MA6 Laptop Cooling Assembly Replacement: crwdns2935265:04crwdnd2935265:01crwdnd2935265:03crwdne2935265:0 Gateway MA6 Laptop Cooling Assembly Replacement: crwdns2935265:04crwdnd2935265:02crwdnd2935265:03crwdne2935265:0 Gateway MA6 Laptop Cooling Assembly Replacement: crwdns2935265:04crwdnd2935265:03crwdnd2935265:03crwdne2935265:0
      • Gently and carefully remove the cooling assembly to avoid ripping the wire attaching it to the computer.

      • Gently flip the cooling fan assembly upside-down on the computer surface.

      • Carefully grab the wire attached to the computer and pull away from the port.

      • The cooling fan is now safe for removal.

      crwdns2952109:0crwdne2952109:0

      crwdns2917038:0crwdne2917038:0

    5. Gateway MA6 Laptop Cooling Assembly Replacement: crwdns2935265:05crwdnd2935265:01crwdnd2935265:01crwdne2935265:0
      • When reinstalling heat sink and fans clean off the old thermal paste from both the heat sink and the CPU and then add new paste to CPU

      • If your unfamiliar with applying thermal paste How to Apply Thermal Paste

      crwdns2952109:0crwdne2952109:0

      crwdns2917038:0crwdne2917038:0

crwdns2915888:0crwdne2915888:0

To reassemble your device, follow these instructions in reverse order.

crwdns2935221:0crwdne2935221:0

crwdns2935229:02crwdne2935229:0

Chris Naughton

crwdns2935283:004/07/14crwdne2935283:0

727 crwdns2915208:0crwdne2915208:0

crwdns2935297:05crwdne2935297:0

crwdns2935287:0crwdne2935287:0

Cal Poly, Team 6-2, Forte Spring 2014 crwdns2935289:0Cal Poly, Team 6-2, Forte Spring 2014crwdne2935289:0

CPSU-FORTE-S14S6G2

crwdns2931471:05crwdne2931471:0

crwdns2935297:084crwdne2935297:0

crwdns2947412:00crwdne2947412:0

crwdns2917038:0crwdne2917038:0

crwdns2936625:0crwdne2936625:0:

crwdns2936751:024crwdne2936751:0 0

crwdns2936753:07crwdne2936753:0 12

crwdns2936753:030crwdne2936753:0 40

crwdns2942667:0crwdne2942667:0 1,304