crwdns2933423:0crwdne2933423:0

Gateway M-2626u RAM Replacement

crwdns2942213:0crwdne2942213:0

  1. Gateway M-2626u RAM  Replacement, Battery: crwdns2935265:01crwdnd2935265:01crwdnd2935265:01crwdne2935265:0
    • To prevent injury, make sure the laptop is not plugged in while removing the battery!

    • Make the switch in the upper right corner of the turned over laptop is switched to the "unlocked" position. (the unlocked padlock icon)

  2. Gateway M-2626u RAM  Replacement: crwdns2935265:02crwdnd2935265:01crwdnd2935265:03crwdne2935265:0 Gateway M-2626u RAM  Replacement: crwdns2935265:02crwdnd2935265:02crwdnd2935265:03crwdne2935265:0 Gateway M-2626u RAM  Replacement: crwdns2935265:02crwdnd2935265:03crwdnd2935265:03crwdne2935265:0
    • Push the switch to the right, toward the inside of the computer to dislodge the battery.

    • Finally, pull the battery outwards and away from the laptop as depicted in this image.

  3. Gateway M-2626u RAM  Replacement, Back Panel: crwdns2935265:03crwdnd2935265:01crwdnd2935265:02crwdne2935265:0 Gateway M-2626u RAM  Replacement, Back Panel: crwdns2935265:03crwdnd2935265:02crwdnd2935265:02crwdne2935265:0
    • Using the Phillips #1 screwdriver, remove the four 6mm screws on the back of the laptop.

  4. Gateway M-2626u RAM  Replacement: crwdns2935265:04crwdnd2935265:01crwdnd2935265:02crwdne2935265:0 Gateway M-2626u RAM  Replacement: crwdns2935265:04crwdnd2935265:02crwdnd2935265:02crwdne2935265:0
    • Insert the plastic prying tool and pry the back panel off starting at an edge and moving your way around it.

  5. Gateway M-2626u RAM  Replacement, RAM: crwdns2935265:05crwdnd2935265:01crwdnd2935265:01crwdne2935265:0
    • Remember to always remove or disconnect the battery!

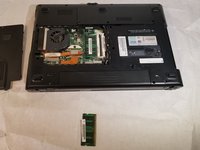
    • Push outwards on the metal tab to unlock the RAM stick from its position.

  6. Gateway M-2626u RAM  Replacement: crwdns2935265:06crwdnd2935265:01crwdnd2935265:02crwdne2935265:0 Gateway M-2626u RAM  Replacement: crwdns2935265:06crwdnd2935265:02crwdnd2935265:02crwdne2935265:0
    • Lift up and remove the RAM from the device.

    • Follow the same steps to remove the second RAM stick from your device.

crwdns2915888:0crwdne2915888:0

To reassemble your device, follow these instructions in reverse order.

Tanya Jain

crwdns2935283:003/19/18crwdne2935283:0

317 crwdns2915208:0crwdne2915208:0

crwdns2935297:03crwdne2935297:0

crwdns2915084:0crwdne2915084:0

UMass Dartmouth, Team S3-G2, Peak Spring 2018 crwdns2935289:0UMass Dartmouth, Team S3-G2, Peak Spring 2018crwdne2935289:0

UMASSD-PEAK-S18S3G2

crwdns2931471:02crwdne2931471:0

crwdns2935297:014crwdne2935297:0

crwdns2944067:00crwdne2944067:0

crwdns2917038:0crwdne2917038:0

crwdns2936625:0crwdne2936625:0:

crwdns2936751:024crwdne2936751:0 0

crwdns2936753:07crwdne2936753:0 0

crwdns2936753:030crwdne2936753:0 12

crwdns2942667:0crwdne2942667:0 148