crwdns2915892:0crwdne2915892:0
Use this guide to replace the top case of your Gateway 600YG2 laptop. The top case surrounds the keyboard and the mousepad. Removing it allows you to access components on the system board underneath the keyboard. It also allows you to replace the system board altogether.
This guide does not require any specialized skills.
Before beginning, make sure to shut down your laptop and disconnect it from any external power source.
crwdns2942213:0crwdne2942213:0
-
-
Flip the laptop over.
-
Slide the battery release tab to the right to open the battery cover.
-
-
-
Remove the battery cover using the tab on the right side.
-
Lift and remove the battery.
-
-
-
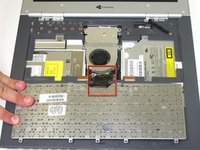
Insert the spudger between the "sysrq" and "ins" keys.
-
Gently pry free the power button panel above the keyboard, from the right and moving to the left.
-
-
-
Remove the five screws holding the keyboard in place.
-
-
-
Follow the black ribbon cable and gently pull straight up.
-
-
-
Remove the five screws with a Phillips #0 screwdriver.
-
Lift the hinge covers along the outer edges with the spudger until they are released.
-
-
-
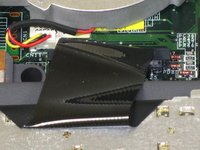
Gently unplug the LCD from the system board.
-
-
-
Using the Phillips #0 screwdriver, remove six screws that hold the LCD to the hinge.
-
-
-
Remove the cable by gently pulling it out while holding down the LCD.
-
-
-
Slide the release and push the button to eject the drive.
-
Remove the drive.
-
-
-
Use a Phillips #0 screwdriver to remove the thirteen screws from the bottom of the computer.
-
-
-
Remove the four screws from the back of the case.
-
-
-
Lift the plug holding the mouse ribbon about 1/16 inch or until it stops
-
Remove the ribbon.
-
-
-
Insert your spudger between the upper and lower case at the drive bay closest to the battery.
-
Carefully go around the entire case, unseating all plastic clips holding the upper and lower cases together.
-
-
-
Lift the upper case about 1/4 inch.
-
Unplug the last connecting wire and remove the upper case.
-


To reassemble your device, follow these instructions in reverse order.
crwdns2935221:0crwdne2935221:0
crwdns2935227:0crwdne2935227:0
crwdns2935287:0crwdne2935287:0

Cal Poly, Team 20-10, Maness Fall 2010 crwdns2935289:0Cal Poly, Team 20-10, Maness Fall 2010crwdne2935289:0
CPSU-MANESS-F10S20G10
crwdns2931471:03crwdne2931471:0
crwdns2935297:022crwdne2935297:0