crwdns2933423:0crwdne2933423:0

Garmin Nuvi 2689LMT Microphone Replacement

crwdns2942213:0crwdne2942213:0

  1. Garmin Nuvi 2689LMT Microphone Replacement, Microphone: crwdns2935265:01crwdnd2935265:01crwdnd2935265:01crwdne2935265:0
    • Start by taking off the stand by depressing the table turning the round piece back toward you, pulling it away for the Garmin device.

  2. Garmin Nuvi 2689LMT Microphone Replacement: crwdns2935265:02crwdnd2935265:01crwdnd2935265:01crwdne2935265:0
    • Use a T5 bit on a screwdriver to remove the 4 screws at the 4 corners on the back of the device.

    • Right to tighten, left to loosen.

  3. Garmin Nuvi 2689LMT Microphone Replacement: crwdns2935265:03crwdnd2935265:01crwdnd2935265:01crwdne2935265:0
    • Place the device face down on a flat surface, with the bottom facing you.

    • Pry open the seam with a prying tool .

    • There are two seams, the top one is artificial.

  4. Garmin Nuvi 2689LMT Microphone Replacement: crwdns2935265:04crwdnd2935265:01crwdnd2935265:01crwdne2935265:0
    • Firmly force a plastic spudger into the bottom seam and pry open a section of the device

    • Use a prying/pushing motion to force the tool into the device until there is a click

    • Repeat all the way around the seam until the back comes off.

  5. Garmin Nuvi 2689LMT Microphone Replacement: crwdns2935265:05crwdnd2935265:01crwdnd2935265:01crwdne2935265:0
    • When the seam is completely separated, lift the back away from the screen.

    • Do not attempt to separate the unit until all the tabs have been separated.

  6. Garmin Nuvi 2689LMT Microphone Replacement: crwdns2935265:06crwdnd2935265:01crwdnd2935265:01crwdne2935265:0
    • Wedge an angled plastic prying tool under the connector to the battery where the wires attach to the mother board

    • Gently pry up the connector. It should come free easily.

    • The battery is connected to the main circuit board by two wires, that are red and green and is attached to a white connector.

  7. Garmin Nuvi 2689LMT Microphone Replacement: crwdns2935265:07crwdnd2935265:01crwdnd2935265:02crwdne2935265:0 Garmin Nuvi 2689LMT Microphone Replacement: crwdns2935265:07crwdnd2935265:02crwdnd2935265:02crwdne2935265:0
    crwdns2935267:0crwdne2935267:0
    Tweezers
    $4.99
    crwdns2942207:0crwdne2942207:0
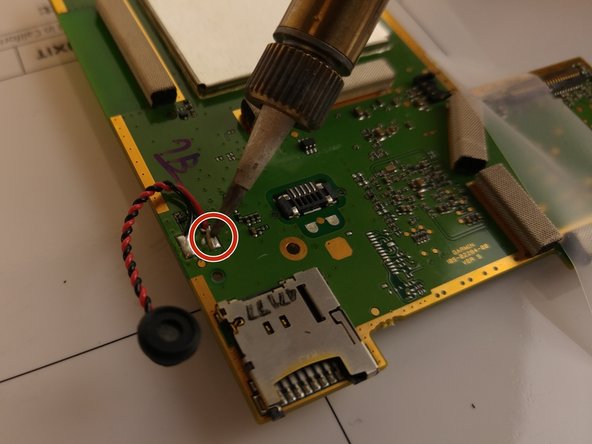
    • Melt the two metal connections on the circuit board using a soldering iron.

    • Remove the wires using tweezers.

    • There are two wires that are connected to the main circuit board.

    • Soldering irons will reach extremely high temperatures and should be used with caution.

  8. Garmin Nuvi 2689LMT Microphone Replacement: crwdns2935265:08crwdnd2935265:01crwdnd2935265:01crwdne2935265:0
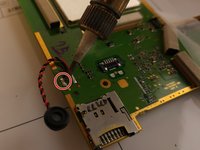
    • Retrieve your new microphone for your Garmin device and attach to the circuit board with the soldering iron.

    • Carefully melt the solder onto the wire at the connection points on circuit board.

    • Keep the solder on the metal contact point and avoid heating the plastic circuit board to prevent damage.

crwdns2915888:0crwdne2915888:0

To reassemble your device, follow these instructions in reverse order.

Allyson Smith

crwdns2935283:009/26/16crwdne2935283:0

114 crwdns2915208:0crwdne2915208:0

crwdns2935295:0crwdne2935295:0

crwdns2915084:0crwdne2915084:0

USF Tampa, Team 16-5, Eyestone Fall 2016 crwdns2935289:0USF Tampa, Team 16-5, Eyestone Fall 2016crwdne2935289:0

USFT-EYESTONE-F16S16G5

crwdns2931471:03crwdne2931471:0

crwdns2935297:05crwdne2935297:0

crwdns2917034:0crwdne2917034:0

Great explanation, thank you! But where can I buy the replacement mic, please?

André Kobzar - crwdns2934203:0crwdne2934203:0

crwdns2917038:0crwdne2917038:0

crwdns2936625:0crwdne2936625:0:

crwdns2936751:024crwdne2936751:0 0

crwdns2936753:07crwdne2936753:0 1

crwdns2936753:030crwdne2936753:0 8

crwdns2942667:0crwdne2942667:0 289