crwdns2933423:0crwdne2933423:0
crwdns2947577:0crwdnd2947577:0crwdne2947577:0

Garmin GPSmap 60CSx Screen Replacement

crwdns2942213:0crwdne2942213:0

    1. Garmin GPSmap 60CSx Screen Replacement, Back Cover and AA Batteries: crwdns2935265:01crwdnd2935265:01crwdnd2935265:01crwdne2935265:0
      • Lift and twist the battery cover release 90 degrees counterclockwise on the back of the device.

      crwdns2952109:0crwdne2952109:0

      crwdns2917038:0crwdne2917038:0

    2. Garmin GPSmap 60CSx Screen Replacement: crwdns2935265:02crwdnd2935265:01crwdnd2935265:01crwdne2935265:0
      • Lift battery release up to remove battery cover.

      crwdns2952109:0crwdne2952109:0

      crwdns2917038:0crwdne2917038:0

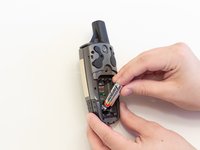
    3. Garmin GPSmap 60CSx Screen Replacement: crwdns2935265:03crwdnd2935265:01crwdnd2935265:02crwdne2935265:0 Garmin GPSmap 60CSx Screen Replacement: crwdns2935265:03crwdnd2935265:02crwdnd2935265:02crwdne2935265:0
      • Pull AA batteries out.

      crwdns2952109:0crwdne2952109:0

      crwdns2917038:0crwdne2917038:0

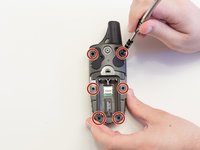
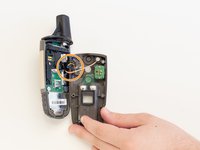
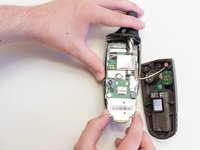
    1. Garmin GPSmap 60CSx Screen Replacement, Screen: crwdns2935265:04crwdnd2935265:01crwdnd2935265:02crwdne2935265:0 Garmin GPSmap 60CSx Screen Replacement, Screen: crwdns2935265:04crwdnd2935265:02crwdnd2935265:02crwdne2935265:0
      • Remove the six 10 mm screws on the back of the device with a Phillips #0 Screwdriver.

      • Flip the back panel over to view the green electronics board (the PCB) and the PCB cover.

      • Remove the black, yellow, blue, and red wires connected to the PCB with light force.

      crwdns2952109:0crwdne2952109:0

      crwdns2917038:0crwdne2917038:0

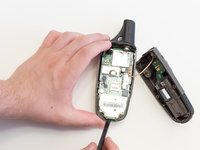
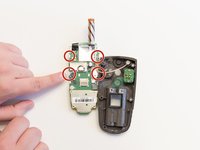
    2. Garmin GPSmap 60CSx Screen Replacement: crwdns2935265:05crwdnd2935265:01crwdnd2935265:01crwdne2935265:0
      • Take the spudger and place it in the bottom right corner of the black PCB cover.

      • Use the spudger to pry the corner out. This will need to be done to all four corners of the PCB cover.

      • It is best to do remove the bottom corners first.

      • Pull the PCB cover out of the GPSMap 60CSx.

      crwdns2952109:0crwdne2952109:0

      crwdns2917038:0crwdne2917038:0

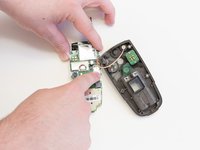
    3. Garmin GPSmap 60CSx Screen Replacement: crwdns2935265:06crwdnd2935265:01crwdnd2935265:02crwdne2935265:0 Garmin GPSmap 60CSx Screen Replacement: crwdns2935265:06crwdnd2935265:02crwdnd2935265:02crwdne2935265:0
      • Carefully use the spudger to lift the PCB a few centimeters.

      • Pull the PCB towards the bottom of the GPSMap 60CSx.

      • This will pull the other components out of the GPSMap 60CSx like the antenna and the screen.

      crwdns2952109:0crwdne2952109:0

      crwdns2917038:0crwdne2917038:0

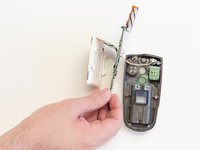
    4. Garmin GPSmap 60CSx Screen Replacement: crwdns2935265:07crwdnd2935265:01crwdnd2935265:03crwdne2935265:0 Garmin GPSmap 60CSx Screen Replacement: crwdns2935265:07crwdnd2935265:02crwdnd2935265:03crwdne2935265:0 Garmin GPSmap 60CSx Screen Replacement: crwdns2935265:07crwdnd2935265:03crwdnd2935265:03crwdne2935265:0
      • Apply light pressure to the four white tabs that are holding the screen in place.

      • The screen will now come off the PCB.

      crwdns2952109:0crwdne2952109:0

      crwdns2917038:0crwdne2917038:0

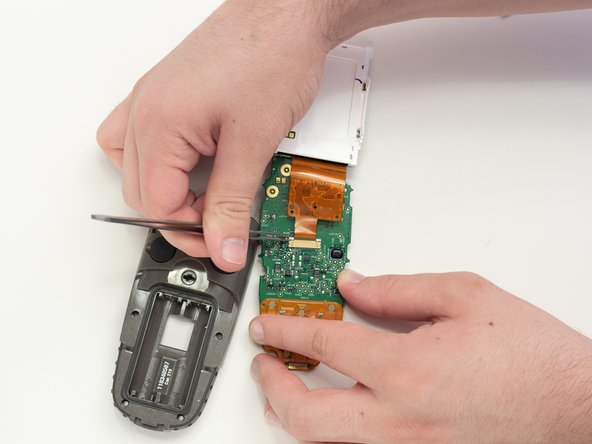
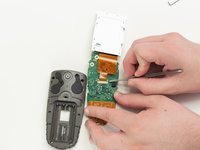
    5. Garmin GPSmap 60CSx Screen Replacement: crwdns2935265:08crwdnd2935265:01crwdnd2935265:01crwdne2935265:0
      • Turn the PCB over so the screen connector is facing you.

      • Move the screen out of the way for access to the screen connector.

      crwdns2952109:0crwdne2952109:0

      crwdns2917038:0crwdne2917038:0

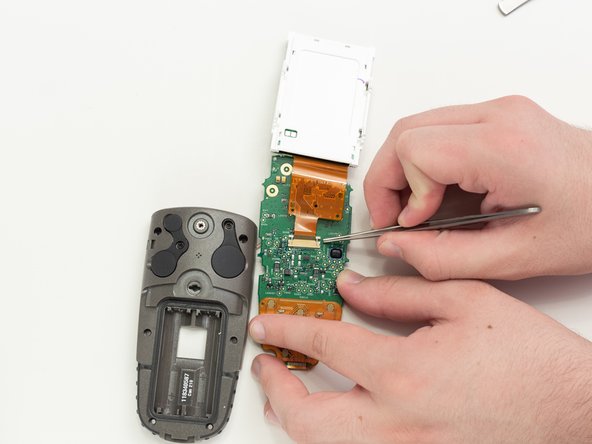
    6. Garmin GPSmap 60CSx Screen Replacement: crwdns2935265:09crwdnd2935265:01crwdnd2935265:03crwdne2935265:0 Garmin GPSmap 60CSx Screen Replacement: crwdns2935265:09crwdnd2935265:02crwdnd2935265:03crwdne2935265:0 Garmin GPSmap 60CSx Screen Replacement: crwdns2935265:09crwdnd2935265:03crwdnd2935265:03crwdne2935265:0
      crwdns2935267:0crwdne2935267:0
      Tweezers
      $4.99
      • Use tweezers to pull the two white pins on the connector forward.

      crwdns2952109:0crwdne2952109:0

      crwdns2917038:0crwdne2917038:0

    7. Garmin GPSmap 60CSx Screen Replacement: crwdns2935265:010crwdnd2935265:01crwdnd2935265:01crwdne2935265:0
      • Remove the screen ribbon connector and screen.

      crwdns2952109:0crwdne2952109:0

      crwdns2917038:0crwdne2917038:0

crwdns2915888:0crwdne2915888:0

To reassemble your device, follow these instructions in reverse order.

crwdns2935221:0crwdne2935221:0

crwdns2935229:05crwdne2935229:0

Thomas Humphrey

crwdns2935283:004/05/18crwdne2935283:0

549 crwdns2915208:0crwdne2915208:0

crwdns2935297:04crwdne2935297:0

crwdns2935287:0crwdne2935287:0

Linn Benton Community College, Team S2-G5, Johnson Spring 2018 crwdns2935289:0Linn Benton Community College, Team S2-G5, Johnson Spring 2018crwdne2935289:0

LBCC-JOHNSON-S18S2G5

crwdns2931471:05crwdne2931471:0

crwdns2935297:060crwdne2935297:0

crwdns2947412:02crwdne2947412:0

i have a 60csx and the battery bounces the liquid, can help me?

salvador2707 - crwdns2934203:0crwdne2934203:0 crwdns2950251:0crwdne2950251:0

Thank you for these step by step detailed instructions.

jlciscorp - crwdns2934203:0crwdne2934203:0 crwdns2950251:0crwdne2950251:0

crwdns2917038:0crwdne2917038:0

crwdns2936625:0crwdne2936625:0:

crwdns2936751:024crwdne2936751:0 5

crwdns2936753:07crwdne2936753:0 26

crwdns2936753:030crwdne2936753:0 107

crwdns2942667:0crwdne2942667:0 5,916