crwdns2915892:0crwdne2915892:0
cut off the mini-USB, or micro-USB, or Thunderbolt and remove the isolation of the red and the black wires.
the red wire will go on the top of the 4 contacts.
the black will go on the bottom last of the 4 contacts.
be creative and fasten them to the fenix 3. I used a clip and insulted it with a piece of plastic. you can also use duck take or similar to stick the 2 wires to the corresponding contacts on the fenix.
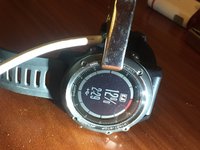
plug in the USB to a USB port or USB charging plug.
on the display you should now see the charging %
crwdns2942213:0crwdne2942213:0


To reassemble your device, follow these instructions in reverse order.
To reassemble your device, follow these instructions in reverse order.
crwdns2935221:0crwdne2935221:0
crwdns2935229:011crwdne2935229:0
crwdns2947412:09crwdne2947412:0
great job, very easy to do it. The hard part is that the wiring is too small :)
thank you
Thank you, David704. Your guide save me 13.50$ and a 3 day wait.
Thank you.. forgot charger at work before vacation.. thank youuuu :)
Thank you! You just saved my step streak :)
quiero que me cheque un garmin istinct que no recibe carga
Victor Manuel Perez Rodriguez - crwdns2934203:0crwdne2934203:0
Forgot my charger during a trip and found this guide. Works like a charm! Thank you for this nifty guide! Works well for Garmin Fenix 3 HR.
Worked great thanks. The only hard part was that the wires are small.
Since the original charging connector plug is symmetrical and can be connected either way around, it's very likely that you can connect the + and - either way around. Just be sure to connect to pin 1 and pin 4 and you should be good.
Not sure about the polarity, for me it only worked for red (positive) clamped to the pin next to the CE/BT signs (bottom).
Assuming that I had no contact issues for my first couple of attempts with the inverted polarity and that the cable had standard colour coding.