crwdns2915892:0crwdne2915892:0
This guide explains how to replace the speaker in a first-generation Nintendo Game Boy system.
crwdns2942213:0crwdne2942213:0
crwdns2936621:0crwdne2936621:0
-
-
Switch your Game Boy off and remove the cartridge.
-
-
-
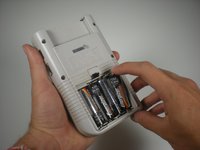
Use a fingernail (or small coin) to push down on the battery door latch and remove the battery door.
-
-
-
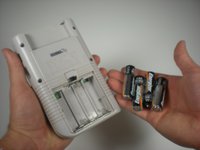
Use a fingernail to pry each battery outward from the positive (+) terminal to remove them.
-
-
-
Remove the six Triwing screws from the back of the device.
-
-
-
-
Gently separate the device's front casing from the back casing after you remove the screws.
-
-
-
Slide the front side of the casing down to expose the ribbon cable connector.
-
-
-
Grip the ribbon connector with your thumb and forefinger. Pull down gently until the connector, not the ribbon itself, comes out of its socket.
-
Separate the front and back casings.
-
-
-
Remove the 10 Phillips #00 screws from the motherboard.
-
-
-
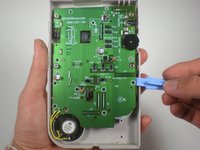
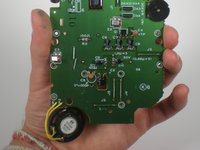
Use a plastic opening tool to gently lift the motherboard up and remove it from the front plastic case.
-
-
-
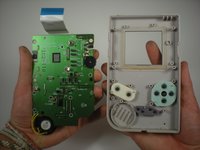
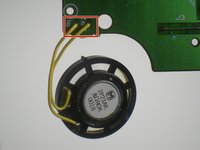
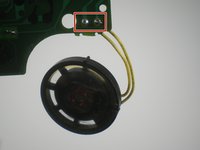
Desolder the two wires connecting the speaker to the motherboard.
-
Remove the speaker.
-


To reassemble your device, follow these instructions in reverse order.
crwdns2935221:0crwdne2935221:0
crwdns2935229:016crwdne2935229:0
crwdns2935287:0crwdne2935287:0

Cal Poly, Team 3-2, Johann Summer 2010 crwdns2935289:0Cal Poly, Team 3-2, Johann Summer 2010crwdne2935289:0
CPSU-JOHANN-R10S3G2
crwdns2931471:03crwdne2931471:0
crwdns2935297:036crwdne2935297:0
crwdns2947412:02crwdne2947412:0
This is just a guide to remove the speaker not replacing it so change the title as it is misleading as people that following this will want know how to replace not remove only
As stated in the conclusion, you simply follow the steps in reverse to install your replacement speaker.