crwdns2933423:0crwdne2933423:0

Game Boy Headphone Jack Replacement

crwdns2942213:0crwdne2942213:0

  1. Game Boy Headphone Jack Replacement, Batteries: crwdns2935265:01crwdnd2935265:01crwdnd2935265:02crwdne2935265:0 Game Boy Headphone Jack Replacement, Batteries: crwdns2935265:01crwdnd2935265:02crwdnd2935265:02crwdne2935265:0
    • Switch your Game Boy off and remove the cartridge.

  2. Game Boy Headphone Jack Replacement: crwdns2935265:02crwdnd2935265:01crwdnd2935265:03crwdne2935265:0 Game Boy Headphone Jack Replacement: crwdns2935265:02crwdnd2935265:02crwdnd2935265:03crwdne2935265:0 Game Boy Headphone Jack Replacement: crwdns2935265:02crwdnd2935265:03crwdnd2935265:03crwdne2935265:0
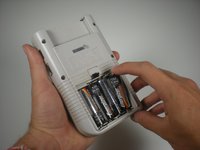
    • Use a fingernail (or small coin) to push down on the battery door latch and remove the battery door.

    • The release latch is a plastic spring clip. If your Game Boy is getting on in years, be careful as the plastic may be brittle.

    • When you're replacing the cover, be sure to get its two plastic tabs into the slots in the bottom of the battery compartment before pushing the cover back in place.

  3. Game Boy Headphone Jack Replacement: crwdns2935265:03crwdnd2935265:01crwdnd2935265:02crwdne2935265:0 Game Boy Headphone Jack Replacement: crwdns2935265:03crwdnd2935265:02crwdnd2935265:02crwdne2935265:0
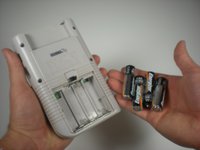
    • Use a fingernail to pry each battery outward from the positive (+) terminal to remove them.

    • Dispose of used batteries properly!

    • Remove the batteries from your Game Boy before storing it for more than a month or so.

  4. Game Boy Headphone Jack Replacement, Outer Case: crwdns2935265:04crwdnd2935265:01crwdnd2935265:01crwdne2935265:0
    • Remove the six Triwing screws from the back of the device.

  5. Game Boy Headphone Jack Replacement: crwdns2935265:05crwdnd2935265:01crwdnd2935265:01crwdne2935265:0
    • Gently separate the device's front casing from the back casing after you remove the screws.

    • Be careful not to completely separate the casing halves, as they are still joined by a large ribbon cable that may be damaged.

  6. Game Boy Headphone Jack Replacement: crwdns2935265:06crwdnd2935265:01crwdnd2935265:01crwdne2935265:0
    • Slide the front side of the casing down to expose the ribbon cable connector.

  7. Game Boy Headphone Jack Replacement: crwdns2935265:07crwdnd2935265:01crwdnd2935265:01crwdne2935265:0
    • Grip the ribbon connector with your thumb and forefinger. Pull down gently until the connector, not the ribbon itself, comes out of its socket.

    • Separate the front and back casings.

  8. Game Boy Headphone Jack Replacement, Headphone Jack: crwdns2935265:08crwdnd2935265:01crwdnd2935265:02crwdne2935265:0 Game Boy Headphone Jack Replacement, Headphone Jack: crwdns2935265:08crwdnd2935265:02crwdnd2935265:02crwdne2935265:0
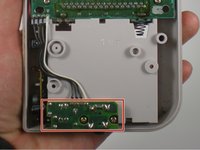
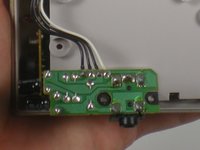
    • The headphone jack is located on the bottom of the rear outer casing, near the battery compartment.

    • Use a Phillips #00 screwdriver to remove the two screws holding the headphone jack in place.

  9. Game Boy Headphone Jack Replacement: crwdns2935265:09crwdnd2935265:01crwdnd2935265:02crwdne2935265:0 Game Boy Headphone Jack Replacement: crwdns2935265:09crwdnd2935265:02crwdnd2935265:02crwdne2935265:0
    • Once the headphone jack is detached it will dangle by the wires attached to the main circuit board. Do not worry about the connections, they are solid and will not break.

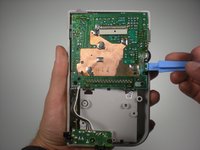
    • Use a Phillips#00 screwdriver to remove the two screws that hold the main circuit board to the casing. This will allow access to the connection points of the headphone jack.

  10. Game Boy Headphone Jack Replacement: crwdns2935265:010crwdnd2935265:01crwdnd2935265:02crwdne2935265:0 Game Boy Headphone Jack Replacement: crwdns2935265:010crwdnd2935265:02crwdnd2935265:02crwdne2935265:0
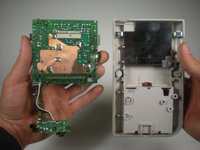
    • Use a plastic opening tool to remove the main circuit board from the casing.

    • Once the main circuit board is removed, set aside the outer casing.

  11. Game Boy Headphone Jack Replacement: crwdns2935265:011crwdnd2935265:01crwdnd2935265:03crwdne2935265:0 Game Boy Headphone Jack Replacement: crwdns2935265:011crwdnd2935265:02crwdnd2935265:03crwdne2935265:0 Game Boy Headphone Jack Replacement: crwdns2935265:011crwdnd2935265:03crwdnd2935265:03crwdne2935265:0
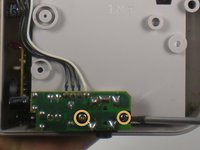
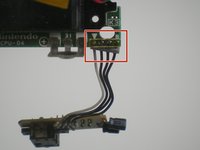
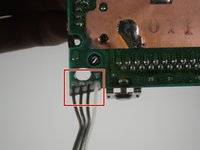
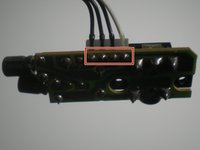
    • Desolder the four wires connecting the headphone jack to the motherboard.

    • Desolder the four wires connected to the headphone jack

    • To learn more about soldering, check out iFixit's soldering technique guide.

    • Remove the headphone jack with tweezers.

crwdns2915888:0crwdne2915888:0

To reassemble your device, follow these instructions in reverse order.

crwdns2935229:016crwdne2935229:0

Andrew Tramposch

crwdns2935283:006/24/10crwdne2935283:0

2.225 crwdns2915208:0crwdne2915208:0

crwdns2935297:06crwdne2935297:0

crwdns2915084:0crwdne2915084:0

Cal Poly, Team 3-2, Johann Summer 2010 crwdns2935289:0Cal Poly, Team 3-2, Johann Summer 2010crwdne2935289:0

CPSU-JOHANN-R10S3G2

crwdns2931471:03crwdne2931471:0

crwdns2935297:034crwdne2935297:0

crwdns2917034:0crwdne2917034:0

Hi, great work, but where could I find replacement to buy?

Thanks

fred fred - crwdns2934203:0crwdne2934203:0

crwdns2917038:0crwdne2917038:0

crwdns2936625:0crwdne2936625:0:

crwdns2936751:024crwdne2936751:0 5

crwdns2936753:07crwdne2936753:0 25

crwdns2936753:030crwdne2936753:0 84

crwdns2942667:0crwdne2942667:0 18,412