
Game Boy Display Lines/Bars

crwdns2959932:0crwdnd2959932:0Mitchellcrwdnd2959932:0crwdnd2959932:0crwdne2959932:0
crwdns2959936:0Maw 1, 2024crwdne2959936:0
crwdns2869540:0crwdne2869540:0: 10K
crwdns2959988:0crwdne2959988:0
- crwdns2959990:0crwdne2959990:0
- 9
- crwdns2959992:0crwdne2959992:0
- 59
- crwdns2959994:0crwdne2959994:0
- 321
- crwdns2959996:0crwdne2959996:0
- 10,055
crwdns2955950:0crwdne2955950:0: 8
crwdns2960004:06crwdne2960004:0, crwdns2960008:02crwdne2960008:0
crwdns2960000:0crwdne2960000:0crwdns2959984:0crwdne2959984:0: 7 8
crwdns2959974:07crwdne2959974:0
crwdns2959970:08crwdne2959970:0
crwdns2959986:0crwdne2959986:0: 6 7
crwdns2959982:06crwdne2959982:0
crwdns2959978:07crwdne2959978:0
crwdns2862611:0crwdne2862611:0
crwdns2862612:0crwdne2862612:0
crwdns2944444:0crwdne2944444:0
crwdns2944446:0crwdne2944446:0
crwdns2915892:0crwdne2915892:0
crwdns2959928:0crwdne2959928:0 ↓Fixing the common problem of lines/bars on the original Nintendo Gameboy.
crwdns2959930:0crwdne2959930:0
crwdns2943215:0crwdne2943215:0


-
-
-
Remove the back housing by removing the 6 Tri-Point or Philip screws.
 crwdns2952109:0crwdne2952109:0
-
-
-
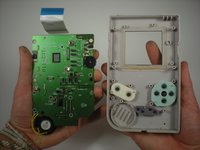
Carefully lift up the top half of the system. Be careful, there's a ribbon cable that connects the top and bottom half of the system.
-
Remove the ribbon cable for the next step.
-
-
-
-
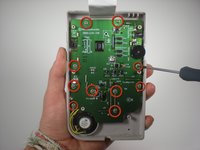
Now there will be screws that mount the board to the front, carefully unscrew these.
-
Now remove the board from the housing.
-
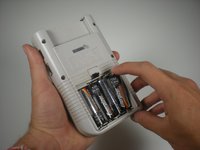
Now put the batteries back into the compartment, so you can test the screen while you fix it.
-
Reconnect the the board to back housing with the ribbon cable.
-
-
-
You're now going to turn the contrast ( the slider on the left) all the way up, and take your soldering iron and gently move it back and forth on the ribbon cable below the screen.
-
-
-
You will start to see the lines of pixels fade in and out, keep moving your iron back and forth until screen is completely black.
-
-



To reassemble your device, follow these instructions in reverse order.
crwdns2935221:0crwdne2935221:0
crwdns2935229:07crwdne2935229:0

crwdns2947412:02crwdne2947412:0
Hi, this is the second time I attempt this fix, the first time it worked perfectly. The problem is that with this second machine there's a couple of pixel lines that have not tickled back to black even though I have been patiently going over them for quite some time (2 rounds of 10-15 min) is there anything else that I could try or should I just go on over the same area until I see something happen? Thanks in advance
Jose Saura - crwdns2934203:0crwdne2934203:0 crwdns2950251:0crwdne2950251:0
Use this guide linked below understand where to place the iron under the screen. Step 4 doesn't seem to contain the proper images or details of this step here well enough.
https://www.youtube.com/watch?v=-OEXhxoT...
Bossman207 - crwdns2934203:0crwdne2934203:0 crwdns2950251:0crwdne2950251:0
