crwdns2915892:0crwdne2915892:0
A Guide to replacing the battery in a GBA Cartridge.
crwdns2942213:0crwdne2942213:0
-
-
Unscrew the screw on the back using a Tri-Point Y0 Screwdriver.
-
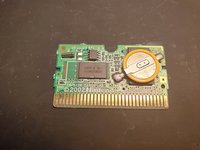
Flip the cartridge over and carefully push the front half of the casing down, you can now take the front off and remove the game from the plastic casing.
-
-
-
crwdns2935267:0crwdne2935267:0FixHub | Power Series Smart Soldering Iron$79.95
-
It is now time to get your soldering iron out.
-
Start off by tinning your soldering iron, then push it down against the one of the solder pads until the solder melts, lift one side of the battery up so it no longer makes contact with the pad. Repeat this step for the other pad to remove the battery completely.
-
-
-
To make things a bit easier you can tin the tabs of the battery.
-
Place the battery on the circuit board (make sure you get the orientation right), put a small blob of solder on your iron and heat up the pad under the battery tab while applying some slight pressure to the tab. Once the battery is in place remove the iron and repeat the step for the other side.
-
You can now reassemble the cartridge and check if it works.
-


To reassemble your device, follow these instructions in reverse order.
crwdns2935221:0crwdne2935221:0
crwdns2935229:024crwdne2935229:0

crwdns2947412:04crwdne2947412:0
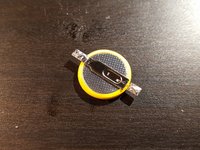
The battery in the finished example is soldered in backwards. The pads are labeled + or -, the battery is also labeled + or -. You can see the - sign on the battery and the tab attached to that is soldered into the + pad in the finished example.
That’s is the letter e, it’s part of the branding
I was trying to fit a new battery but at the negative side pole I keep my solder pen a lot with high temperature and the pad wend away .( Under the iron there is a small square that keeps the iron )this square went away is it possible to fix it ? If yes how I glue ? Cause I don’t know what to do .
Sounds like you've torn the pad off the board, there isn't a lot you can do about this other than running a small patch wire from the battery tab to one side of the resistor marked "R9"