crwdns2915892:0crwdne2915892:0
This guide will help you replace the LCD screen on the Fujifilm X-M1.
We highly suggest you use a magnetic project mat or an organization tray. This camera has many different types of screws and keeping them organized is key to proper reassembly.
crwdns2942213:0crwdne2942213:0
-
-
Turn the camera upside down to locate the battery compartment.
-
Slide the button up to open the compartment.
-
Slide the orange button up to release the battery.
-
-
crwdns2935267:0crwdne2935267:0Tweezers$4.99
-
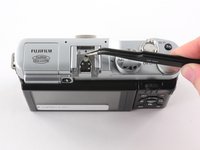
Twist the lens cap to remove it from the camera.
-
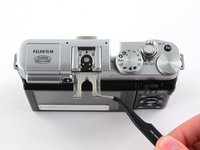
Remove the six 6.5 mm Phillips screws from the front of the lens assembly.
-
Use tweezers to remove the top metal ring and the thin metal ring below it .
-
-
-
Remove the four 4.3 mm Phillips screws inside the lens assembly.
-
-
-
Remove the six 2.5 mm Phillips screws from the bottom of the camera.
-
-
crwdns2935267:0crwdne2935267:0Tweezers$4.99
-
Use tweezers or a finger nail to peel back the rubber cover on the left handgrip.
-
Remove the 3.4 mm Phillips screw.
-
Remove the 3.7 mm screw.
-
-
-
Use tweezers or a fingernail to peel back the rubber cover on the right handgrip.
-
Remove the 3.2 mm Phillips screw.
-
Remove the 3.8 mm Phillips screw.
-
Remove the 2.8 mm Phillips screw.
-
-
-
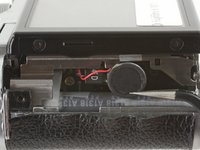
Use tweezers to slide the metal shield straight out of the external flash mount.
-
-
-
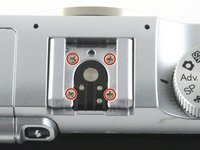
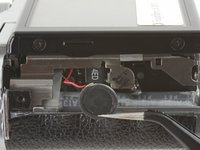
Remove the four 4.6 mm Phillips screws from the external flash mount.
-
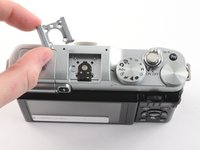
Use tweezers or two fingers to remove the mount clip.
-
-
-
-
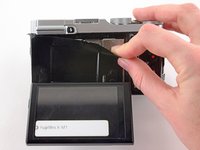
Extend the LCD.
-
Remove the two black 4.3 mm Phillips screws from the back case.
-
-
-
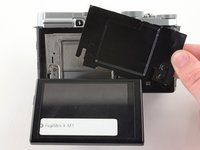
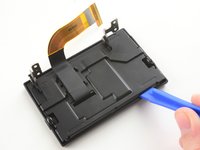
Use two fingers to peel back and remove the black plastic cover from behind the LCD.
-
-
-
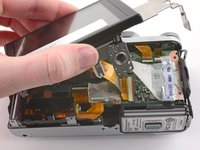
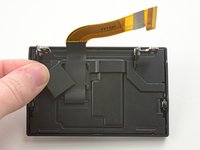
Slowly pull the back frame away from the camera.
-
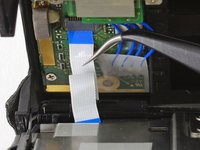
Use tweezers to pull the white and blue ribbon cable out of the connector.
-
-
-
Slide the frame around the LCD to remove it from the camera.
-
-
-
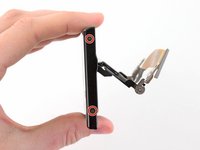
Remove the two 2.6 mm Phillips screws from the right side of the metal frame.
-
-
-
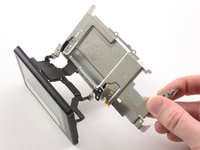
Use tweezers to unhook the speaker near the left handgrip.
-
-
-
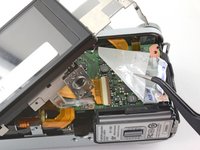
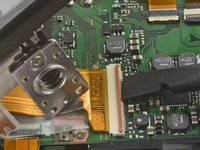
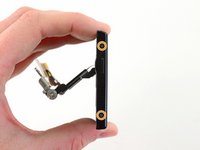
Slowly lift the metal frame away from the motherboard.
-
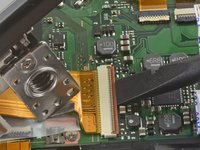
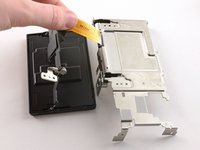
Use tweezers to remove the plastic covering the motherboard.
-
-
-
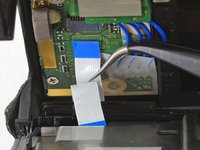
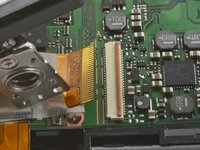
To remove the ribbon cable, flip back the orange lock on the large ZIF connector with the flat end of a spudger.
-
Remove the back case.
-
-
-
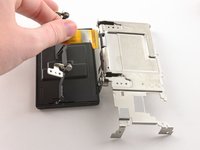
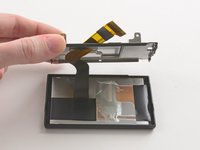
Remove the four 2.6 mm Phillips screws from the LCD hinges.
-
Tilt the LCD away from the metal frame.
-
-
-
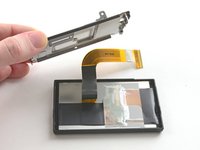
Use two fingers to pull the ribbon through the hole in the metal frame.
-
Remove the LCD from the metal frame.
-
-
-
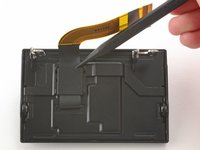
Use the pointed end of a spudger to remove the ribbon cover on the back of the LCD.
-
-
-
Remove the two 2.6 mm Phillips screws from the right hand side of the LCD screen.
-
Remove the two 2.6 mm Phillips screws from the left hand side of the LCD screen.
-
-
-
Use a plastic opening tool to pry the LCD case open.
-
Once the case is open, pull the ribbon through the hole on the back case.
-
-
-
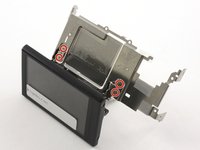
Remove the LCD from the screen cover.
-


To reassemble your device, follow these instructions in reverse order.
To reassemble your device, follow these instructions in reverse order.
crwdns2935221:0crwdne2935221:0
crwdns2935227:0crwdne2935227:0
