crwdns2933423:0crwdne2933423:0

Framework Laptop 12 Display Installation

crwdns2862623:0crwdne2862623:0
crwdns2942641:0crwdne2942641:0

crwdns2942213:0crwdne2942213:0

  1. Framework Laptop 12 Display Installation, Prepare the replacement display: crwdns2935265:01crwdnd2935265:01crwdnd2935265:02crwdne2935265:0 Framework Laptop 12 Display Installation, Prepare the replacement display: crwdns2935265:01crwdnd2935265:02crwdnd2935265:02crwdne2935265:0
    • The Framework Display Kit comes with an extra webcam bracket. If you're not using this kit to repair your display, skip this step.

    • Inspect the replacement display and carefully peel off any protective liners.

    • Use your Framework Screwdriver to remove the two 3.3 mm‑long T5 Torx screws securing the webcam bracket on the replacement display.

    • Remove the webcam bracket.

    • Remove any protective liners that may be in the webcam recess. The liners are normally clear or colored plastic films that easily detach.

    • You can use the replacement bracket and screws, or you can reuse your existing ones.

  2. Framework Laptop 12 Display Installation, Install the display: crwdns2935265:02crwdnd2935265:01crwdnd2935265:02crwdne2935265:0 Framework Laptop 12 Display Installation, Install the display: crwdns2935265:02crwdnd2935265:02crwdnd2935265:02crwdne2935265:0
    • Carefully lay the display screen-side down on top of the Input Cover. The edge with the webcam should lay near the touchpad edge.

    • The Input Cover magnets will align the display to itself.

    • Use your fingers to slide the display off the Input Cover magnets towards the hinge edge so that the display cable can reach its connector.

  3. Framework Laptop 12 Display Installation: crwdns2935265:03crwdnd2935265:01crwdnd2935265:02crwdne2935265:0 Framework Laptop 12 Display Installation: crwdns2935265:03crwdnd2935265:02crwdnd2935265:02crwdne2935265:0
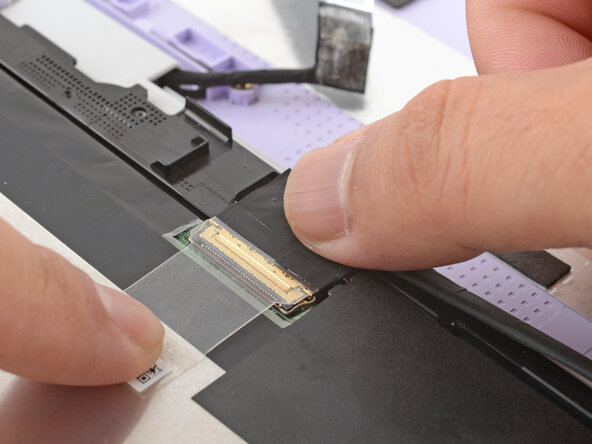
    • Use your fingers to grab the display cable by the clear tab and the locking bar.

    • Align the display cable with its connector and slide it in until it's fully seated.

  4. Framework Laptop 12 Display Installation: crwdns2935265:04crwdnd2935265:01crwdnd2935265:03crwdne2935265:0 Framework Laptop 12 Display Installation: crwdns2935265:04crwdnd2935265:02crwdnd2935265:03crwdne2935265:0 Framework Laptop 12 Display Installation: crwdns2935265:04crwdnd2935265:03crwdnd2935265:03crwdne2935265:0
    • Swing the locking bar down over the connector.

    • If the locking bar can't swing all the way down around the connector, you'll need to insert the cable deeper into the connector.

    • Lay the clear tab over the connector and press it onto the display.

  5. Framework Laptop 12 Display Installation: crwdns2935265:05crwdnd2935265:01crwdnd2935265:02crwdne2935265:0 Framework Laptop 12 Display Installation: crwdns2935265:05crwdnd2935265:02crwdnd2935265:02crwdne2935265:0
    • Slide the touch control cable into the ZIF connector up to the printed line on the cable.

    • Use your finger to flip down and gently press the locking tab in place.

  6. Framework Laptop 12 Display Installation: crwdns2935265:06crwdnd2935265:01crwdnd2935265:02crwdne2935265:0 Framework Laptop 12 Display Installation: crwdns2935265:06crwdnd2935265:02crwdnd2935265:02crwdne2935265:0
    • Use your finger to press the display cable grounding tape onto the metal back of the display.

    • Use your fingers to press the display cable onto the display.

  7. Framework Laptop 12 Display Installation: crwdns2935265:07crwdnd2935265:01crwdnd2935265:01crwdne2935265:0
    • Use your fingers to press the webcam cable onto the display.

crwdns2935217:0crwdne2935217:0

Arthur Shi

crwdns2935283:001/03/18crwdne2935283:0

296,646 crwdns2915208:0crwdne2915208:0

crwdns2935297:0682crwdne2935297:0

crwdns2947412:00crwdne2947412:0

crwdns2917038:0crwdne2917038:0

crwdns2936625:0crwdne2936625:0:

crwdns2936751:024crwdne2936751:0 0

crwdns2936753:07crwdne2936753:0 9

crwdns2936753:030crwdne2936753:0 9

crwdns2942667:0crwdne2942667:0 27