crwdns2933423:0crwdne2933423:0
crwdns2947577:0crwdnd2947577:0crwdne2947577:0

Flydigi Apex 5 Battery Replacement

crwdns2942213:0crwdne2942213:0

  1. Flydigi Apex 5 Battery Replacement, Battery: crwdns2935265:01crwdnd2935265:01crwdnd2935265:02crwdne2935265:0 Flydigi Apex 5 Battery Replacement, Battery: crwdns2935265:01crwdnd2935265:02crwdnd2935265:02crwdne2935265:0
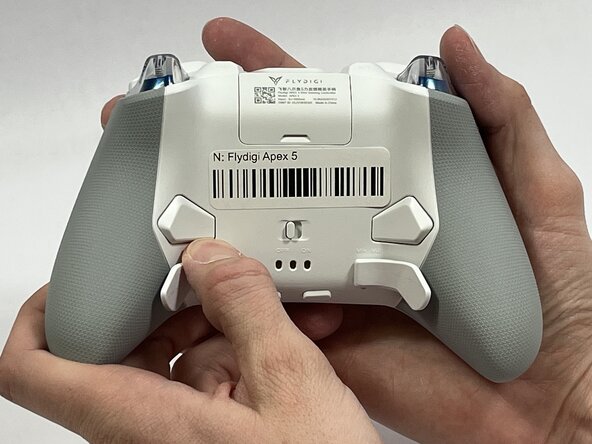
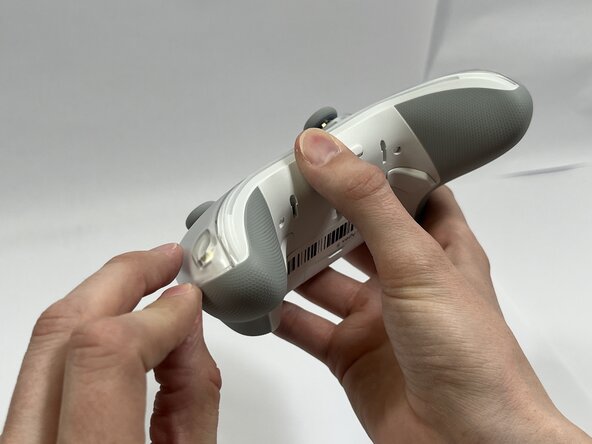
    • Orient the controller so that its back is facing you.

    • Apply firm downward pressure to remove both the M3 and M4 back paddles.

  2. Flydigi Apex 5 Battery Replacement: crwdns2935265:02crwdnd2935265:01crwdnd2935265:03crwdne2935265:0 Flydigi Apex 5 Battery Replacement: crwdns2935265:02crwdnd2935265:02crwdnd2935265:03crwdne2935265:0 Flydigi Apex 5 Battery Replacement: crwdns2935265:02crwdnd2935265:03crwdnd2935265:03crwdne2935265:0
    • Turn the controller over so its front faces you.

    • Remove the D-pad by firmly pulling it away from the body of the controller.

  3. Flydigi Apex 5 Battery Replacement: crwdns2935265:03crwdnd2935265:01crwdnd2935265:03crwdne2935265:0 Flydigi Apex 5 Battery Replacement: crwdns2935265:03crwdnd2935265:02crwdnd2935265:03crwdne2935265:0 Flydigi Apex 5 Battery Replacement: crwdns2935265:03crwdnd2935265:03crwdnd2935265:03crwdne2935265:0
    • Remove the clear, magnetically-adhered faceplate of the controller by firmly pulling it away from the body of the controller starting from the edge of the faceplate.

  4. Flydigi Apex 5 Battery Replacement: crwdns2935265:04crwdnd2935265:01crwdnd2935265:03crwdne2935265:0 Flydigi Apex 5 Battery Replacement: crwdns2935265:04crwdnd2935265:02crwdnd2935265:03crwdne2935265:0 Flydigi Apex 5 Battery Replacement: crwdns2935265:04crwdnd2935265:03crwdnd2935265:03crwdne2935265:0
    • Remove the small cover from the rear of the controller by pushing it upward.

    • Remove the two 5.8mm screws behind the battery cover using a Phillips #0 screwdriver.

  5. Flydigi Apex 5 Battery Replacement: crwdns2935265:05crwdnd2935265:01crwdnd2935265:02crwdne2935265:0 Flydigi Apex 5 Battery Replacement: crwdns2935265:05crwdnd2935265:02crwdnd2935265:02crwdne2935265:0
    • Turn the controller over so its front faces you.

    • Remove the six 10mm long screws from the front of the controller using a Torx T6 screwdriver.

  6. Flydigi Apex 5 Battery Replacement: crwdns2935265:06crwdnd2935265:01crwdnd2935265:03crwdne2935265:0 Flydigi Apex 5 Battery Replacement: crwdns2935265:06crwdnd2935265:02crwdnd2935265:03crwdne2935265:0 Flydigi Apex 5 Battery Replacement: crwdns2935265:06crwdnd2935265:03crwdnd2935265:03crwdne2935265:0
    • Insert the plastic opening tool between the top and bottom plastic controller molds, then pry until the two pieces separate.

    • Be careful not to fully separate the two pieces of the controller. There is a fragile ribbon cable connecting the two sides that must be carefully disconnected in the next step.

  7. Flydigi Apex 5 Battery Replacement: crwdns2935265:07crwdnd2935265:01crwdnd2935265:03crwdne2935265:0 Flydigi Apex 5 Battery Replacement: crwdns2935265:07crwdnd2935265:02crwdnd2935265:03crwdne2935265:0 Flydigi Apex 5 Battery Replacement: crwdns2935265:07crwdnd2935265:03crwdnd2935265:03crwdne2935265:0
    • Carefully remove the back paddle ribbon cable with the angled tweezers or spudger.

  8. Flydigi Apex 5 Battery Replacement: crwdns2935265:08crwdnd2935265:01crwdnd2935265:03crwdne2935265:0 Flydigi Apex 5 Battery Replacement: crwdns2935265:08crwdnd2935265:02crwdnd2935265:03crwdne2935265:0 Flydigi Apex 5 Battery Replacement: crwdns2935265:08crwdnd2935265:03crwdnd2935265:03crwdne2935265:0
    • Press a prong of each side of the angled tweezers under the lip of the power supply cable connector and pull the plastic connector out of its terminal.

    • Pull the power supply cable through the plastic cable guides.

  9. Flydigi Apex 5 Battery Replacement: crwdns2935265:09crwdnd2935265:01crwdnd2935265:03crwdne2935265:0 Flydigi Apex 5 Battery Replacement: crwdns2935265:09crwdnd2935265:02crwdnd2935265:03crwdne2935265:0 Flydigi Apex 5 Battery Replacement: crwdns2935265:09crwdnd2935265:03crwdnd2935265:03crwdne2935265:0
    • Optional: Drip isopropyl alcohol along the sides of the battery. Then rotate the controller to distribute the alcohol and dissolve the adhesive holding the battery to the mount

    • Pry up the battery with the plastic hook and pry tool.

    • Do not use sharp metal tools to pry the battery out. That action risks puncturing the battery.

crwdns2915888:0crwdne2915888:0

To reassemble your device, follow these instructions in reverse order.

crwdns2935227:0crwdne2935227:0

Benjamin Tapp

crwdns2935283:003/10/26crwdne2935283:0

219 crwdns2915208:0crwdne2915208:0

crwdns2935295:0crwdne2935295:0

crwdns2935287:0crwdne2935287:0

Idaho State University, Team 1-3, Watkins Spring 2026 crwdns2935289:0Idaho State University, Team 1-3, Watkins Spring 2026crwdne2935289:0

ISU-WATKINS-S26S1G3

crwdns2931471:04crwdne2931471:0

crwdns2935303:01crwdne2935303:0

crwdns2947412:00crwdne2947412:0

crwdns2917038:0crwdne2917038:0

crwdns2936625:0crwdne2936625:0:

crwdns2936751:024crwdne2936751:0 0

crwdns2936753:07crwdne2936753:0 16

crwdns2936753:030crwdne2936753:0 34

crwdns2942667:0crwdne2942667:0 70