crwdns2915892:0crwdne2915892:0
Fitbit charge teardown. It stopped working and was sent a new one so tore old one open...wondering if possible to replace battery (cant find a replacement) as the voltage is 0.
LSSP031420AB lipoly battery.
crwdns2942213:0crwdne2942213:0
-
-
-
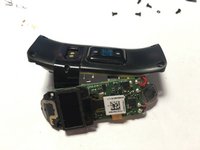
Remove all four T3 Torx screws. Then "pop" out the electronics by pressing in the reset hole and pushing out the side with a pin. Use your thumb and push it up towards the wrist band clip (top in this picture). The unit "slides" up and out.
 crwdns2952109:0crwdne2952109:0
-
-
-
-
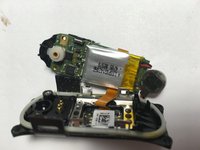
To access the lipo, remove the two screws above the screen. Pull the circular vibrating motor out and pull out the board.
-
-
-
Image 3a) Two inner screws removed, case gently pried open.
-
Image 3b) Obverse, showing battery glued onto the circuit. Be careful when prying this up as it could pull off the other connectors.
-
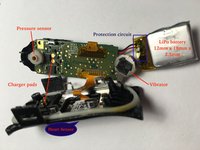
Expanded view showing battery pried out.
-
-



crwdns2947412:025crwdne2947412:0
The band on mine fell apart but I already had one sent for warranty. Min still worked so I took it apart, and while trying to look for a replacement lipo (Searching the number on the battery) i came here... The batter is measuring between 4.1 and 4.2v. There appears to be some sort of protection or charging board taped to the lipo that I think we need to keep if we are to replace the lipo battery.
Randy Fyfe - crwdns2934203:0crwdne2934203:0 crwdns2950251:0crwdne2950251:0
I did some more searching, lipo batteries in this voltage are usually labelled as "3.7V" meaning they are a cell with protection pcb that operates up to 4.2v (full charge) down to 3.2V (discharged).
The battery cell in mine measure approx 12mm x 18mm x 2.5mm (WxHxT); with the proection pcb it was a total of about 12mm x 22mm x 2.5mm.
I ahve not found an exact replacement, but did find 10mm x 20mm x 2.5mm cells which should fit... going to order some and see if a bit of soldering will ahve a better running fitbit. :)
Randy Fyfe - crwdns2934203:0crwdne2934203:0 crwdns2950251:0crwdne2950251:0
Hola,
I figured at somepoint someone would have a similar problem. I´m no Electric Engineer but I know the battery is a lithium polymer battery. From playing with drones and electric skateboards I know that the standard "nominal" voltage of Lipo batteries in the 3.7V and they should only be charged up to 4.2 V and to extend battery life (at least with my electric skateboards) should not be discharged past around 3.5V. I assume the PCB will take care of the battery charge and discharge. I havent torn into the battery to look at the PCB yet. I´ll post some photos when I get there.
I was curious where you found the small lipo - 10mm x 20mm x 2.5mm cells???? I have been unsuccessful finding replacements based on the product code as well. I did fond some small lipos for older fitbit models. Ususally with lipos this small the batteries are sold with a PCB built in (again from my experience with smaller drones, and I was hoping to find something like that.
Hunter - crwdns2934203:0crwdne2934203:0 crwdns2950251:0crwdne2950251:0
I ended up using a combination of the T3, H0.7 and H0.9 bits from the tool kit to get the screws out. Neither was a perfect match, though.
I also added three photos showing the next steps of disassembly.
wt8p - crwdns2934203:0crwdne2934203:0 crwdns2950251:0crwdne2950251:0
One thought is the number on the front is the manufacturer ("LSSP") and dimensions ("031420") of the battery. (For example, see here: http://www.gmbattery.com/product/showpro...)
Using this link, the model "GMB301320" (at 45 mAh) would be close.
wt8p - crwdns2934203:0crwdne2934203:0 crwdns2950251:0crwdne2950251:0
