crwdns2915892:0crwdne2915892:0
Use this guide to replace one or both of the faulty extendable feet on the Epson VS250 projector. The extendable legs help with angling the display image of the projector in order to get it into the correct alignment. If you notice that the display image on the screen is tiled then the legs should be the first components to check. First check that both legs are extended equally to ensure a balanced image. If you find that your Epson VS250 projector’s feet are not extending correctly, or at all, you will need to replace them. If one or both of the legs are damaged then this guide will show you how to replace them.
crwdns2942213:0crwdne2942213:0
-
-
Place the projector on a flat surface.
-
Orient the projector so that the the word "Epson" is facing you.
-
Use Phillips #1 screwdriver to loosen the 10 mm screw on the top right corner of the projector.
-
-
-
Slide the cover to the right and lift the cover up and out to remove.
-
-
-
Use a Phillips #1 screwdriver to loosen the two 10 mm screws that hold the lamp in place.
-
-
-
After loosening both screws, remove the lamp from the projector by pulling it up and out.
-
-
-
-
Use a Phillips #1 screwdriver to remove the three 6 mm screws that hold the side portion of the projector in place.
-
-
-
Use a Phillips #1 screwdriver to remove the single 10 mm screw that is holding the side cover of the projector in place.
-
-
-
Use a Phillips #1 screwdriver to remove the two 10.00mm screws that are holding the side cover of the projector in place.
-
-
-
Flip the projector so that it lays upside down.
-
Using a Phillips #1 screwdriver, remove the three 10 mm screws that secure the side portion of the projector.
-
-
-
Remove the front cover from the projector by pulling it off.
-
-
-
Twist the two feet in the counterclockwise direction until both feet are full extended to their maximum lengths.
-
-
crwdns2935267:0crwdne2935267:0Tweezers$4.99
-
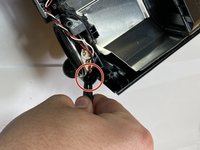
Place the tweezers into the hole where the foot is connected.
-
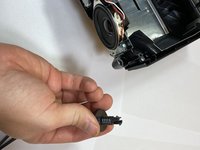
Use one of your hands to squeeze the tweezers on the top of the foot. Use your free hand to wiggle the bottom of the foot while pulling outward to remove it.
-


To reassemble your device, follow these instructions in reverse order.
To reassemble your device, follow these instructions in reverse order.

crwdns2915084:0crwdne2915084:0

Clemson, Team 4-2, Hunter Fall 2021 crwdns2935289:0Clemson, Team 4-2, Hunter Fall 2021crwdne2935289:0
CLEM-HUNTER-F21S4G2
crwdns2931471:05crwdne2931471:0
crwdns2935297:05crwdne2935297:0