crwdns2933423:0crwdne2933423:0

Epson Stylus NX230 Motherboard Replacement

crwdns2942213:0crwdne2942213:0

  1. Epson Stylus NX230 Motherboard Replacement, Motherboard: crwdns2935265:01crwdnd2935265:01crwdnd2935265:01crwdne2935265:0
    • Check to make sure the printer is unplugged to prevent electric shock.

  2. Epson Stylus NX230 Motherboard Replacement: crwdns2935265:02crwdnd2935265:01crwdnd2935265:02crwdne2935265:0 Epson Stylus NX230 Motherboard Replacement: crwdns2935265:02crwdnd2935265:02crwdnd2935265:02crwdne2935265:0
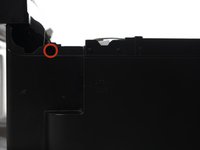
    • Align your printer so that the front buttons face to the right.

    • Remove the 3mm Phillips #2 screw in the hole in the top left corner. This screw attaches the side panel to the printer.

    • Store the screws in a safe place so you can access them later.

  3. Epson Stylus NX230 Motherboard Replacement: crwdns2935265:03crwdnd2935265:01crwdnd2935265:01crwdne2935265:0
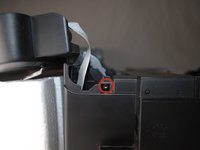
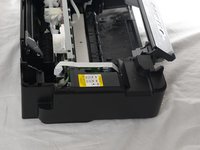
    • Flip and remove the top of the printer up so that you can see the inside.

    • There is a white strip in the top right corner of the printer called the ribbon cable.

    • Make sure that the ribbon cable does not detach from the printer to prevent damaging the connection.

  4. Epson Stylus NX230 Motherboard Replacement: crwdns2935265:04crwdnd2935265:01crwdnd2935265:02crwdne2935265:0 Epson Stylus NX230 Motherboard Replacement: crwdns2935265:04crwdnd2935265:02crwdnd2935265:02crwdne2935265:0
    • Align the printer so the front button panel faces to the right.

    • Remove the 3mm Phillips #2 screw on the side of the printer in the top left corner.

    • Store the screw in a safe place so you can access it later.

  5. Epson Stylus NX230 Motherboard Replacement: crwdns2935265:05crwdnd2935265:01crwdnd2935265:02crwdne2935265:0 Epson Stylus NX230 Motherboard Replacement: crwdns2935265:05crwdnd2935265:02crwdnd2935265:02crwdne2935265:0
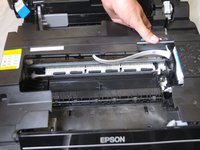
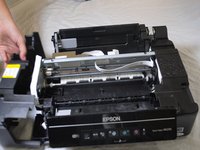
    • Take the right side of the bar of plastic that runs across the top of the inside of the printer and push it towards the left side of the printer.

    • Take the left side of the bar and push it to the left and then to the right.

  6. Epson Stylus NX230 Motherboard Replacement: crwdns2935265:06crwdnd2935265:01crwdnd2935265:03crwdne2935265:0 Epson Stylus NX230 Motherboard Replacement: crwdns2935265:06crwdnd2935265:02crwdnd2935265:03crwdne2935265:0 Epson Stylus NX230 Motherboard Replacement: crwdns2935265:06crwdnd2935265:03crwdnd2935265:03crwdne2935265:0
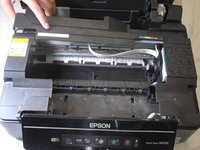
    • Using your hands, detach the side panel from the printer.

    • Take extra care with the locking mechanisms, which help keep the side panel on the printer.

    • You may need to use the plastic opening tools to pry apart the locking mechanisms.

  7. Epson Stylus NX230 Motherboard Replacement: crwdns2935265:07crwdnd2935265:01crwdnd2935265:01crwdne2935265:0
    • Remove the two 3mm Phillips #2 screws attaching motherboard to the printer.

    • Store the screws in a safe place so you can access them later.

    • The motherboard can now be removed from the printer.

crwdns2915888:0crwdne2915888:0

To reassemble your device, follow these instructions in reverse order.

crwdns2935229:02crwdne2935229:0

Kimberly Pugel

crwdns2935283:004/07/14crwdne2935283:0

404 crwdns2915208:0crwdne2915208:0

crwdns2935297:03crwdne2935297:0

crwdns2915084:0crwdne2915084:0

Cal Poly, Team 6-1, Forte Spring 2014 crwdns2935289:0Cal Poly, Team 6-1, Forte Spring 2014crwdne2935289:0

CPSU-FORTE-S14S6G1

crwdns2931471:04crwdne2931471:0

crwdns2935297:010crwdne2935297:0

crwdns2944067:00crwdne2944067:0

crwdns2917038:0crwdne2917038:0

crwdns2936625:0crwdne2936625:0:

crwdns2936751:024crwdne2936751:0 1

crwdns2936753:07crwdne2936753:0 3

crwdns2936753:030crwdne2936753:0 18

crwdns2942667:0crwdne2942667:0 1,149