crwdns2933423:0crwdne2933423:0

Edwin the Duck Motherboard Replacement

crwdns2942213:0crwdne2942213:0

  1. Edwin the Duck Motherboard Replacement, Motherboard: crwdns2935265:01crwdnd2935265:01crwdnd2935265:02crwdne2935265:0 Edwin the Duck Motherboard Replacement, Motherboard: crwdns2935265:01crwdnd2935265:02crwdnd2935265:02crwdne2935265:0
    • Unscrew the four 9mm screws with a T8 screwdriver bit

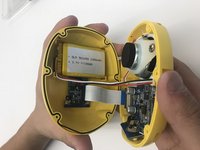
    • Remove the back plate off

  2. Edwin the Duck Motherboard Replacement: crwdns2935265:02crwdnd2935265:01crwdnd2935265:02crwdne2935265:0 Edwin the Duck Motherboard Replacement: crwdns2935265:02crwdnd2935265:02crwdnd2935265:02crwdne2935265:0
    • Carefully take off the rubber skin.

    • Be patient and don't rush. You don't want to rip or damage the rubber skin resulting in losing the waterproof cover.

  3. Edwin the Duck Motherboard Replacement: crwdns2935265:03crwdnd2935265:01crwdnd2935265:01crwdne2935265:0
    • Using the J1 screwdriver bit, unscrew all six 9 mm screws that run along the border.

  4. Edwin the Duck Motherboard Replacement: crwdns2935265:04crwdnd2935265:01crwdnd2935265:02crwdne2935265:0 Edwin the Duck Motherboard Replacement: crwdns2935265:04crwdnd2935265:02crwdnd2935265:02crwdne2935265:0
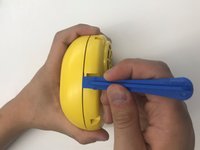
    • Use the plastic opening tool to open the inside of the duck.

    • Be very careful when splitting the two halves apart. There are wires connecting to both sides. Remember to open slowly.

  5. Edwin the Duck Motherboard Replacement: crwdns2935265:05crwdnd2935265:01crwdnd2935265:02crwdne2935265:0 Edwin the Duck Motherboard Replacement: crwdns2935265:05crwdnd2935265:02crwdnd2935265:02crwdne2935265:0
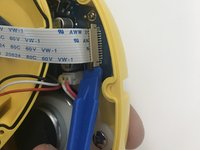
    • Using the plastic opening tool pull up the black tab up until it stops.

    • Be careful not to pull up the black tab too far up, otherwise the cable won't be secure anymore.

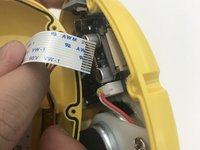
    • Pull up the white cable tab, up slowly

  6. Edwin the Duck Motherboard Replacement: crwdns2935265:06crwdnd2935265:01crwdnd2935265:01crwdne2935265:0
    • Use the J1 screwdriver bit to unscrew all four 9 mm screws attached to the motherboard.

  7. Edwin the Duck Motherboard Replacement: crwdns2935265:07crwdnd2935265:01crwdnd2935265:01crwdne2935265:0
    • Remove the top connector as you see in the picture.

    • Replace the new motherboard and you are finished.

crwdns2915888:0crwdne2915888:0

To reassemble your device, follow these instructions in reverse order.

crwdns2935227:0crwdne2935227:0

Caleb Kim

crwdns2935283:010/18/17crwdne2935283:0

143 crwdns2915208:0crwdne2915208:0

crwdns2935295:0crwdne2935295:0

crwdns2915084:0crwdne2915084:0

UW Tacoma, Team S1-G4, Rose Fall 2017 crwdns2935289:0UW Tacoma, Team S1-G4, Rose Fall 2017crwdne2935289:0

UWT-ROSE-F17S1G4

crwdns2931471:04crwdne2931471:0

crwdns2935297:08crwdne2935297:0

crwdns2944067:00crwdne2944067:0

crwdns2917038:0crwdne2917038:0

crwdns2936625:0crwdne2936625:0:

crwdns2936751:024crwdne2936751:0 0

crwdns2936753:07crwdne2936753:0 1

crwdns2936753:030crwdne2936753:0 2

crwdns2942667:0crwdne2942667:0 394