crwdns2933423:0crwdne2933423:0

Echo Dot 3 Mic/LEDs/Button Replacement

crwdns2942213:0crwdne2942213:0

  1. Echo Dot 3 Mic/LEDs/Button Replacement, Outer Shell: crwdns2935265:01crwdnd2935265:01crwdnd2935265:02crwdne2935265:0 Echo Dot 3 Mic/LEDs/Button Replacement, Outer Shell: crwdns2935265:01crwdnd2935265:02crwdnd2935265:02crwdne2935265:0
    • Turn your Dot around, so that the Barcode is facing up, and the buttons down.

  2. Echo Dot 3 Mic/LEDs/Button Replacement, Bottom "Lid": crwdns2935265:02crwdnd2935265:01crwdnd2935265:02crwdne2935265:0 Echo Dot 3 Mic/LEDs/Button Replacement, Bottom "Lid": crwdns2935265:02crwdnd2935265:02crwdnd2935265:02crwdne2935265:0
    crwdns2935267:0crwdne2935267:0
    Spudger
    $3.99
    crwdns2942207:0crwdne2942207:0
    • Using a Spudger remove the Lid.

    • There's Adhesive under the lid, so the best way to get it off, is to go all the way around with the Spudger

  3. Echo Dot 3 Mic/LEDs/Button Replacement, Shell unscrewing: crwdns2935265:03crwdnd2935265:01crwdnd2935265:03crwdne2935265:0 Echo Dot 3 Mic/LEDs/Button Replacement, Shell unscrewing: crwdns2935265:03crwdnd2935265:02crwdnd2935265:03crwdne2935265:0 Echo Dot 3 Mic/LEDs/Button Replacement, Shell unscrewing: crwdns2935265:03crwdnd2935265:03crwdnd2935265:03crwdne2935265:0
    crwdns2935267:0crwdne2935267:0
    TR6 Torx Security Screwdriver
    $5.99
    crwdns2942207:0crwdne2942207:0
    • Unscrew the 4 T6 Torx screws using the Right Screwdriver

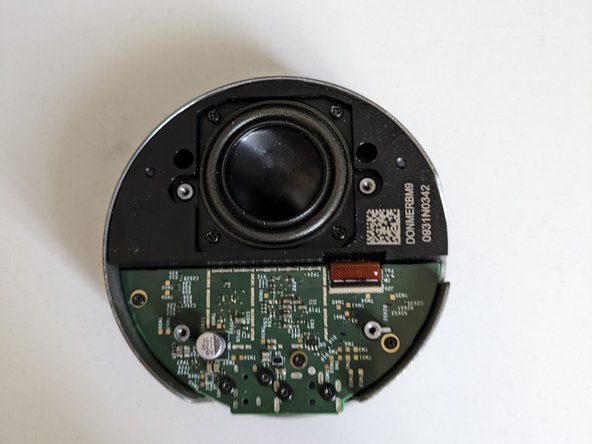
    • After unscrewing, you can slowly lift the shell, and you'll be greeted by the insides of the Dot!

  4. Echo Dot 3 Mic/LEDs/Button Replacement, Insides: crwdns2935265:04crwdnd2935265:01crwdnd2935265:03crwdne2935265:0 Echo Dot 3 Mic/LEDs/Button Replacement, Insides: crwdns2935265:04crwdnd2935265:02crwdnd2935265:03crwdne2935265:0 Echo Dot 3 Mic/LEDs/Button Replacement, Insides: crwdns2935265:04crwdnd2935265:03crwdnd2935265:03crwdne2935265:0
    • Unscrew the 3 T6 Torx screws,

    • and lift the flex cable connector.

    • After that, very carefully remove the PCB/Power supply (no idea).

  5. Echo Dot 3 Mic/LEDs/Button Replacement, Middle part: crwdns2935265:05crwdnd2935265:01crwdnd2935265:02crwdne2935265:0 Echo Dot 3 Mic/LEDs/Button Replacement, Middle part: crwdns2935265:05crwdnd2935265:02crwdnd2935265:02crwdne2935265:0
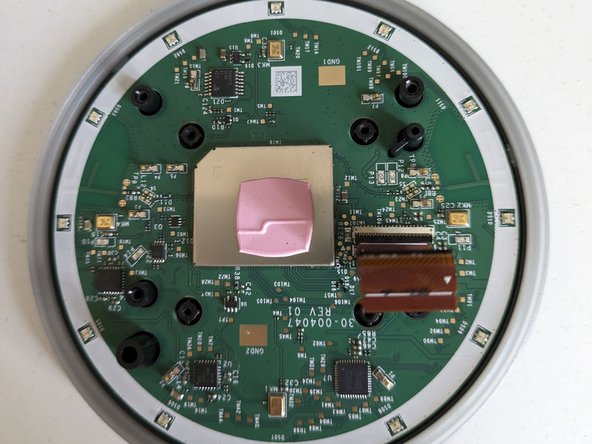
    • Remove the 4 T6 Torx screws (2 different lengths!)

    • Slowly Remove the Middle part

    • Be very careful while removing the middle part, so that you don't damage the cable!

  6. Echo Dot 3 Mic/LEDs/Button Replacement, Top part: crwdns2935265:06crwdnd2935265:01crwdnd2935265:03crwdne2935265:0 Echo Dot 3 Mic/LEDs/Button Replacement, Top part: crwdns2935265:06crwdnd2935265:02crwdnd2935265:03crwdne2935265:0 Echo Dot 3 Mic/LEDs/Button Replacement, Top part: crwdns2935265:06crwdnd2935265:03crwdnd2935265:03crwdne2935265:0
    • Remove the 4 T6 Torx screws,

    • and lift the plastic to remove it.

  7. Echo Dot 3 Mic/LEDs/Button Replacement, Motherboard: crwdns2935265:07crwdnd2935265:01crwdnd2935265:03crwdne2935265:0 Echo Dot 3 Mic/LEDs/Button Replacement, Motherboard: crwdns2935265:07crwdnd2935265:02crwdnd2935265:03crwdne2935265:0 Echo Dot 3 Mic/LEDs/Button Replacement, Motherboard: crwdns2935265:07crwdnd2935265:03crwdnd2935265:03crwdne2935265:0
    • Simply flip the device to separate the:

    • Motherboard and

    • Buttons from each other.

crwdns2915888:0crwdne2915888:0

Congrats! To put together your Echo Dot, simply follow the instructions backward! Have a nice day!

crwdns2935227:0crwdne2935227:0

ashlynn

crwdns2935283:005/10/22crwdne2935283:0

148 crwdns2915208:0crwdne2915208:0

crwdns2935295:0crwdne2935295:0

crwdns2944067:00crwdne2944067:0

crwdns2917038:0crwdne2917038:0

crwdns2936625:0crwdne2936625:0:

crwdns2936751:024crwdne2936751:0 1

crwdns2936753:07crwdne2936753:0 13

crwdns2936753:030crwdne2936753:0 31

crwdns2942667:0crwdne2942667:0 136