crwdns2933423:0crwdne2933423:0

EONO B08J8J8FGTX9 Bluetooth Speaker Button Replacement (Won't switch on)

crwdns2942213:0crwdne2942213:0

  1. EONO B08J8J8FGTX9 Bluetooth Speaker Button Replacement (Won't switch on), Problem description: crwdns2935265:01crwdnd2935265:01crwdnd2935265:02crwdne2935265:0 EONO B08J8J8FGTX9 Bluetooth Speaker Button Replacement (Won't switch on), Problem description: crwdns2935265:01crwdnd2935265:02crwdnd2935265:02crwdne2935265:0
    • The buttons on these speakers can fail due to corrosion or repeated pressing. They are easy to replace.

  2. EONO B08J8J8FGTX9 Bluetooth Speaker Button Replacement (Won't switch on): crwdns2935265:02crwdnd2935265:01crwdnd2935265:02crwdne2935265:0 EONO B08J8J8FGTX9 Bluetooth Speaker Button Replacement (Won't switch on): crwdns2935265:02crwdnd2935265:02crwdnd2935265:02crwdne2935265:0
    • There are four clips in total

    • Pop the top cover up using a flat spudger.

  3. EONO B08J8J8FGTX9 Bluetooth Speaker Button Replacement (Won't switch on): crwdns2935265:03crwdnd2935265:01crwdnd2935265:01crwdne2935265:0
    • Peel off the silicone cover. It is glued on with double-sided tape which can be removed with isopropanol if desired.

  4. EONO B08J8J8FGTX9 Bluetooth Speaker Button Replacement (Won't switch on), Remove the broken switch: crwdns2935265:04crwdnd2935265:01crwdnd2935265:01crwdne2935265:0
    • You can cut out the old switch using flush cutters or a rotary tool, be careful not to rip the solder pads of the circuit board.

    • Alternatively, use a hot air gun. You can use low-melting solder to make removal easier.

  5. EONO B08J8J8FGTX9 Bluetooth Speaker Button Replacement (Won't switch on): crwdns2935265:05crwdnd2935265:01crwdnd2935265:01crwdne2935265:0
    • Solder the replacement button into place using a hot air gun, solder and flux.

    • The buttons measure 5.1mm x 5.1mm (excluding the legs). They are about 1.5mm tall excluding the push button

  6. EONO B08J8J8FGTX9 Bluetooth Speaker Button Replacement (Won't switch on): crwdns2935265:06crwdnd2935265:01crwdnd2935265:01crwdne2935265:0
    • Solder the new button into place.

    • Test before reassembly

    • Glue the silicone back into place.

crwdns2915888:0crwdne2915888:0

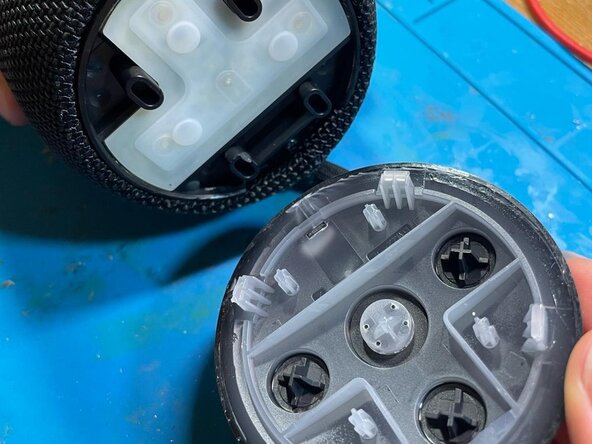
Reassembly is very simple, you can stick the silicone in case and push the cap back on.

Leafy Williams

crwdns2935283:006/05/24crwdne2935283:0

6 crwdns2915208:0crwdne2915208:0

crwdns2935295:0crwdne2935295:0

crwdns2947412:00crwdne2947412:0

crwdns2917038:0crwdne2917038:0

crwdns2936625:0crwdne2936625:0:

crwdns2936751:024crwdne2936751:0 0

crwdns2936753:07crwdne2936753:0 2

crwdns2936753:030crwdne2936753:0 5

crwdns2942667:0crwdne2942667:0 5