crwdns2933423:0crwdne2933423:0

E46 M3 door card/panel removal

crwdns2942213:0crwdne2942213:0

  1. E46 M3 door card/panel removal, Identify the screws: crwdns2935265:01crwdnd2935265:01crwdnd2935265:01crwdne2935265:0
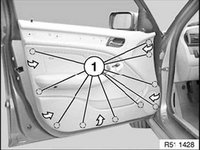
    • The door card is held securely in place with 5 screws.

    • Keep in mind the door card has up to 3 wire bundles attached to it. Be careful when removing it! Be prepared to support it while dealing with the wires.

  2. E46 M3 door card/panel removal, Remove screw covers: crwdns2935265:02crwdnd2935265:01crwdnd2935265:02crwdne2935265:0 E46 M3 door card/panel removal, Remove screw covers: crwdns2935265:02crwdnd2935265:02crwdnd2935265:02crwdne2935265:0
    • Using a spudger, work off the cap of the first screw. The cap is tight; you may need a jimmy or metal spudger.

    • Using the flat end of a spudger, remove the airbag emblem. The emblem has clips on the top and bottom -- work carefully.

  3. E46 M3 door card/panel removal, Remove bolts: crwdns2935265:03crwdnd2935265:01crwdnd2935265:01crwdne2935265:0
    • Using a T20 Torx driver with extension, remove all 5 bolts.

  4. E46 M3 door card/panel removal, Remove mirror control: crwdns2935265:04crwdnd2935265:01crwdnd2935265:01crwdne2935265:0
    • If you're working on the driver side door, remove the mirror control module. Disconnect it from its wiring plug.

  5. E46 M3 door card/panel removal, Pop door card clips: crwdns2935265:05crwdnd2935265:01crwdnd2935265:02crwdne2935265:0 E46 M3 door card/panel removal, Pop door card clips: crwdns2935265:05crwdnd2935265:02crwdnd2935265:02crwdne2935265:0
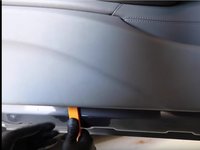
    • Using a trim tool or similar, begin at the bottom of the door card and pop the card away from the door frame.

    • After you've released the bottom clips, work your way around.

    • You will need to lift the door card from the door frame in order to fully release it. Be careful!

    • Disconnect the following from the door panel:

    • Unlocking cable

    • Speaker cable(s)

    • Set the door panel aside.

  6. E46 M3 door card/panel removal, Door panel removed!: crwdns2935265:07crwdnd2935265:01crwdnd2935265:01crwdne2935265:0
    • The door panel is now removed.

    • You will see the airbag module, vapor barrier, and other components.

crwdns2915888:0crwdne2915888:0

To reassemble your door, follow these instructions in reverse order.

crwdns2935229:04crwdne2935229:0

Dom Santangelo

crwdns2935283:009/19/16crwdne2935283:0

592 crwdns2915208:0crwdne2915208:0

crwdns2935297:03crwdne2935297:0

crwdns2944067:00crwdne2944067:0

crwdns2917038:0crwdne2917038:0

crwdns2936625:0crwdne2936625:0:

crwdns2936751:024crwdne2936751:0 1

crwdns2936753:07crwdne2936753:0 35

crwdns2936753:030crwdne2936753:0 116

crwdns2942667:0crwdne2942667:0 14,651