crwdns2915892:0crwdne2915892:0
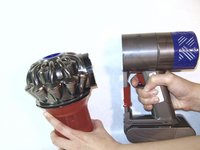
If there are issues with the suction of the Dyson v6 Absolute, the cyclone may have to be cleaned or replaced.
crwdns2942213:0crwdne2942213:0
-
-
Push down the red lever located on the outside of the bin, next to the device handle, to open the door to the debris bin.
-
Avoid pressing the trigger on the handle opposite the red lever, which activates the motor.
-
-
-
Push the red lever down a second time to release the debris bin.
-
Avoid pressing the trigger on the handle opposite the red lever, which activates the motor.
-
-
-
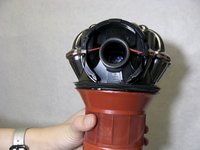
Pull bin away from the cyclone.
Comment fait on pour enlever la pièce rouge … dans le contenant ?
optimal, kurz, verständlich DANKE
-
-
-
-
Separate the bin from the main body of the device.
-
-
-
Locate two visible white clips between the main body and the cyclone.
-
-
crwdns2935267:0crwdne2935267:0Tweezers$4.99
-
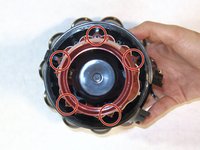
Use tweezers to pinch the white clips together.
-
Widely hold the tweezers apart to get them to reach between the two white clips.
-
Because the space is tight between the cyclone and the main body, pinching the white clips may require additional effort.
You can use spudgers to push the individual white tabs inward. Or, put the unit upside down and use two spudgers to push them inward.
The cyclone will pop out but will require some pulling to clear the main body. There are no wires.
-
-
-
Tilt and pull the main body away from the cyclone.
-
There may be a loud snap when the main body separates from the cyclone.
Do you have any idea how to disassemble the main body (aside from removing the battery pack)? I accidentally waterlogged it and wanted to check for water damage
-
-
-
Use the spudger to remove the cyclone.
-
Start at the small opening beneath the place where the cyclone connects to the main body.
-
Work the spudger around the rim of the red screen filter.
-
You will hear popping noises.
-
-
-
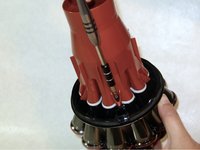
Use a T9 Torx screwdriver to remove five 14mm screws from the edge of the screen filter body.
-
-
-
Remove the filter screen cover away from the cyclone.
-
Pull down on the black tube inside the cyclone body to remove it from the cyclone.
Why is a spudger? Does the mushroom part have a filter in it?
You can go deeper. There’s four more screws that take a very narrow screwdriver that split the top vortex section apart.
-


To reassemble your device, follow these instructions in reverse order.
To reassemble your device, follow these instructions in reverse order.
crwdns2935221:0crwdne2935221:0
crwdns2935229:017crwdne2935229:0

crwdns2915084:0crwdne2915084:0

Washington State, Team 1-2, Staggers Spring 2017 crwdns2935289:0Washington State, Team 1-2, Staggers Spring 2017crwdne2935289:0
WSU-STAGGERS-S17S1G2
crwdns2931471:02crwdne2931471:0
crwdns2935297:023crwdne2935297:0
crwdns2947412:03crwdne2947412:0
Very helpful presentation. Reassembly was fiddley as the new cyclone was not broken and needed a very firm waggle and push to engage with the motor body. The white clip is not easy to grasp at the same time as the body and the cyclone.
I found three small broken black plastic pieces under the white clip- from the lugs of the old cyclone - that had to be removed, with tweezers, before assembling the body and cyclone.
Das Zyklon läßt sich noch viel weiter zerlegen!
Schmutz/Staub an den Plastikteilen nach Zerlegung lassen sich gut im Eimer mit Seifenwasser auflösen.
Wieder zusammenbauen erst nach kompletten Trocknen !
Macht mal Fotos von verdrecktem Zyklon.