crwdns2915892:0crwdne2915892:0
If there are issues with the suction of the Dyson v6 Absolute, the cyclone may have to be cleaned or replaced.
crwdns2942213:0crwdne2942213:0
-
-
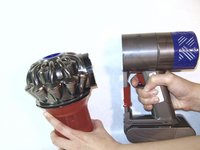
Push down the red lever located on the outside of the bin, next to the device handle, to open the door to the debris bin.
-
Avoid pressing the trigger on the handle opposite the red lever, which activates the motor.
-
-
-
Push the red lever down a second time to release the debris bin.
-
Avoid pressing the trigger on the handle opposite the red lever, which activates the motor.
-
-
-
-
Separate the bin from the main body of the device.
-
-
-
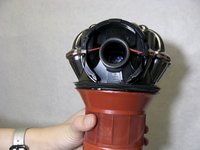
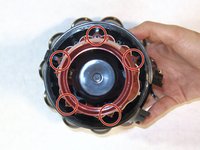
Locate two visible white clips between the main body and the cyclone.
-
-
crwdns2935267:0crwdne2935267:0Tweezers$4.99
-
Use tweezers to pinch the white clips together.
-
Widely hold the tweezers apart to get them to reach between the two white clips.
-
Because the space is tight between the cyclone and the main body, pinching the white clips may require additional effort.
-
-
-
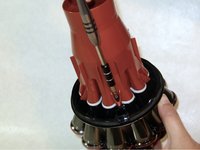
Tilt and pull the main body away from the cyclone.
-
There may be a loud snap when the main body separates from the cyclone.
-
-
-
Use the spudger to remove the cyclone.
-
Start at the small opening beneath the place where the cyclone connects to the main body.
-
Work the spudger around the rim of the red screen filter.
-
You will hear popping noises.
-
-
-
Use a T9 Torx screwdriver to remove five 14mm screws from the edge of the screen filter body.
-
-
-
Remove the filter screen cover away from the cyclone.
-
Pull down on the black tube inside the cyclone body to remove it from the cyclone.
-


To reassemble your device, follow these instructions in reverse order.
crwdns2935221:0crwdne2935221:0
crwdns2935229:017crwdne2935229:0

crwdns2935287:0crwdne2935287:0

Washington State, Team 1-2, Staggers Spring 2017 crwdns2935289:0Washington State, Team 1-2, Staggers Spring 2017crwdne2935289:0
WSU-STAGGERS-S17S1G2
crwdns2931471:02crwdne2931471:0
crwdns2935297:023crwdne2935297:0
crwdns2947412:03crwdne2947412:0
Very helpful presentation. Reassembly was fiddley as the new cyclone was not broken and needed a very firm waggle and push to engage with the motor body. The white clip is not easy to grasp at the same time as the body and the cyclone.
I found three small broken black plastic pieces under the white clip- from the lugs of the old cyclone - that had to be removed, with tweezers, before assembling the body and cyclone.
Das Zyklon läßt sich noch viel weiter zerlegen!
Schmutz/Staub an den Plastikteilen nach Zerlegung lassen sich gut im Eimer mit Seifenwasser auflösen.
Wieder zusammenbauen erst nach kompletten Trocknen !
Macht mal Fotos von verdrecktem Zyklon.